You are probably reading this article because you recently encountered the Update Error 0xc0000017 on your Windows 10 device (also Windows 8.1) and now want to fix it. The good part about this blog post is that you will be offered some approaches that you can use to safely and quickly get out of this update issue on your Windows PC.
What is Error 0xc0000017 and what causes it?
Error 0xc0000017 is an update-related issue and it occurs when you are updating your operating system to its next available OS Build version. This happens due to some badly marked memory sections that prevent Random Access Memory (RAM) from being used as a temporary data storage capacity.
The presence of corrupt system files or folders may also trigger this error code during Windows Update. If that’s the case, you may diagnose and fix this issue using the System File Checker command tool.
Fix Windows 10 Update Error 0xc0000017
Follow the methods to fix the Windows 10 Update error 0xc0000017:
1] Remove the Boot Configurable bad memory
As mentioned above, faulty memory entries are responsible for update error 0xc0000017. According to this report, it is possible to fix the error by deleting the bad memories. The instructions are as follows:
- Run the Command Prompt with admin access.
- Type the command given below in the elevated window and hit Enter.
bcdedit /enum all
bcdedit /deletevalue {badmemory} badmemorylist
- This will delete all the bad memory entries.
Now restart your PC and try upgrading your PC again.
2] Use the Update troubleshooter
Fortunately, Windows 10 includes a built-in update troubleshooter that fixes several commonly occurring problem update error codes. The use of this troubleshooter will hopefully fix the update error 0xc0000017. Below are the steps to run the Update Troubleshooter:
- Press the Windows icon key and click on the Gear icon to open the Settings.
- Go to Update & Security > Troubleshoot > Additional troubleshooter.
- Click on Windows Update under the “Get up and running” section and hit Run the troubleshooter.
- Now follow the on-screen instructions to complete the process.
Restart your system and check if the error is solved.
3] Run the SFC and DISM
Additionally, corrupted and incomplete system files may trigger the occurrence of update error 0xc0000017. To resolve such an error code, you can run the system file checker command to fix the files. The procedure is as follows:
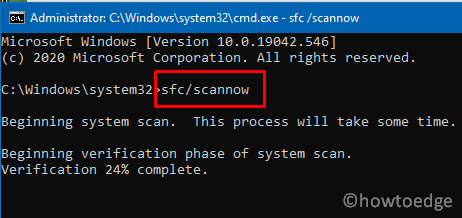
- Open the Command Prompt window as an administrator.
- In the elevated window, type the command given below and hit Enter.
sfc /scannow
- Wait for the completion of the process.
- Close all the windows and restart your PC.
If the error still persists, then try running DISM to repair the corrupted files. Follow the steps given below to run the DISM:

- Again open the elevated Command Prompt window.
- Type the following command in the elevated window and hit Enter.
DISM /Online /Cleanup-Image /RestoreHealth
- Wait until the completion of the process.
Restart your PC and see if the error is solved.
4] Start the Windows Update service
Microsoft’s Windows Update service is the most important way to stay up to date with Windows 10. If this service is not working properly, you may encounter update errors. As such, we recommend that you make sure this service is working correctly. Here are the steps you need to follow:
- Press the Windows + R shortcut key to open the Run dialog box.
- In the text box, type services.msc and hit Enter to open the Services window.
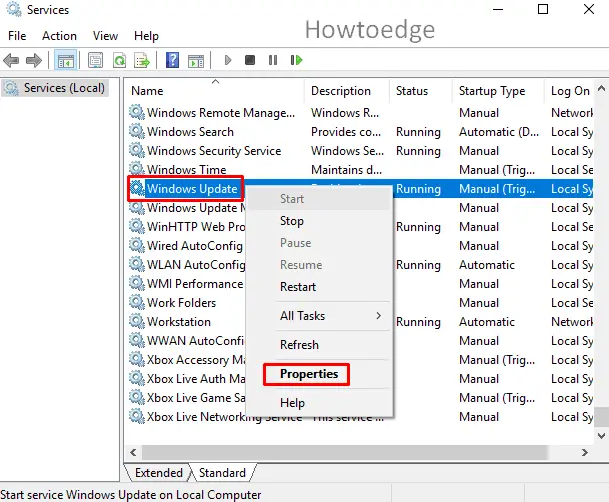
- Search for the Windows Update service, right-click on it, and select Properties.
- Go to the General tab in the Properties window.
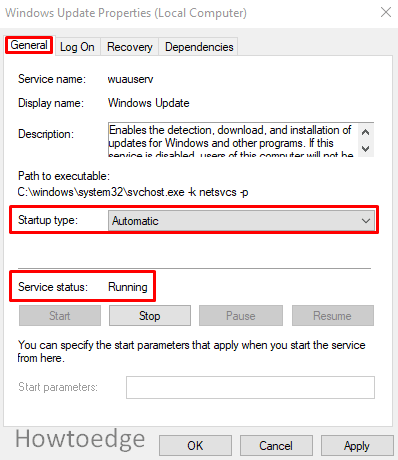
- Now check the Startup type and set it to Automatic using the drop-down menu.
- Also, check if the service is running. If not, then hit the Start button.
- Click OK to save the changes.
- Now close the windows and check if the error is solved.
5] Ensure that the BITS service is running
Running BITS is a prerequisite for receiving Windows 10 updates. In this case, making sure this service is running might help solve the update error 0xc0000017.
- Right-click on the Windows icon and select Run from the menu.
- In the Run dialog box, type services.msc and hit Enter to open the Services window.
- Search for the Background Intelligent Transfer Service (BITS) and when you find it, double-click on it.
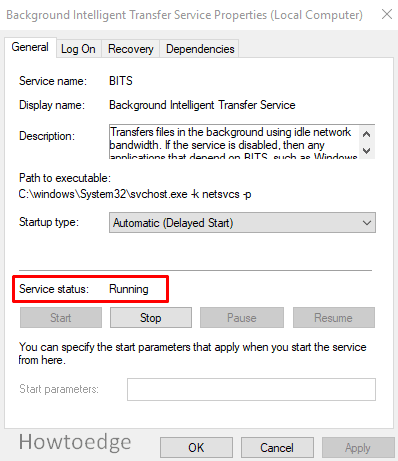
- Go to the General tab, and check if the service is running. If not, then hit the Start button.
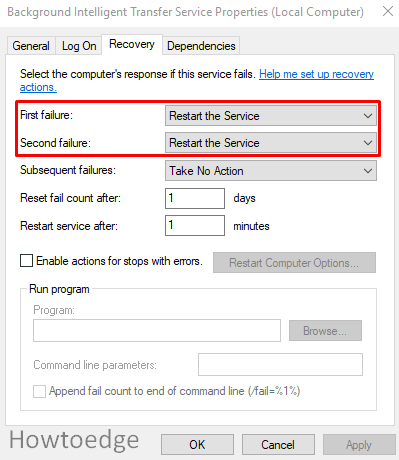
- Now go to the Recovery tab and set the First failure option to Restart the Service using the drop-down menu.
- Similarly, set the Second failure option to Restart the Service.
- Hit OK to apply the changes.
- Now close all the windows and try installing your updates again.
6] Change the DNS settings
Changing the DNS settings might help you in fixing the update error 0xc0000017. The steps for changing the DNS settings are as follows:
- Open the Control Panel and set the View by Category.
- Go to the Network and Internet > Network and Sharing Center > Change adapter settings (in the left pane).
- Now right-click on the Network you are using and select the Properties.
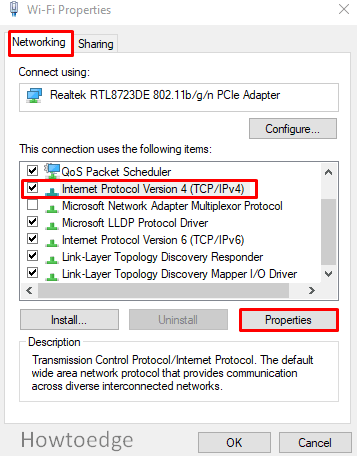
- In the Networking tab, scroll down and search for Internet protocol version 4 (TCP/IPv4), and hit the Properties.
- Now select the checkbox next to Use the following DNS Server addresses.
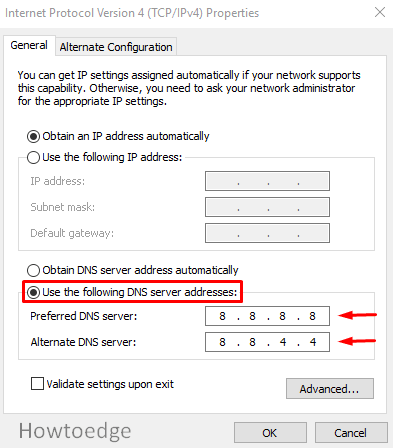
- Enter the value 8.8.8.8 in the DNS Server and 8.8.4.4 in the Alternate DNS Server.
- Hit OK and restart your system.
7] Reset Windows Update components
In case none of the above troubleshooting methods work, you can try resetting the Windows Update components to solve this update error.
How do I fix there isn’t enough memory to create a ramdisk device?
Do the following to fix this problem:
- Open your device in Safe Mode
- When you’re in safe mode, open Command Prompt
- Then type bcdedit /enum all and press Enter.
- Here you will see all memory locations marked as “bad”. Delete these entries to clear the list.
- Now type the below command line and press Enter
bcdedit /deletevalue {badmemory} badmemorylist
Then close the Command Prompt window and restart your PC to complete the update.
Note: If you run the below command, it will show a list of the bad memory addresses for the memory pages that are expected to fail during the test.
bcdedit /enum {badmemory}
When you delete all the bad memory sectors, Windows will have enough memory. There will be no blocking, and it will reboot normally
I hope this article helps you!
