The Windows Hello Error 0x801c0451 usually strikes when you perform a recent system change. When you encounter this error, you need to initiate several rounds of Windows 10 reboots before it finally disappears. Though this is linked to PIN/Password, this may result in system crash errors if unattended for a huge time.
Today, in this article, we discuss the possible reasons that can lead to this issue along with a few working solutions. In general, this bug pops in when you turn On your PC or wake it up from sleep mode and use Hello Pin to enter the login screen. Turning off Sleep Mode, Resetting/Removing the PIN password, and Switching to a Local user account are some of the solutions that you may try to get rid of the 0x801c0451 error. Let’s explore these methods in detail –

Recent – How to fix Windows Hello error 0x801c004d in Windows 10
Fix: Windows Hello error 0x801c0451 in Windows
Simple rebooting of your PC often fixes Windows Hello errors. So, before proceeding to the below workarounds, make sure to sign out of your computer and then re-login. If the error persists, use the following guidelines –

1] Turn off Sleep Mode
Windows 10 users often use Sleep mode when they want to take a rest, however, they don’t want to turn off their PC. Recently, this mode is causing new bugs and errors. Hence, we suggest disabling Sleep mode as this may fix any errors related to PIN/password. Here’s how to perform this task –
- Right-click on the Windows icon and select Power Options.
- Scroll down and click Additional power settings under “Related Settings“.
- On the upcoming window, click Change Plan Settings.
- Here, you will see two different options next to “Put the computer to sleep” i.e. On Battery and Plugged in.
- Use the drop-down menu, and select Never under both categories.

- At last, click Save Changes and Restart your PC.
When you sign back into your computer, check whether you encounter the Error 0x801c0451 again or if it vanishes.
2] Reset/Remove PIN
The Hello Error 0x801c0451 is linked to the PIN/Password that you use on the login screen. So, if you are getting this issue even after disabling the Sleep mode, you should either reset your remove the Login PIN.
- Jointly press Win+I and select Accounts.
- Next, click the Sign-in options available in the left column.
- Head over to the right pane and click Windows Hello PIN. When this section expands, tap the Remove option.

- There appears a confirmation window ensuring whether you really want to remove the Hello PIN password. Just click the remove button again.

- The system will then open the Windows Security window, fill in your Microsoft password, and press OK.
Note: We strongly recommend removing the PIN as you are constantly receiving the Hello error message.
If this indeed stops the 0x801c0451 message, you may try setting a new PIN after a PC reboot.
- After restarting the system, navigate to the following path –
Settings (Win+I) > Accounts > Sign-in Options
- Switch to the right pane, expand Windows Hello Pin, and hit Add button.

- The system will then redirect you to the Microsoft Account, click Next then sign in using your credentials.
- When the “Set up a PIN” wizard appears, enter a pin then confirm the same.

- Lastly, tap OK to save these changes.
That’s it, hopefully, removing/resetting the Pin password should resolve the Windows Hello Error 0x801c0451 on your device.
3] Convert Microsoft Account to Local Account
The above workaround should resolve the Hello PIN issues. However, if not, one should try converting the Microsoft account to a local user account. All you need is to perform the below steps carefully.
Note: Besides, this is also applicable when you don’t remember the exact password or have access to the Email-id used there. It is because removing PIN requires you to fill in your Microsoft Account password.
- Right-click on the Windows icon and select Settings.
- Here, select Accounts then Sign-in options on the succeeding page.
- Now, head over to the Hello PIN section, and when it expands, click “I forgot my PIN“.
- The Microsoft Account will then appear asking whether you really want to continue or cancel, tap Continue.
- The system will then prompt you to verify your identity. Select the email-id and the company will then send you a seven-digit confirmation code.
- Use this code to re-create your Hello PIN.
Note: Since you don’t have the access to this email id, you must convert your Microsoft account to a Local account.
- Browse to the following location –
C:\Windows\ServiceProfiles\LocalService\AppData\Local\Microsoft
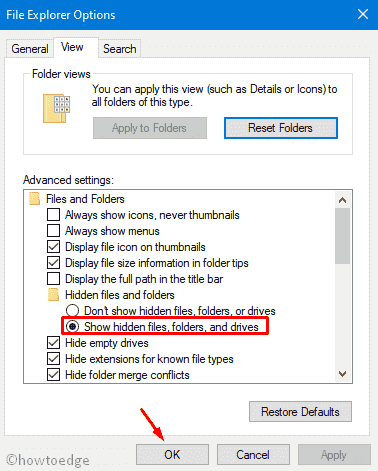
Note: While reaching the above path, you may now get the AppData folder inside LocalService. If that’s the case, you should allow viewing hidden files and folders. To do so, use the below steps –
-
- Type show hidden files in the search bar and click the top result.
- Here, tap show settings next to “Change settings to show hidden and system files“.

- Next, mark the radio button “Sown hidden files, folders, and drives” and press OK.

- You may now access AppData\Local\Microsoft inside the LocalService folder.
- Open the Ngc folder and delete all its contents. If you were not able to either view or delete its directories, follow the below section –
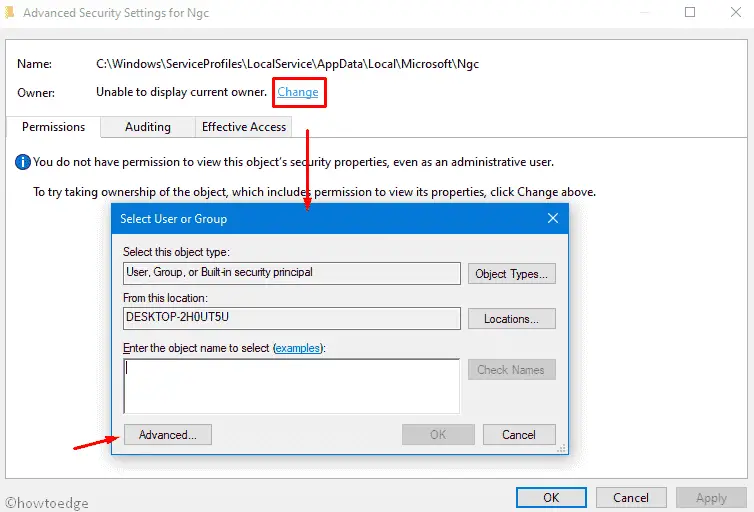
How to take command of the Ngc folder
- Right-click on the Ngc folder and choose “Properties“.
- Head over to the Security Tab and click the Advanced option.

- Go to the Owner section and hit the Change link.

- Type the Administrator name inside “Enter the object name to select” and hit Check names next to it.
- After this accepts the object name, and press OK.
- Coming back to the previous window, select the checkbox “
Replace owner on subcontainers and objects” and click Apply followed by the OK button. - That’s it, you may now enter the Ngc folder and delete all its contents.
After removing all the folders that were inside the Ngc, navigate to the following address and re-create your Hello PIN.
Settings > Account settings > Sign-in Options > Add a PIN
Note: If you do remember the Microsoft account password, there is no need to follow the above steps. Just go to the Your info under the Accounts section and click “Sign in with a local account instead“.
Your system will then redirect you to verify your identity, just follow the on-screen instruction to switch to a local user account.
That’s it, hope this article helps to resolve the Windows Hello Error 0x801c0451 on your PC.
What is causing my Windows Hello PIN to not work?
If you’re having trouble signing in, you may have to reset your Windows Hello PIN. Here are the steps you need to follow.
- Press the Windows+I keys to open the Settings menu.
- From the left pane, click the Accounts tab.
- Then go to Sign-in options> PIN (Windows Hello).

- Next, click on the I forgot my PIN link.
- On the next page, click on the Continue button.
- Now follow the on-screen instructions to reset your Hello PIN.
Fix Windows 10/11 PIN Not Working
If Windows PIN is not working right after you upgrade your operating system, you should revert your system back to its previous build. Here’s how to perform this task in Windows –
- Windows 11: Go to Settings > System > Recovery, and click “Go back” under the Recovery options.
- Windows 10: Go to Settings > Update & Security > Recovery, and click Get back to an earlier build on the right pane.
Follow the on-screen instructions to go back to the previous Build OS on your computer.


