Windows Update runs smoothly in the background most of the time. It automatically gets updated, installs the ones it can, and saves the remaining for when you restart Windows. However, when it fails, users may run the Windows Update troubleshooter and get the issue resolved. What if, the update troubleshooter also stopped working? Well, this article presents the likelihood of it happening and the correct ways to overcome this issue.
A few users reported that they were encountering an error message when attempting to run the troubleshooter. The error message reads the following –
“An error occurred while troubleshooting. A problem is preventing the troubleshooter from starting.”

When does the troubleshooter fail to run occur in Windows 11/10?
This problem affects basically every version of Windows. It frequently happens when you try using the built-in troubleshooting feature or the official fixing tool from Microsoft. When you launch the troubleshooting tool, you’ll see the above-mentioned error message. And, if you click View error details, you’ll see a list of random error codes that differ from system to system.
Why does Windows update Troubleshooter stop working?
Windows Update troubleshooter stopped working when your device meets one or a combination of the below issues on your computer. The most common reasons and their solutions are listed below –
- Disabled Cryptographic Services – Restart or Stop/Start this service.
- Corrupted System Files/Folders – Disable Antivirus and run SFC/DISM tools.
- User Account Control is preventing Windows update troubleshooter from running smoothly – Well, temporarily disable this feature on Windows 11/10.
- Corrupted Registry – Repair the State entry present under the Software Publishing in the registry.
- Obsolete .NET Framework – Uninstall and reinstall the .Net Framework.
- Corrupted User Profile – Well, create a new user profile and sign in using its credentials.
Let’s learn how to apply these fixes in detail –
Fix – Windows Update Troubleshooter stopped working
Windows Troubleshooter is a very useful tool on Windows that can assist you in automatically resolving a variety of issues. However, if you are facing problems activating this utility program, here are the methods that must help to repair the update troubleshooter.
1] Restart cryptographic services
Windows Update troubleshooter stopped working issue generally occurs when the cryptographic services are disabled on your PC. Go and check the current status of this service and if found disabled, restart it.
Here are the steps to start cryptographic services on Windows 11/10 –
- Press Win+R using the keyboard to open Run.
- Type
services.mscinto the search box and press Enter. - Scroll down and locate Cryptographic Services in the subsequent window.
- When found, right-click on it and hit Properties.
- Select Automatic using the drop-down menu next to the Startup Type.
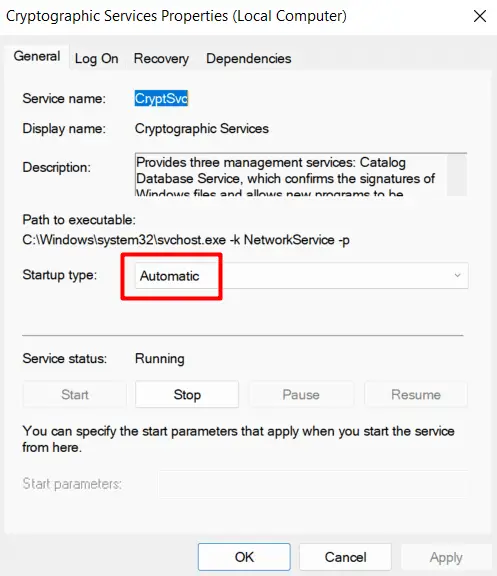
- Click Start (when stopped) or Stop then Start (if it is already running).
- Click Apply then OK to confirm the recent changes.
Restart your PC and check if the problem resolves the next time you run Windows Update Troubleshooter.
2] Temporarily disable User Account Control
Several users suggested that they were able to fix this issue simply by disabling the User Account Control on their PCs. You may perform this task by following the below steps. Once this is over, check if it really resolves the troubleshooter problem.
The essential steps are as follows –
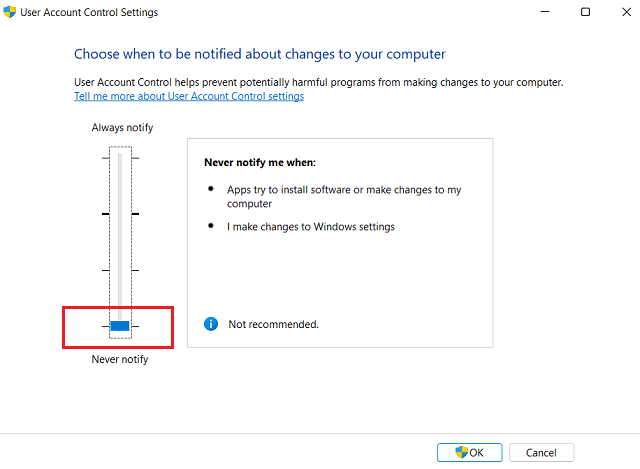
- Press Win + S, and type “UAC” in the search bar.
- Click Change User Account Control next.
- Set the slider to Never notify and click OK.
Restart Windows 11/10 and check if the problem resolves from the next logon.
3] Disable/Uninstall third-party antivirus
Until Windows 7-8, having a third-party security application is essential to protect your device against potential viruses or malware. With Windows 10, Microsoft has upgraded Windows Security software and now this works flawlessly. If you own and run an external antivirus app on Windows 11/10, this might corrupt the internal files and folders. As a result, the Update troubleshooter stopped working.
Disable your external antivirus program (if possible, uninstall that) and the Windows Update troubleshooter will start working quite right.
4] Run SFC/DISM scans
Windows Update Troubleshooter may fail to start when there are missing or damaged system files/folders on your computer. You may overcome this issue by running System File Checker and DISM tools together. Follow the below guideline to run both these utility programs on an elevated console –
- Press Win + R, type CMD and press Ctrl + Shift + Enter keys together.
- Doing so will invoke Command Prompt having administrative privileges.
- On the elevated prompt, run this code first –
sfc /scannow

- Hit Enter and wait for this command to run successfully. This might take 15-20 minutes in detecting and repairing missing or damaged system files. Once this process is over, run the DISM code as provided below –
DISM /Online /Cleanup-Image /RestoreHealth

- Press Enter again and wait for the DISM tool to run successfully.
- When completed, reboot your PC and check if the problem resolves.
5] Modify the registry
Windows Update Troubleshooter stopped working error may also occur when there are some inconsistencies inside the registry. You need to find and repair the corrupted registry and entry and this problem most likely resolves. Here’s how to perform this task –
Imp: Incorrectly configuring the registry may corrupt the entire operating system. So, follow the steps as guided below. You may even create a registry backup so that you can use it in case of any worse scenarios.
- Hit Win + R to launch the Run dialog.
- Type “
regedit” and hit OK. - When the registry editor opens up, navigate to the below path –
Computer\HKEY_LOCAL_MACHINE\SOFTWARE\Microsoft\Windows\CurrentVersion\Win Trust\Trust Providers\Software Publishing
- In the right panel, look for the entry named “State“.
- Right-click on it and hit Properties.
- Change its value data to 23c00.
- Click OK to confirm this change and restart your PC.
Sign back into your device again and check if the Windows Update troubleshooter starts working normally.
6] Restore.NET framework
Another viable reason that may corrupt Windows Update is having an outdated .NET framework running on your PC. In order to overcome this issue then, one must repair his/her .NET framework installation. To do so, you may follow these easy steps –
- Launch Control Panel.
- Go to Programs > Programs and Features next.
- Click “View Installed Updates” on the left navigation.
Note: Make sure to note down the KB number available next to .NET Framework.
- Right-click on the .NET Framework update that appears on the right panel and hit Uninstall.
- When a pop-up window appears, hit uninstall again.
Restart your PC and when it does, visit Microsoft Update Catalog. Search for the KB number that you copied before and download/install the relevant .NET framework.
7] Try the previously created System Restore Point
These days, several users generate a system restore point on their computers while the system is working completely fine. If you had also generated such a backup on your PC, you may use that to revert back your device to its original settings. Here’s how to use system backup on Windows 11/10 –
- Press the Windows key and start typing “System Restore”.
- Click on the option – “Create a system restore”.
- The System Properties wizard will launch next.
- Click the System Restore button followed by Next.
- You may either choose the latest restore point or simply click “Show more restore points” to view the previously created system backup.

- Choose the one and hit Scan for affected programs. This will point out applications and settings that might get destroyed after reverting back to an earlier point.
- Now, follow the on-screen instructions to complete the move over.
In case your restore point is not affected by the recent changes on your PC, the Windows Update troubleshooter should now work smoothly.
8] Create a new user account
If none of the above solutions work to resolve the update troubleshooter, your profile must have corrupted beyond repair. All you can do now is to create a new user profile and sign in to your device using the newly created profile credentials. Here’s how you may create a new user profile –
- Open the Settings app by pressing Win + I.
- Click on Accounts on the left navigation.
- Head over to the right pane and click Family & other users.
- Here, you may either go for creating an account for your family or other users.
- Whatever you decide, click Add account next to that.

- Microsoft account window will appear next, provide the email id and hit Next.
- Decide a role for the chosen profile, and hit Invite.

- That’s it, Microsoft will send an invite to the provided email.
- Use the information provided in the mail and sign in to your computer using the new user profile.
- Now, that you have created a new profile, log out of your current session and sign in to your new profile.
I hope the Windows Update troubleshooter now works error-free. Go to Settings > System > Troubleshoot > Other troubleshooters > Windows Update, and hit Run available on it. This utility program should run without resulting in any new error code.
