In this article, we will discuss how to stop Storage Sense from deleting downloaded files in Windows 11/10. This feature optimizes your hard drive’s space automatically when you are running out of storage. Despite its impressive features, Storage Sense suffers from an important drawback.

If you download from the internet, it treats them as temporary files. This post will help you change Storage Sense’s behavior if you do not want it to delete files from your Downloads folder.
What is Storage Sense?
Disk Cleanup has been modified into a new tool called Storage Sense which is designed to monitor and manage disk storage space. It makes your computer more space-efficient by deleting temporary Internet files, junk files, and temporary app files. Additionally, Storage Sense includes the Downloads folder. However, if you do not want it to empty the Downloads folder, you can change that setting.
Recent – Fix: Activation Error 0xC004F025 on Windows 10 PC
Stop Storage Sense from Deleting Downloaded Files
There are three ways you can use to Stop Storage Sense from Deleting Downloaded Files in Windows 11/10. These are:
1. Windows Settings
If you want to use the Settings app to stop Storage Sense from Deleting Downloaded Files then use the below instructions:
For Windows 11
- Press the Windows + I keys to launch the Settings app.
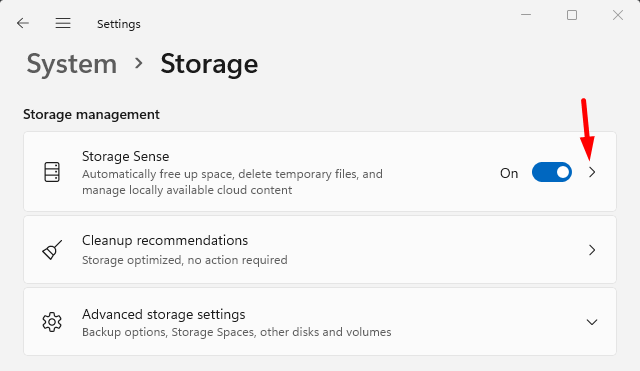
- From the Settings window, go to System > Storage.

- Within the Storage Management section, click on the tiny arrow next to the Storage sense.

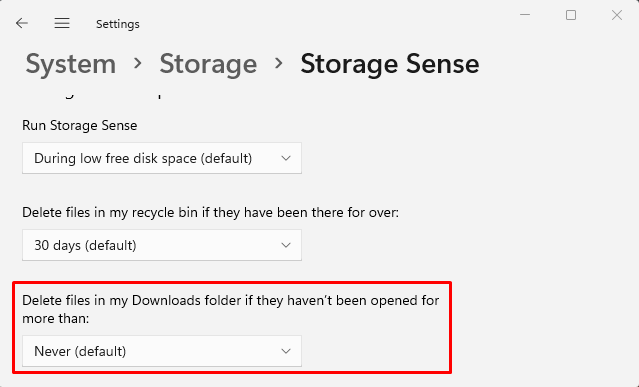
- On the next page, select the Never option, then close the Settings app.
For Windows 10
- Right-click on Start and select Settings.
- Now go to System > Storage.
- Under the Storage Sense section, click on the link that says Configure Storage Sense or run it now.
- Scroll down to the Temporary Files section then click on the Delete files in my Downloads folder if they haven’t been opened for more than the drop-down menu.
- Select the Never option, then close the Settings app.
That would be all!