Windows Update is a great service developed by Microsoft that lets you update the service pack and the patches for the operating system on a regular basis. But it also can’t be denied that users often encounter error codes while updating their Windows devices. Today in this blog post we are going to explain a similar type of common error that is known as Update Error 0x80240017.
This error usually occurs after a failed update performed by Windows Update. It can also appear if you install a third-party tool and in return, your system files get corrupted or damaged. If you’re currently facing this particular problem, the methods below might help you to deal with it.
Solution for Windows Update Error 0x80240017
To fix Windows Update Error 0x80240017, follow the below steps –
Solutions List
1] Run Windows Update Troubleshooter
Windows 10 Update errors are a common problem that sometimes occurs temporarily. Therefore we suggest you run the Update troubleshooter and check if your Windows version is capable of fixing it automatically. Here is a quick guide that will help you to run the Windows Update Troubleshooter –
- Click on the Start button and select the Settings (gear icon) option.
- Select the Update & Security category > Troubleshoot tab.
- Switch to the right pane and select “Additional troubleshooters“.
- Next, go to the “Get up and running” section, and locate Windows Update.
- Once you find it, select it and then hit Run the troubleshooter.

- This will start scanning to detect any problem in your device.
- Once it completes the process, follow the on-screen instructions to finish the steps.
- Now restart your computer and check if the problem still exists.
If you are getting this error code on Windows 11, you may find the Windows update troubleshooter’s link at the following path –
Win + I > System > Troubleshoot > Other troubleshooters > Windows update > Run.
2] Reset Windows Update Components
If the problem is not solved, try to reset Windows Update components manually. This method is known to have a higher degree of success in fixing the Update error code. So, let’s give it a try.
- Right-click on the Start menu and select the Run option from the menu list.
- In the dialog box, type “cmd” and press Ctrl+Shift+Enter to open the elevated Command Prompt.
- At this time, UAC prompts on the screen, tap Yes to give your consent.
- Now type the following codes one after another and press Enter after each one.
 net stop wuauserv
 net stop cryptSvc
 net stop bits
 net stop msiserver
- Doing so will execute the above command and as a result, it stops certain basic services.
- Next, rename the SoftwareDistribution and Catroot2 folders using the below two codes –
Ren C:\Windows\SoftwareDistribution SoftwareDistribution.old
Ren C:\Windows\System32\catroot2 Catroot2.old
- Now you need to restart the services that you stopped earlier. To do that, type the following codes and hit Enter separately –
net start wuauserv
net start cryptSvc
net start bits
net start msiserver
- Here you need to restart your Windows to apply the changes.
- Once your device starts up, go to Settings > Update & Security > Windows Update.
- From here, move to the right pane and Check for Updates.
- If there you find any pending updates then download and install them.
In case resetting Windows components didn’t resolve the problem, then move down to the next potential method.
3] Run SFC and DISM Tools
If some system files get damaged or corrupted, this may be the reason for update issues and errors. Thanks to the System File Checker and DISM tool using which you may quickly get out of this problem. These tools will scan your system and detect the corrupted files that will be replaced or repaired after executing some commands. Here is how to do it:
- Go to your taskbar, then right-click on the Start button.
- Choose Run from the menu list.
- Type “cmd” in the text area and then press Ctrl + Shift + Enter shortcut key.
- In the elevated command prompt, type “
sfc /scannow” and then hit Enter. It will scan all protected system files.
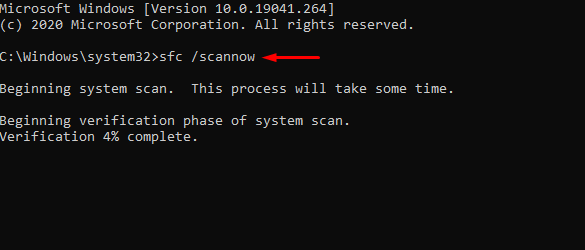
- Once it completes, close the command prompt window and restart your PC.
Now try to download and install the updates to see if the update error is fixed now. If you’re still seeing the error code 0x80240017, then run the DISM tool so that it will replace the corrupted system files.
It requires an internet connection to download healthy files from the internet. So, make sure your internet connection is working properly, and then execute the below codes on the elevated command prompt.
DISM /Online /Cleanup-Image /ScanHealthNote
DISM.exe /Online /Cleanup-image /RestorehealthNote
Now hit enter to complete the process. After that, close the window > restart your computer, and see if the error still persists.
4] Manually Install Pending Windows updates
Resetting update components should resolve errors of any kind. However, if you are still struggling to update your operating system, you may get the pending standalone package from Microsoft Update Catalog. After downloading the setup file, double-click on it to begin its installation.
If you don’t know how to work on this aspect, read this tutorial.
5] Reset your PC
If none of the above methods help you resolve this issue then our last resort is to reset your Windows device. This will remove all the applications you have installed while retaining all the data intact. Therefore I would recommend you backup your important files and folders before you begin the process. In case you created it already then start the procedure by following the below steps –
- Right-click on the Start menu and select Settings > Update & Security.
- Select the Recovery feature and move to the right pane of the screen.
- Under Reset this PC, click on the Get started button.
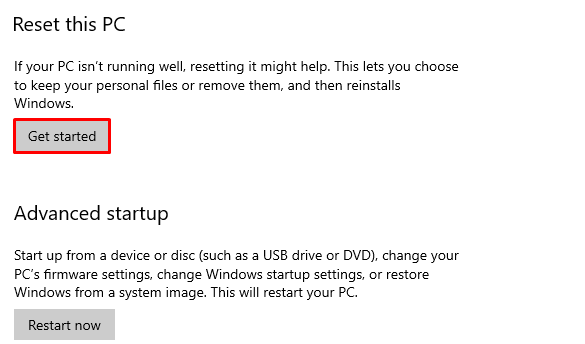
- Then follow the on-screen instructions to finish the Reset process.
- Once it completes, restart your Windows 10 device.
- Check again if this method fixed the problem.
That’s it, I hope this article helps you to fix the Update Error 0x80240017. If you have any queries or suggestions, let us know in the comment section.
