Catroot2 and SoftwareDistribution are two important cache folders on Windows 11/10 PC. Whenever you update your device, some information is saved inside these folders. When their database increase in size, they may start causing different error codes on your PC and even prevent updates from happening automatically. In this blog post, we have discussed how to find and purge this Catroot2 folder on Windows PC.

See Also: How to Clear the SoftwareDistribution Folder on Windows 11
How to Purge the contents inside the Catroot2 folder
If you are struggling with an update error code, clearing the contents inside the Catroot2 folder might help. Here’s how to purge this folder on Windows PC –
Note: Before you begin clearing the contents inside this folder, make sure to disable the update services first.
- Press Windows + R to launch the Run dialog box.
- Type “
services.msc” on it and hit OK. - When the Services window opens up, scroll down to the Background Intelligent Transfer service.
- Right-click on this service, and choose the Stop option from the context menu.
- In a similar way, disable the services – Windows Update and Cryptographic services as well.
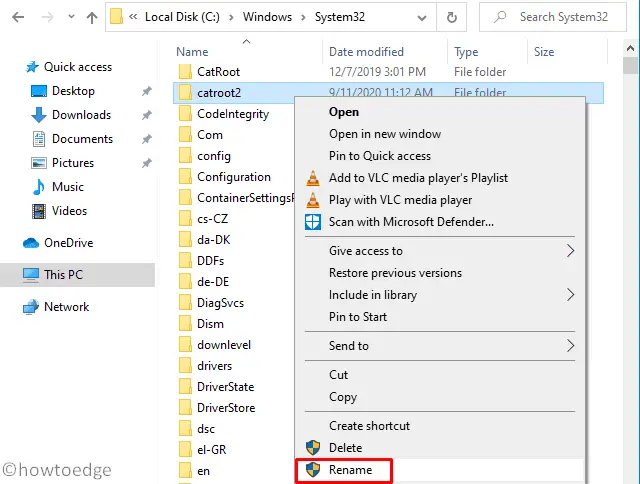
- Once disabled, open File Explorer by pressing Win + E and reach out to the below path –
C:\Windows\System32
- Locate and double-click on Catroot2 to open this folder.
- Use Ctrl + A to select all items, right-click on any one item, and choose to delete them.
Note: Though you may delete this folder, we suggest renaming this folder to something catroot2.old. This way, all the files inside this folder are with you and you may use them in case something went wrong on your computer.

- Once deleted or renamed, you may restart all those services that you have stopped before.
Restart your Windows PC and check if the persisting update error resolves afterward. When you reach out to the Catroot folder’s location, you will find new files and folders lying there.
Note: If you had renamed this folder, you will find two different folders starting with catroot2. Out of them, one is the folder bearing “.old” extension while the latter is recently created by Windows.
2] Deleting the Catroot2 Folder using CMD or PowerShell
Since the Catroot2 folder contains some important data related to previous updates on your Windows PC, we suggest not deleting this folder or purging its contents. Instead, you may rename this folder to something like catroot2.old. This way, you not only contain the catroot2 folder from deleting but also severs the deletion purpose.
Follow the below instructions on how to perform this task on Windows 11 –
- Press Windows + X to launch the Power Menu.
- Select Terminal (Admin) and when the UAC window prompts, hit Yes.
- This will default open Windows PowerShell having admin privileges.
Note: Alternatively, you may also use Ctrl + Shift + 2 to invoke Command Prompt on the terminal.
- Copy/paste the following codes on the elevated console to stop all major update services.
net stop bits
net stop wuauserv
net stop appidsvc
net stop cryptsvc

- After you stopped the update services from running on your system, run the following code to delete the catroot2 folder from your system.
rmdir %systemroot%\system32\catroot2 /S /Q
Note: If you want, you may even choose to rename this folder to something – “catroot.old” as well. Do note to run this code instead of running the above command –
rename C:\Windows\System32\catroot2 Catroot2.old
- Restart all those services that you stopped earlier by executing the below series of commands –
net start wuauserv
net start bits
net start appidsvc
net start cryptsvc

- After you have run all these codes successfully, close Command Prompt/PowerShell, and restart your PC.
Sign back into your device again and you will find this Catroot2 folder lying inside the C:\Windows\System32 folder.
