This post discusses how to enable, disable, stop, or start different services on Windows 11. If you are facing issues with any service installed on your computer, this article will guide you on how to find and resolve the underlying causes.
Windows 11 relies on services, which are small background programs responsible for the smooth operation of the system and applications. These services perform diverse tasks such as file sharing, printing, network connections, and user authentication.
To manage these essential services in Windows 11, you can utilize the Services snap-in. This user-friendly interface allows you to view, start, stop, pause, resume, and configure services effortlessly. Moreover, you have the option to configure services using Task Manager and execute commands through PowerShell or Command Prompt.

Read Also: Which Services You Can Safely Disable on Windows 11
1. Start and Stop Services on Windows 11 using Task Manager
Task Manager offers users the ability to stop or start services on Windows 11 right on its interface. However, with this, you don’t get the option to modify the startup type of any services. Here’s how to use task manager to configure a service in Windows.
- Right-click anywhere on the taskbar, and select Task Manager. Alternatively, one may also use the Ctrl + Shift + Esc hotkey to open the Task Manager.
- Go to the last tab on the left navigation and you will enter the Services list.
- Scroll down and locate the service that you would like to modify from here.
- Right-click on a specific service, and choose between the options – Start, Stop, or Restart.
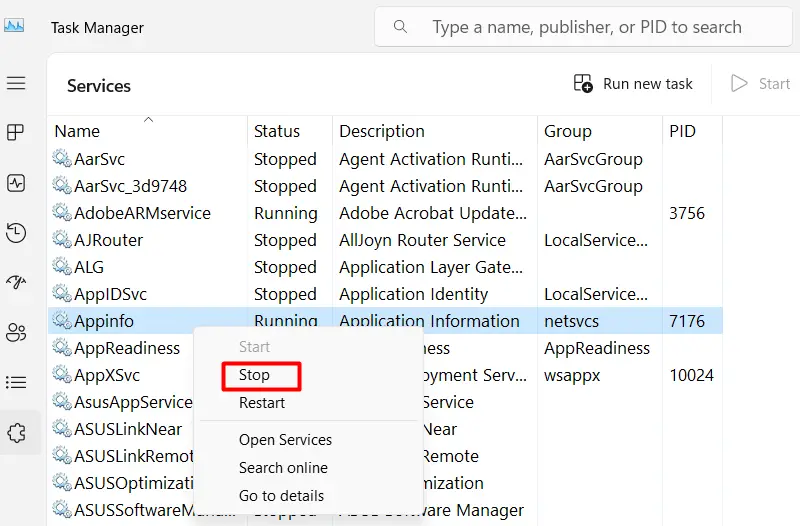
Note: Since the services list is quite long in Windows, you may use the Search bar to search for any particular service. Type the Services name in the text field, and press the Enter key.
2. Stop and Start Services using the Services app
The Services is an inbuilt app on Windows that let you stop, start, disable, or even re-enable services. Using this app is quite easy and for that, you need to follow these simple steps –
- Press Windows + R to launch the Run dialog.
- Type “
services.msc” without quotes inside it, and hit OK. - When the Services app launches, scroll down and locate the service that you want to modify.
- Once found, right-click on that particular service, and select Properties.
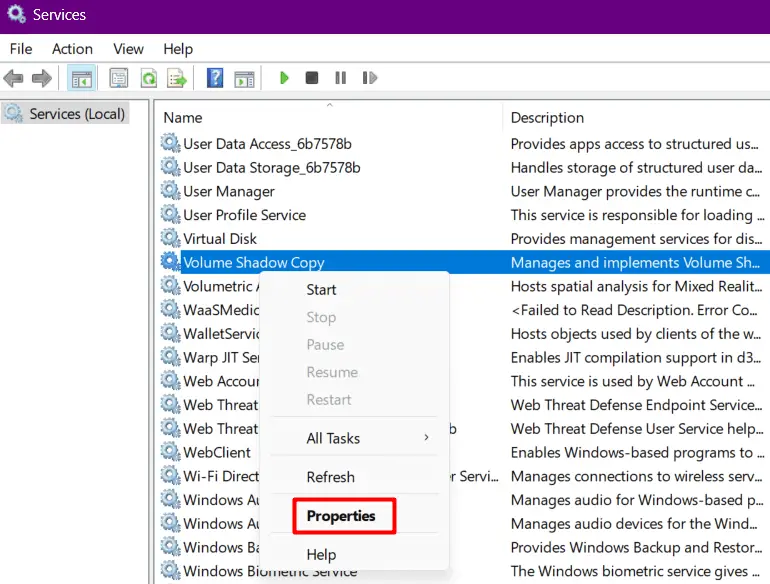
- When its properties window opens up, use the drop-down menu next to Startup type, and select your preferred option.
- In the end, click Stop/Start to turn off/on the selected service on your computer.
- Click Apply > OK to confirm the recent changes on your Windows 11 PC.
Note: It is possible to stop and start a service right from the context menu. However, you can’t modify its startup type option proceeding this way.
3. Configure Services using Command Prompt
You may also use Command Prompt as administrator to stop, restart, enable, or disable different services on your Windows PC. Before you proceed ahead and perform any of the above-mentioned tasks, it is essential to know the name of a service that you would like to configure.
For this, you require opening CMD as administrator and then running the following code on it.
sc queryex state=all type=service
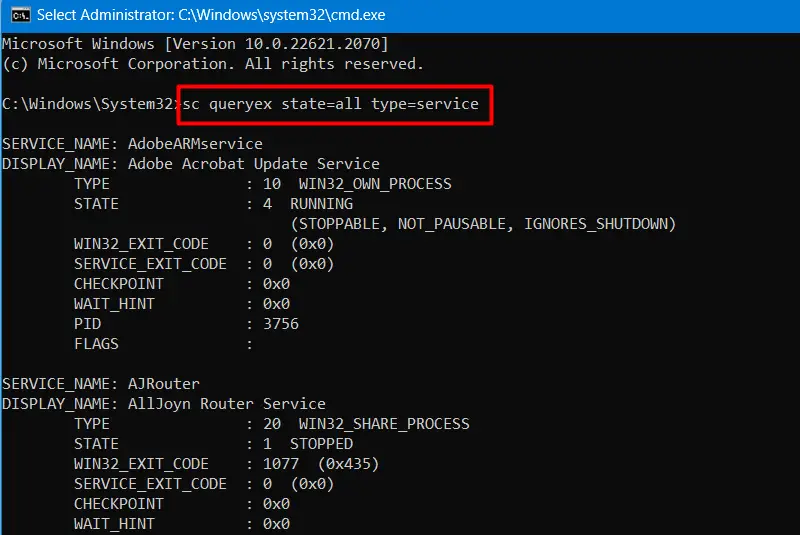
You will now be able to view all services with their specific Service Names. Now that you know the Service Name of a particular service, perform either of the below tasks on your computer.
3.1 Stopping a Service
To stop a service using CMD on your Windows 11 PC, copy/paste the below code on it, and press Enter.
net stop Service_Name
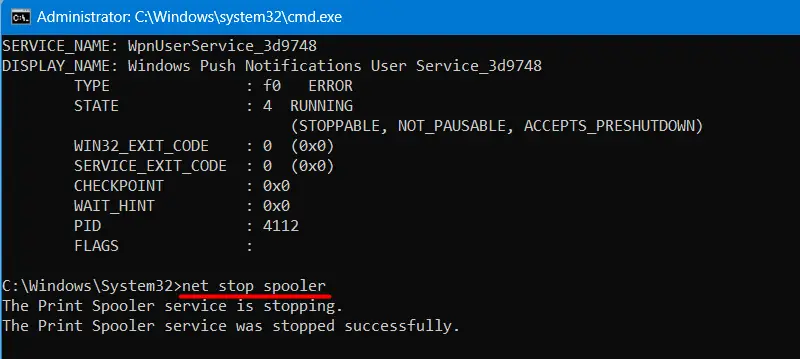
Note: Make sure to replace the Name-Service in the above command with the exact name of the Service Name of the service.
Doing so will stop the typed-in service in the above command. For example, use net stop "spooler" to stop the Print Spooler service on your PC.
3.2 Restarting a Service
If you would like to start or restart an already-stopped service in Windows 11, run this code on the elevated console.
net start Service_Name
3.3 Disabling or Turning off a Service
To turn off or disable a particular service from running on your computer, copy/paste the below code, and press Enter.
sc config Service_Name start=disabled
3.4 Enabling or Turning On a Service
To re-enable a service on Windows 11, you require to execute the following code on the elevated console.
sc config Service_Name start=auto
Type the following command to enable a specific service and press Enter:
3.5 Set the Service to start on demand
If you want a particular service to start on demand, run this code.
sc config Service_Name start=demand
3.6 Automatic Delayed start of a service
To start a service automatically but with a delay, you need to execute the below command.
sc config Service_Name start=delayed-auto
4. Manage Services in Windows 11 using PowerShell
If you want, you may configure internal as well as external services in Windows 11 using PowerShell as well. For this, you need to first launch Windows Terminal (Admin) and when this launches, execute the below codes inside it –
| Windows 10 users may launch PowerShell as administrator instead, and then run the following cmdlets on it. |
4.1 View all Services
Before you make any changes to the existing service, you need to first know about the service name and all. So, copy/paste the below code on the elevated console, and press Enter.
Get-Service
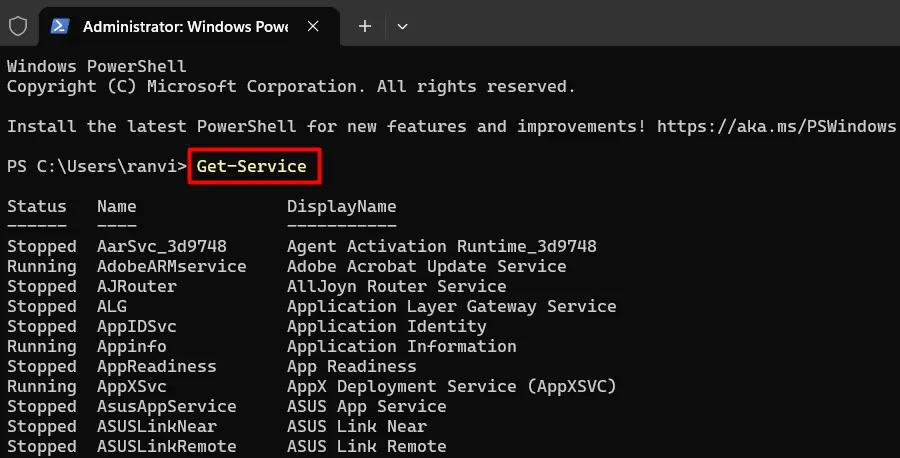
Windows PowerShell will now display all the services with their Service_Name which you require to either stop, start, enable, or disable on your PC.
4.2 Stopping a Service
To stop a service from running on your Windows PC, you may copy/paste the following on the elevated PowerShell, and press the Enter key.
Stop-Service -Name "Service_Name"
Note: Make sure to replace the Service_Name in the above code with the exact name of the service which you would like to remove from your system.
For example, you may use this code Stop-Service -Name "defragsvc" to stop the Disk Defragmenter Service on your PC.
4.3 Starting a Service
To start or restart a service using PowerShell, execute the following code on the elevated console.
Start-Service -Name "Service_Name"
4.4 Disabling a Service
If you would like to disable a particular service from running on your computer, you may run this simple code –
Set-Service -Name "Service_Name" -Status stopped -StartupType disabled
4.5 Enabling a Service
In case you would like to restart an already disabled service in Windows, copy/paste the below code, and press Enter.
Set-Service -Name "Serivce_Name" -Status running -StartupType automatic
4.6 Enable a service using the automatic delayed startup option
You may run the following command to enable a service with a delayed automatic startup option.
Set-Service -Name "Service_Name" -StartupType AutomaticDelayed
That’s it, I hope you are now able to stop and start services on your Windows 11 PC.
