In this tutorial, we will discuss what Update drivers mean in Windows 11, how often should you do it, and what are the possible ways that you can apply them.
A device driver is behind all the basic or complex operations you perform on your computer. Many a time, you may run into some error just because the responsible driver is simply not working or has become obsolete. If that’s the case, it’s a must thing to update the corrupted or outdated device adapters.
Of all the drivers that you use on a daily basis, some are essential ones (hardware related) that you must check regularly and update if any update is available. This includes Bluetooth, Audio, Graphics, Display adapters, and others. On the contrary, there are also drivers for secondary devices like Printers, Processors, or Bus controllers. These are the types that you can leave as they are.

Should I update drivers on Windows 11?
If your PC is running all okay with no lag or issues, all your drivers must be healthy and you need not do anything. Any update that your PC’s manufacturer releases will be submitted to Microsoft for initial testing and verifying. And, as the system is constantly looking for any new updates, the same will notify you provided, it does find any pending update.
So, relax and just focus on keeping the Windows Update section healthy. In case you do face any difficulty with a particular driver, then only, look for an update.
Which Drivers should I check and update regularly?
To answer this question, you need to first understand the two types of drivers that run on your computer. The first one is for the hardware and includes adapters like Graphic cards, Firmware, Webcam, Bluetooth, etc. This type plays a vital role in keeping your system healthy and running especially the Graphic card.
If you want to be on the safe side, just make sure to check for any updates over Windows updates, or OEM sites. A timely update of the system drivers will not only improve your device efficiency but will also secure your PC from any loophole that a hacker can exploit.
Coming back to the second type i.e. Peripheral device drivers. These are the types that don’t actively participate in your computer’s functioning. So, you may skip searching for any updates to them. Updating them in certain cases may do more harm than any good because of any compatibility issues.
Now that you do know which ones to check and which ones to leave, follow the below section on how to automatically set drivers to update or upgrade them manually.
How do I Update Drivers in Windows 11
To update device drivers on Windows 11, go through the below suggestions and see which one suits you the most –
1] Download & Install Optional Updates
Microsoft is deprecating all its famous features and bringing them under the common roof i.e. Settings. As opposed to earlier ways, you may now easily update the OS Build version, device drivers, or firmware via Windows Update. Here’s how to perform this task –
- First of all, navigate to the path below –
Settings (Win +I) > Windows Update > Check For Updates
- The system will automatically look for any pending driver updates online and fetch the same.
- Click the Optional updates link to view what it contains.
Quick Note: If it doesn’t reveal any optional updates link, this simply implies – No driver updates are available for your Windows 11 PC.
- Expand the Driver updates section, and check all the boxes.
- Hit the button – Download and install.

- That’s it, wait till the driver installation completes on your device.
Note: The “Optional update” is considered a better way on Windows 11 or the latest versions of Windows 10. This is because it allows only compatible drivers to install on your device so that no new issue appears after the driver installs.
2] Manually update drivers via Device Manager
Device Manager is the place where you can find all the drivers arranged properly. Go and check if any drive features a yellow exclamatory sign next to it. In case any driver indeed displays such a sign, right-click over it, and hit the option – Update driver. However, the chances of upgrading drivers this way are pretty nil.
Here’s how you can update device drivers manually on Windows 11 –
- Press Win + R.
- When the Run dialog opens up, type “
devmgmt.msc“, and hit OK. - Expand the section that contains the obsolete device drivers.
- Right-click over it, and choose the option – Update driver.

- Click “Search automatically for drivers” next, and the system will take care of the rest steps.

As I stated earlier, it’s just a waste of time searching for driver updates this way. Instead, you better check for driver updates via Windows Update or simply follow the next method.
3] Manually download and install driver updates
PC manufacturer often releases new updates of a driver and uploads them on their official sites. So, if you were not able to find an update for a particular driver, go and check if you can find it over the internet.
|
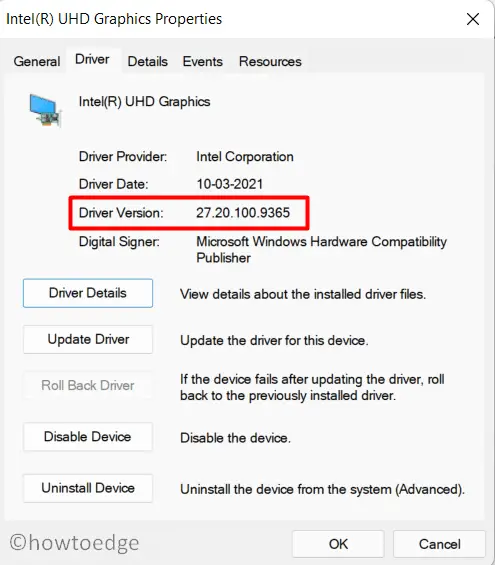
Before you proceed ahead with the manual download, make sure to note down the current version of the driver of which you are looking for an update. Here’s how to check the current version of a device adapter –
Now that you know the driver’s current state, check if the latest version offered on the manufacturer’s site is an update to this or not. If it isn’t, you may keep the driver as it is. |
Here’s how you can manually download and install the driver updates –
- First of all, navigate to your device manufacturer’s official site.
For your ease, we have listed out the most famous PC Manufacturer’s homepages –
- If you don’t find your manufacturer’s name in the list above, check for the same online. I am sure you will easily find that.
- When you are on the right website, locate and open the driver section.
- You ought to feed your model number, the Windows OS version running on your PC, and the system architecture.
- Fill in all the details and press Enter.
- You will be redirected to a directory where you can find all the drivers or even firmware for your computer.
- Download the driver that you were looking for. The setup file should be an executable file i.e. “.exe” file format. Double-click over the downloaded file to begin its installation.
How do I enable Automatic Driver updates on Windows 11?
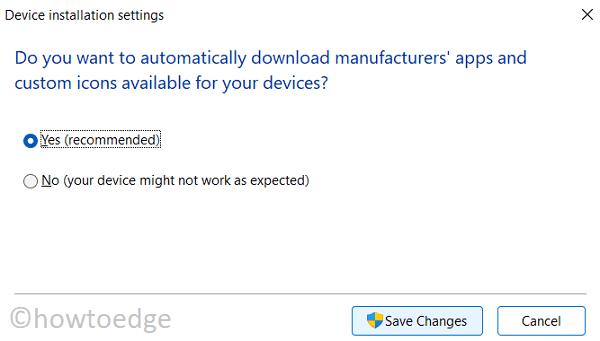
If you don’t wish to manually find and update device adapters on Windows 11, you may set them to auto-update via configuring Device Installation Settings. To enable this, do the following –
- Press the Windows key and start typing “Device Installation settings”.
- Click over the top result i.e. Change device installation settings.
- On the upcoming window, tick the box – “Yes (recommended)”, and then hit Save changes.

That’s it, your PC will regularly check for any pending updates online including any updates for the installed drivers, and firmware. In case it does find any available update, the same gets downloaded and installed automatically. You need not require to do anything.
Aren’t Drivers updated automatically already?
Microsoft has designed Windows Update in such a way that it will regularly look for available updates online, and download/install them without asking for any consent from your side. However, this is applicable to only those drivers that it finds compatible.
In case, it does find any compatibility issue with any driver present on your computer, a manual check can only reveal pending updates. Though this is a reality, the case may differ from one driver to another.
For example – Let’s say your PC manufacturer indeed launches a new version of the driver running on your device, however, it doesn’t submit the same for Microsoft validation. Since the company never got to know if there is any new update available or not, there won’t be any testing and thus that specific driver will remain as it is. In such a scenario, all you can do is visit the official site, and look if there is an update available for the problematic driver with an increase in the version number.
I hope this guide helps you in knowing what driver updates mean, how often you should do it, and most importantly how to perform this task.
Read Next:


