Keeping Windows 10 up-to-date is really important as it makes your system more stable and secure. However, the installation process of updating often takes a long time, gets blocked, or becomes stuck. Recently, some users reported Windows Update Error 0x80245006 while trying to update Windows.
If your computer is also having the same problem, then try to implement the given suggestions one by one. This guide provides a list of the solutions that will help you resolve the error 0x80245006 on Windows 10.
What causes Windows Update Error 0x80245006

Several conditions could result in Update Error 0x80245006 appearing in Windows 11/10. Below are some possible causes.
- The Windows Update database is corrupted.
- Background Intelligent Transfer Service (BITS) lacks a content link header.
- System files that are needed by the system are not correctly registered.
How to Fix Windows Update Error 0x80245006
To fix Windows Update Error 0x80245006, you can use the following methods –
- Check your internet connection
- Run Windows Update Troubleshooter
- Reset SoftwareDistribution & Catroot2 folders
- Restart some required services
- Perform a Clean boot
- Install the updates manually
1. Check your internet connection
Having problems with your internet connection increases the chance of getting Error 0x80245006. Therefore, make sure your system is connected to the internet first and then try any other method.
If there’s a poor connection on your network, disconnect other devices and if necessary, place the device close to the router and see if that fixes it. You can try the next solution if your network is up and running.
2. Run Windows Update Troubleshooter
There are different types of built-in troubleshooters in Windows 10 that can help fix various types of problems. If you encounter Windows Update Error 0x80245006, the next thing you should do is to run the Windows Update troubleshooter to reset the Windows Update settings to defaults. The procedure is as follows –
Windows 11
- Right-click on Start and select Settings.
- From the left pane, click System > Troubleshoot > Other troubleshooters.

- Next to Windows Update, click on the Run button.
Windows 10
- Press Win+I to open the Settings app.
- Then click on Updates & Security.
- Click the Troubleshoot tab.
- Go to the right side of the page and select Additional Troubleshooters.

- Select Windows Update and then click Run the troubleshooter.
- Then follow the instructions on your screen.
- When the solution is available, click on the Apply this fix button
- Once you have completed all the steps, restart your computer and try to update your Windows again
3. Rename SoftwareDistribution & Catroot2 folders
Here is another effective method of solving the Windows Update Error 0x80245006. This step will certainly work to fix any problems related to the Windows components. Use the following guide to do this –
- Open the elevated command prompt.
- Enter the below commands one after the other, and press Enter after each one –
net stop wuauserv
net stop cryptSvc
net stop bits
net stop msiserver
- Running the above commands will halt the update processes for a while.
ren C:\Windows\SoftwareDistribution SoftwareDistribution.old
ren C:\Windows\System32\catroot2 Catroot2.old
- By doing this, you will rename the SoftwareDistribution folder and the Catroot2 folder. As a result, the next time you try to update, Windows will be fresh.
net start wuauserv
net start cryptSvc
net start bits
net start msiserver
- All the services that you had stopped earlier will now be restarted
- Close the command prompt window and restart your device.
4. Restart some required Services
Some services need to be running for Windows updates. A recent system change could cause the update process to be interrupted, causing this error code. It is best to try restarting any stopped services with the troubleshooting package. If it did not, start them using the below steps –
- Click on Start and search for Services.
- Select the result from the list to open the application.
- Search for the Background Intelligent Transfer Service (BITS) and double-click on it.

- On the General tab, check the Service status.
- Make sure that the Startup type is Automatic.
- If the status is Stopped, click on the Start button.
- In the same way, check the status of the Windows Update and Workstation services.
- And start their status if you find them stopped.
- Once you’re done, close the Services application and check for the error code.
5. Perform a Clean boot
In case you continue to receive this error code, try to perform the Clean Boot states to start Windows with a minimal set of drivers. By doing this, you can eliminate most software conflicts that are induced when you install a program or update your Windows PC.
- Click on Start, search for System Configuration, and then select it from the search results.

- On the Services tab, check the box next to Hide All Microsoft Services.
- Then click on the Disable all button.
- Now switch to the Startup tab and click Open Task Manager.
- If any startup program seems to be causing you problems, click it
- Then click the Disable button.
- Similarly, disable other startup programs that might be causing this issue.
Once you have completed the steps, close the window and restart the computer. After restarting your PC, only essential services will run.
6. Install the updates manually
Another method is to download Windows Update manually from the Microsoft Update Catalog. Using this service, you can distribute certain updates across several devices.
- Right-click on Start and select Settings.
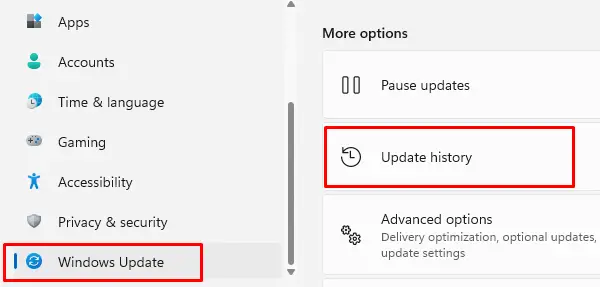
- For Windows 11 – Scroll down to Windows Update and then select Update history.

- For Windows 10 – Select Update & Security > Windows Update > View update history.

- Search for the failed update and then note its KB number from the list.
- Now open the Microsoft Update Catalog page.
- Enter the KB number in the search box and then search for it.
- Choose the most appropriate version for your operating system, then click on Download.
- You will now need to follow the on-screen instructions and restart your PC once you are finished
That’s all. This article hopefully helps you resolve this issue.
Read Next:


