BlueStacks is a cloud-based cross-platform that supports playing Android games or applications on Windows as well as Apple devices. With a recent update in the Windows operating system i.e. Enabling Hyper-V, the previous versions of BlueStacks are failing on Incompatible Windows Settings error.
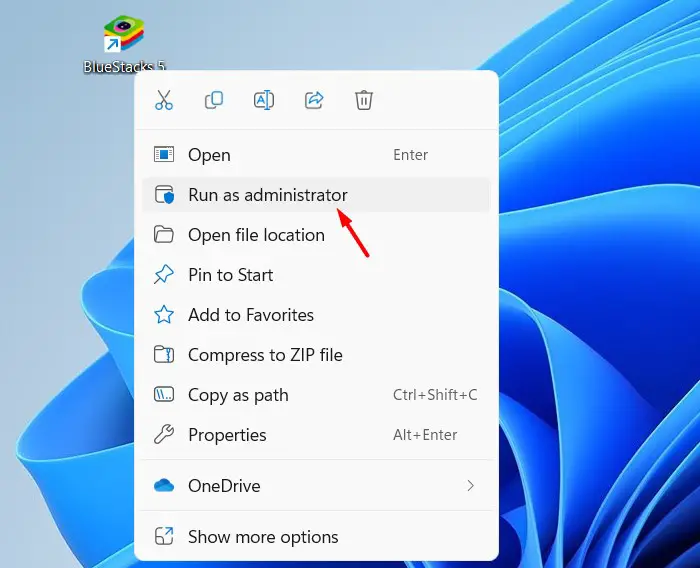
When this error occurs, you also see an option to Review the FAQ. The moment you click on this button, BlueStacks closes and you are redirected to the Support site on your default web browser. Attempt running BlueStacks as admin and this problem might resolve instantly.

In case the error persists, you need to disable Hyper-V by following the below sections.
- Disabling Hyper-V under Windows Features
- Reinstall BlueStacks 5 version for Hyper-V
- How do I install BlueStacks with Hyper-V enabled?
- What are some other ways to disable Hyper-V on Windows?
- How do I disable Memory Integrity on Windows?
- How to disable Ads in BlueStacks
Ways to Fix BlueStacks Incompatible Windows Settings
If you are getting Incompatible Windows Settings while starting BlueStacks on your computer, go through the below set of solutions and apply them sequentially.
Note: Before you apply any workaround, make sure to right-click on the BlueStacks icon and choose the “Run as administrator” option first. Chances are pretty high that the incompatibility issue resolves this way alone.

1] Disabling Hyper-V under Windows Features
There are certain features in Windows that normally prevent BlueStacks from opening on your computer. If that’s the case, you must disable all these features by following the below steps –
- Press Windows + S, and search for Windows Features in the text field.
- Click on the top result i.e. Turn Windows features on or off.
- On Windows Features, scroll down and locate the following features –
Hyper-V
Virtual Machine Platform
Windows Hypervisor Platform
Windows Sandbox
Windows Subsystem for Linux

- Make sure to uncheck the boxes against all these features, and click OK.
- You must restart your device next so that the recent changes come into effect from the next login.
Note: If you are using the Home edition of Windows, you will not find the option to disable Windows Sandbox.
2] Reinstall BlueStacks 5 version for Hyper-V
BlueStacks fail to start primarily when Hyper-V is enabled on your Windows PC. You may disable the same as stated above or disable Hyper-V using CMD. If the Incompatible Windows Settings error is still appearing on BlueStacks, one should reinstall the BlueStacks 5 version that supports the Hyper-V feature. Here’s how to download and install the latest version of BlueStacks 5 on Windows 11 –
- First of all, launch Control Panel.
- Go to Programs and Features next, and locate BlueStacks on it.
- Right-click on this program, and choose the Uninstall button.

- The User Account Control window will appear next. Well, click on the Yes button to authorize removing this program from your device.
Note: Uninstalling BlueStacks 5 will remove all your downloaded apps, other app settings, and your game data.
Wait for the uninstallation to complete, and once this is over, navigate to BlueStacks’s official site. Locate and click on the button – Download BlueStacks 5. The setup file will immediately start downloading on your computer.
How do I install BlueStacks with Hyper-V enabled?
Assuming you have already downloaded its set-up file, double-click on the same to begin its installation. When you see the Install now button, click on it. Now, wait for the installation to complete. The installer will automatically download and install the BlueStacks latest version supporting Hyper-V.
If the Incompatible Windows Settings error appears again while opening BlueStacks, right-click on its icon, and select Run as administrator. Hopefully, BlueStacks will run normally on your Windows 11 PC.
What are some other ways to disable Hyper-V on Windows?
In certain cases, you might not find the option to disable Hyper-V on Windows using Windows Features. Well, in such cases, what you can do is launch CMD as administrator, and run the below code on it –
dism.exe /online /enable-feature /featurename:VirtualMachinePlatform /all

After this code runs successfully, the Command Prompt will ask whether you would like to restart your PC. Type Y and your system will restart automatically.
Alternatively, you may also execute the below command to disable Hyper-V and Windows Hypervisor Platform on your computer. Make sure to launch the Command prompt as administrator first and then only run the below code on it-
bcdedit /set hypervisorlaunchtype off
After you disable Hyper-V, restart your PC and check if you can run BlueStacks without receiving the compatibility issues on it.
How do I disable Memory Integrity on Windows?
Though you will find the Virtual Machine Platform and Windows hypervisor platform, there are cases when users don’t find these features inside Windows Features. Well, in that case, you need to disable Memory integrity under Windows Defender. To disable Memory integrity, follow these easy steps –
- On Windows Search, type Core isolation and click on the top result.

- Doing so will Core isolation inside Windows Security.
- Disable the toggle switch available next to Memory integrity.

- The UAC window will prompt immediately afterward, click Yes to authorize performing this task.
- Close Windows Security and restart your PC.
Sign back into your device again and check if you can open BlueStacks without getting the same Review the FAQ error.
How to disable Ads in BlueStacks
BlueStacks has now enabled displaying Ads when you are playing a game on it. The ads appearing on its interface don’t obstruct the gameplay by design, however, they might distract you from playing your normal game.
Though BlueStacks suggests not disabling ads on it, they do provide options to disable viewing ads on it. Follow the below instructions on how to remove ads from BlueStacks –
- Launch BlueStacks first, and click on the gear icon (Settings).

- When the Settings window launches, select Preferences from the left sidebar.
- On its right pane, disable the toggle switch available next to “Allow BlueStacks to show Ads during gameplay”.

- BlueStacks will confirm this request again by displaying a message – “Please keep ads enabled“.
- Click Disable and the ads will be disabled from its interface. In case you click on Sure, the ads keep on appearing during your gameplay.
- Click Save changes and exit the Settings window.
You may now start playing a game on BlueStacks without getting any ads appearing on it.

