I’ve always enjoyed keeping my computer neat and orderly. But as time went on, my Windows 11 computer began to feel a little disorganized. System files, private images, downloads, games, and work projects were all stuffed onto one drive. My “C:” drive appeared to be a drawer filled with digital junk. At that point, I made the decision to finally make a disk partition, which completely altered how I use my computer on a daily basis.
What pushed me into creating the disk partition?
It began with a minor issue; my computer took longer to boot up. Then I discovered that my downloads folder alone weighed more than 30 GB. My C drive was running out of room after adding a few big video projects and a few games.
The real pain hit when Windows updates began failing because of insufficient storage. I had to remove files that I still needed just to keep the system running smoothly. It occurred to me then that I needed a cleaner separation between my OS and my data.
A complete reinstallation of Windows or a new hard drive would be time consuming and very complex, I looked for options here and there. Since I wanted a smarter organization, I decided to create a new partition, a dedicated space for all my personal files, free from rest of the clutter already present on my system drive.
Disk Partition provides me a balance between control and safety
Creating a disk partition was not solely for the purpose of freeing up space, rather it was more about control and safety of the files that I keep on my computer. Some points which I realized back then are as follows:
- What if my system ever got corrupted or needed a reset?
This puzzled me a lot and based on previous new installation of Windows on my other PCs, I remembered that the other disk partition remains completely safe even during a fresh Windows installation or reinstallation.
- Disk Partition provides me a better file organization
One partition for Windows and apps, another for personal data. No more accidental deletion or confusion.
- Creating Backups became quite easy
I personally am fond of doing backups of all important things at more than one or two places. With disk partition available on Windows, it becomes quite easy to just backup one partition which is containing all my personal or office files.
- Efficient Storage Management
I could keep large, rarely used files away from the drive that affects performance the most including the system drive.
It’s more like dividing a messy house into rooms. Keeping things organized helps me a lot in quick finding things where it belongs. This even helps me in cleaning up Windows whenever the need arises.
Steps that I followed to create a Disk Partition on Windows 11
I won’t lie as i was very nervous at first, but things were quite easy when I kept on going. With Windows 11, things have become surprisingly simple. Here’s exactly how I did it –
-
Opened Disk Management:
I hit Windows + X and chose Disk Management from the menu. A window popped up showing all my drives and partitions in neat little boxes.

-
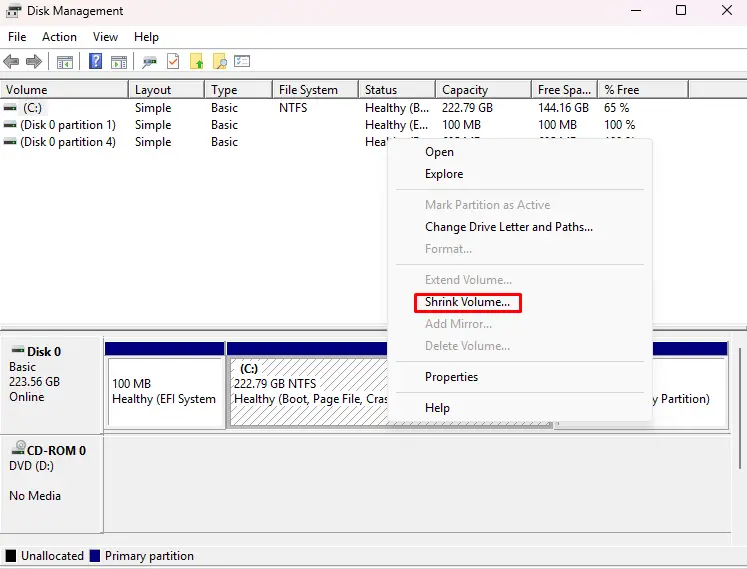
Selected My C: Drive:
This was the main drive where Windows was installed. I right-clicked it and selected Shrink Volume.
-
Decided How Much Space to Shrink:
Windows asked how much space I wanted to carve out. I chose around 110 GB, enough for my personal data but leaving the OS plenty of breathing room.

-
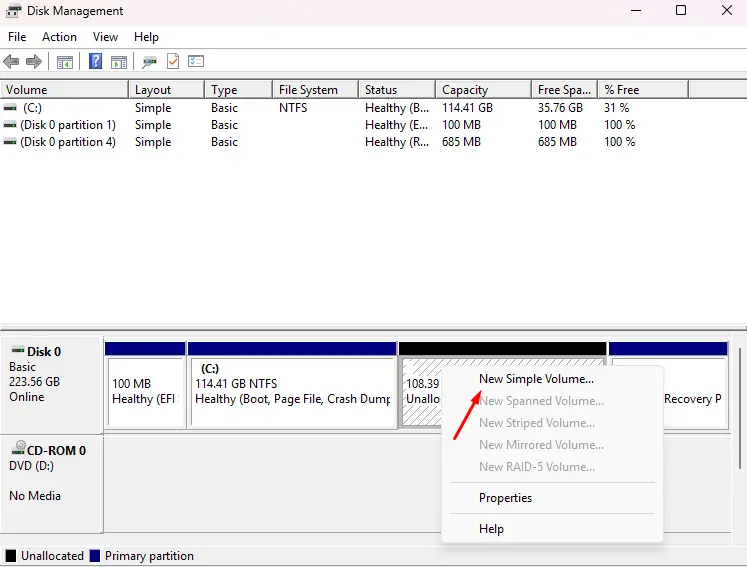
Created the New Partition:
After the shrinking process, I saw “Unallocated Space.” I right-clicked it, selected New Simple Volume, and followed the wizard, naming it Data (D:) and formatting it in NTFS.
-
Moved My Files:
Finally, I moved my documents, photos, and videos into the new partition. Suddenly, my C: drive looked clean and efficient again.
To be honest, I could practically hear my PC exhale in relief as it felt like digital spring cleaning.
The Results & Why I’d Recommend It?
After partitioning, the difference was immediate. Windows started faster, updates installed smoothly, and my storage usage appeared to be structured rather than disorganized.
The best thing happened after this is I no longer panic while installing Windows on my computer. I just format C:, reinstall the OS, and my D: drive stays untouched. It more looks like having a personal vault inside the same disk.
If you are also struggling with unstructured files on your Windows drives, or your system is running slow, it’s best you create a disk partition and that alone will resolve most of the issues.
