In this blog post, we cover three different ways to delete File History earlier versions on Windows 10. File History is the built-in feature by Microsoft that allows creating a backup of files or folders such as images, video, software, music, and others on the specified directory.
Enabling this utility, there is no fear of sudden data loss on your computer. In general, users create a local File History on their PC. However, we suggest creating File History somewhere on your external drive as this can recover the lost files in case the system corrupts on anything which is pretty common in Windows 10.
How you may handle File History in Windows?
File History uses the NTFS feature to copy files, thus it can generate numerous backups of all files or folders over a large span of time. Keeping heap of such histories is really difficult as this may result in storage issues on your PC.
With the latest concept of reserved storage on newer Build versions, this is even more hectic. To resolve further complications, one should keep on deleting File History Older Versions from time to time. To do so, you can take the help of three different approaches which are well illustrated below –
Ways to Delete “File History older versions” on Windows 10
To wipe the “File History older versions” on Windows 10, use the following workarounds –
1. Using Settings
The Windows 10 Settings is no doubt the best tool to make any changes to the whole system. Using this application, one can delete any files or folders that were accessed at some point using File Explorer. Let’s learn the steps to clear file history older versions on Windows 10 –
- Launch the Settings app (using Win and I keys).
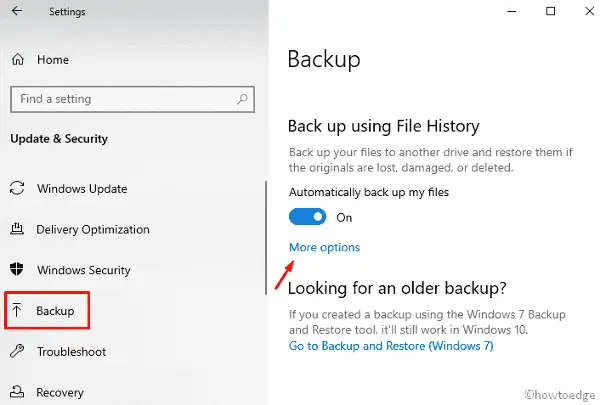
- Select the Update & Security category thereafter Backup on the next screen.
- Jump to the adjacent right wing and hit More Options.

- Now, do the click on See advanced settings option.
- Click Advanced Settings available on the left column.
- Here, do the click on Clean up versions link right under the Versions section.
Note: If this option does not appear, it implies your system has no previous data inside the File History.
- Using the drop-down menu, select the time period up to which you want to delete any files lying in the time-range.
All but the latest one
Older than 3 months
Older than 6 months
Older than 9 months
Older than 1 year
Older than 2 years
- Now hit the “Clean up” button to confirm the ongoing changes.
- Once the task completes successfully, all the data (Files & Folders) residing in the file history will get deleted.
2. Via File Explorer
Choosing Automatic clearing, in general, removes all the stored data up to the selected time period. In case, you want to perform this task manually, you may use the Windows Explorer to perform the deletion of the older versions of the File history.
This method suits the most as it allows selecting specific files or folders that you no longer require. Here are the essential steps to work upon –
- Press Win & E shortcut keys together to launch the File Explorer.
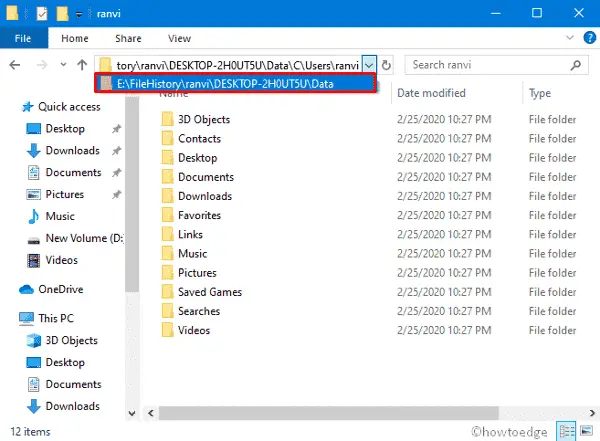
- In the address bar, navigate to the File History location.
- Expand the directory using your admin account. See the Snapshot below –

- Here opens the Data folder then go to the specific location where the file exists.
- This will display a list of contents, select one or more that you want to delete.

- Now move to the Toolbar and hit the Delete button.
- After you complete the above task successfully, the file will no longer be available for recovery. Hence, proceed with caution.
Note: To create a backup of system files, go to the following address and click on the Backup now button.
Settings > Update & Security > Backup > More Options
3. Using Command Prompt
Alternatively, you can remove the previous versions of File History running a few codes on Command Prompt as well. This is applicable as Windows 10 supports the fhmanagew.exe feature using Console using which one can make necessary changes. Let’s see how to proceed –
- Type cmd in the search bar.
- Make a right-click on the top result and select Run as Administrator.
- If the UAC prompt appears, tap Yes to open Command Prompt with admin rights.
- On the elevated console, execute the below codes one by one. Make sure to press the Enter key after each command line –
FhManagew.exe – cleanup age:- Here, age symbolizes the time period up to which you want to clear the history. For Example –
FhManagew.exe - cleanup 0: Deletes all the prior versions leaving aside the protected files.
FhManagew.exe - cleanup 30: Removes the data older than 30 days.
FhManagew.exe - cleanup 360: Clears the file or folder the previous one year.


