Microsoft tests the new feature via the insider programs before officially releasing them to the general public. For this very reason, there lies a program titled “Windows Insider” on our computer. The intention is pretty simple – the registered users (insiders) get early access to these beta versions so that they can test new features on their computers. When everything seems to be working fine on the preview builds, the company includes the new features on its next major or cumulative update.
Each and every program on Windows 10 has its own service running in the background and so is the case with the Insider program. Whether you are enrolled in this or not, the service keeps running until you manually stop this. If you are getting performance issues on your device, you may safely disable the related services.
Note: The insiders who want to retain back their PC’s original speed may also disable the Windows Insider service.
How to Disable Windows Insider Service in Windows 10
To disable the Windows Insider service (wisvc) on Windows 10, you can use the following methods –
- Stop receiving the Next Production Build via Settings (Insiders only)
- Through the Services Console
- Using the cmd command
- Via the Windows PowerShell
1] Stop Receiving the Next Production Build via Settings
If you want to stop receiving the Next production build instead of disabling the whole Insider Services, you may use these steps. Otherwise, follow the next set of solutions –
- First of all, reach out to the following location –
Settings (Win + I) > Update & Security > Windows Insider Program. - Jump to the right side and slide the “Stop getting preview builds” toggle switch to the right.
For Insiders OnlyIf you are already an insider and want to opt out of these services, make sure that you are using a production build. You may do the following to know what is the current build number on your device.
|
2] Through the Services Console
One may disable the insider services simply by opening the Services window and making the necessary changes. Here’s how to perform this task –
- Press Win + S to launch the Search window.
- Type “services” in the text field and press Enter.
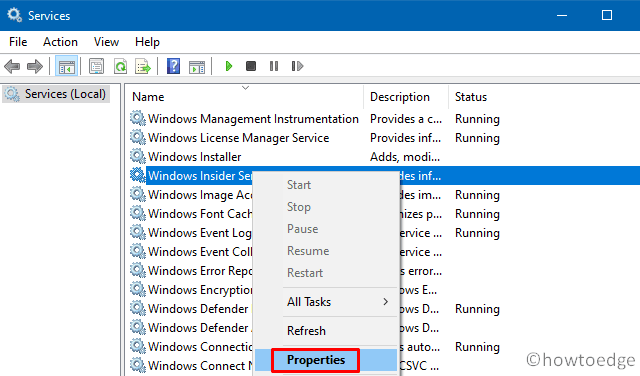
- Scroll and locate “Windows insider service” under the Name column.
- Right-click on this service and hit Properties on the context menu.

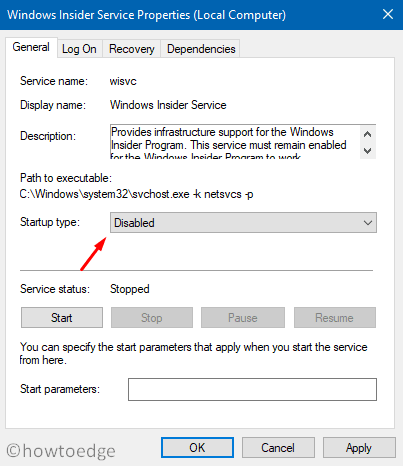
- Use the drop-down menu next to Startup type and select “Disabled“.

- Subsequently, hit Apply then OK to confirm the above changes.
3] Disable Windows Insider Service using the “cmd” command
Alternatively, you may also use a single command to disable the Insider services on Windows 10. Here are the essential steps to work upon –
- Right-click on the Windows icon and select Run.
- Press and hold Ctrl + Shift + Enter to open Command Prompt as an Administrator.
- Click Yes to agree with the User account control prompt.
- On the elevated console, type the following and hit Enter.
sc config “wisvc” start= disabled

- When you receive the confirmation message i.e. “[SC] ChangeServiceConfig SUCCESS“, close Command Prompt, and Restart Windows.
4] With Windows PowerShell
Windows PowerShell also provides an option to disable the insider services on the computer. To do so, use these simple steps –
- Press Windows Key and X altogether to launch the Power Menu.
- Select the option – Windows PowerShell (Admin).
- When the UAC dialog comes into view, hit Yes.
- Now, copy/paste the below code and hit Enter –
Set-Service wisvc –Startup Type Disabled

- Once over, Reboot your computer so that changes made become effective from the next logon.
By choosing any of the above methods, you may safely disable Windows Insider Service. For users who don’t wish to be part of the Windows Insider Program, removing this service can boost their PC’s performance.
Frequently Asked Questions
Windows Insider Program: Is it safe to enable?
There is no stability in the Windows Insider builds. You may find bugs in them. Microsoft releases these previews so that they can receive feedback from users and make the software more stable. The insider preview is not something I will recommend you install on your main system. However, you can try it out on a secondary system if you have one.
Read Next: How to Change Windows 11 insider Channel to Beta from Dev


