Windows Sandbox is a nice tool by Microsoft that lets you test new applications on its interface. When you are 100% sure about the application’s usability and have no bugs associated with it, you may install that on your host system. If you find this tool interesting, let’s learn how to enable or disable Sandbox on Windows 11 PC.
There are several other virtualization apps that let you perform similar tasks on their interfaces. For example, Hyper-V is a good alternative to this Windows Sandbox and is as trustworthy as it is. Well, Sandbox lets its users test new apps in an isolated environment and purge all the accumulated data as soon as you close it. That’s the reason why everyone loves testing new apps over Sandbox in Windows 11.

Note: Windows Sandbox is available only for users running Windows 11 editions Pro, Enterprise, or Education. So, if you are a Windows 11 Home edition user, you better continue using the other virtualization apps.
Ways to Enable Sandbox on Windows 11
This guide presents three ways using which one can easily turn On Sandbox on his/her computer. These methods are as follows –
Now that you know about all three different ways, let’s explore how to enable Sandbox on your PC in detail –
1] Through Windows Features Dialog
The most effective way to enable Windows Sandbox is through the Settings app. All you require is to open Windows Features, look for Windows Sandbox, and enable it from there. Follow the below instructions to turn On Sandbox on your Windows 11 PC –
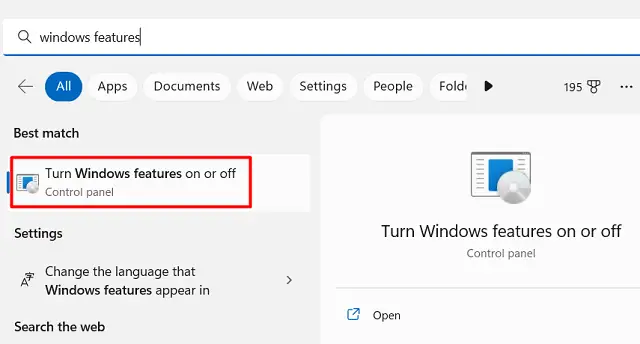
- Launch Windows Search by pressing Win + S.
- Type “Windows features” in the text field, and click on the top result.

- On the upcoming window, scroll down to Windows Sandbox.

- Tick the box next to it and hit OK.
Wait for the system to detect files and install the required DI to enable Windows Sandbox. As soon as the dependencies are installed on your computer, you are all good to launch Sandbox on your PC.
Windows Sandbox Failed to start, Error 0x80070015 Fix
2] Using Windows PowerShell (Admin)
If Sandbox is not turning ON through Windows Features for some reason, you may enable it directly by running a single-line command on Windows PowerShell. This method is also helpful if the Sandbox option is greyed out on your computer. Here’s what you need to do to enable Sandbox on your PC –
- Press Win + X to launch the Power Menu. Select Terminal (Admin) from here.
- When the UAC window prompts, hit Yes to authorize opening the terminal.
- The terminal will default land into Windows PowerShell (Admin).
- Copy/paste the below code on it and press Enter –
Enable-WindowsOptionalFeature -Online -FeatureName "Containers-DisposableClientVM" -All

- Wait for this command to run successfully. Once this is over, the terminal will prompt you to restart your PC.
- Type Y and press Enter to reboot your computer.
Sign back into your device again and check Sandbox must be enabled on your Windows 11 PC.
3] Via Command Prompt
Just like PowerShell, users may enable Sandbox on Windows 11 by running the DISM code on Command Prompt. For this, you need to launch CMD as administrator first and execute a single-line command. The detailed steps are provided below –
- Press Win + R to launch the Run dialog.
- Type CMD on it and press Ctrl + Shift + Enter keys simultaneously.
- The UAC window will prompt next, hit Yes to authorize opening it.
- On the elevated console, copy/paste the below command, and press Enter.
dism /online /Enable-Feature /FeatureName: "Containers-DisposableClientVM" -All

Wait for this command to run successfully on your computer. As soon as this is over, restart your PC. From the next login, check if you can start Windows Sandbox on your PC.
How to Fix Sandbox Issues in Windows 11/10
How to Use Windows Sandbox on Windows 11
Now that you have enabled Windows Sandbox, let’s learn the steps to use it on your Windows 11 PC –
- Press Win + S, and type Sandbox in the text field.
- Click on the top result to launch Windows Sandbox.
- You may now copy files from your system to here or simply download the new apps online.
- Since the operations performed inside it remains here, you need not worry about new apps affecting your system.
- After you test an application inside the Sandbox, close it. A confirmation window might prompt, hit OK to confirm closing Sandbox.
The moment you exit the Sandbox environment, the files or settings used will be lost forever. So, whenever you launch Sandbox, you enter a clean and isolated environment very different from its previous one.
What does Sandbox offer for Windows users?
Windows Sandbox is basically a virtualization app and it provided an environment where one can test new applications in a completely isolated environment. Whatever apps you install on this tool will remain here and would not affect the original apps running on your computer in any way.
You can think of Windows Sandbox as a virtual machine that comes from Microsoft. So, you need not worry about any data leakage, privacy, or other things. Being a superfast and lightweight application, Sandbox distinctively offers its users a slight edge over using third-party VMs.
If you are a Windows 11 Home edition user, you can’t enable this tool on your computer. As a result of this, you can’t test your installed app. Worry not, as you can always go for third-party apps readily available online. A few examples include Shade Sandbox, Sandboxie Plus, and others.
How do I disable Windows Sandbox on Windows 11?
If for some reason, you don’t want to keep using this Sandbox feature and want to turn it off, follow these steps –
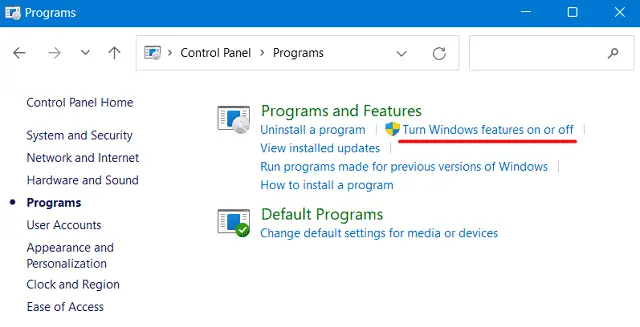
- Launch Control Panel first.
- Click Programs > Turn Windows features on or off. See the Snapshot below –

- Windows Features will launch next on the display screen.
- Scroll down and locate Windows Sandbox.
- When found, uncheck the box left of it, and hit OK.

That’s it, you have successfully disabled Sandbox on Windows 11. Restart your PC to delete the installed dependencies on your computer. Sign back into your device again and search for Windows Sandbox. You will not find the trace of this application installed on your Windows 11 PC.
Minimum system requirements to enable Sandbox on Windows 11
You may turn On Windows Sandbox only when your system meets the below requirements –
- Windows 11 Edition: Pro, Enterprise, or Education
- RAM: 8 GB recommended, but Sandbox can run efficiently on 4GB memory
- 64-bit Processor with Second Level Address Translation (SLAT)
- CPU support for VM Monitor Mode Extension (VT-c on Intel CPUs)
Note: Sandbox is an optional feature on Windows 11. That’s the reason why it comes disabled on new Windows 11 PCs.


