Today, in this post, we explore three different ways to Enable or Disable the Remote Desktop on Windows 10. This is a unique protocol that helps you access more than one PC at ease. It is a pretty cool feature and is well suited for business purposes. However, you need to have a secure Desktop UAC prompt on your computer to access other PCs remotely.
The three different ways we are going to explore are Local Settings, Control Panel, and Command prompt. We have also provided tips to disable this feature using these three options. Let’s discuss them in detail-
Enable or Disable Remote Desktop on Windows 10
Here is the complete description of how to turn or off Remote Desktop in Windows 10-
- Enable Remote Desktop using Settings
- Enable Remote Desktop using Control Panel
- Enable Remote Desktop using Command Prompt
1. Enable Remote Desktop using Settings
System Setting is an easy way to Turn On or Off any task like accessing the desktop remotely. Here are the steps-
Step-1: Press Win & I to invoke the Settings app.
Step-2: Once the page appears up, select System followed by Remote Desktop on the left pane.
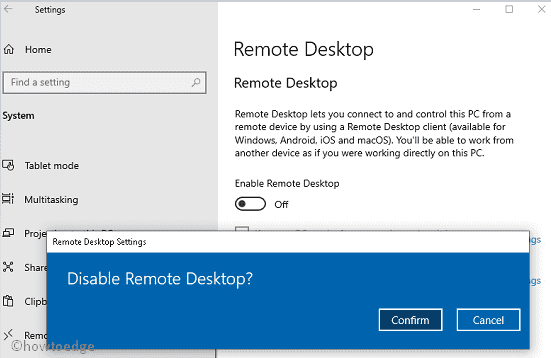
Step-3: Move to the right-hand side and activate Enable Remote Desktop toggle switch.

Step-4: Now tap the Confirm button to save the changes.
Here you will get two options, they are-
- Keep my PC awake for connection when it is plugged in
- Make my PC discoverable on private networks to enable automatic connection from a remote device.
Step-5: Select any one of the above two and mark its checkbox too.
Once the above task gets over, you will be able to connect your PC using the inbuilt option of Windows 10 i.e. modern Remote Desktop app (recommended) or Remote Desktop Connection.
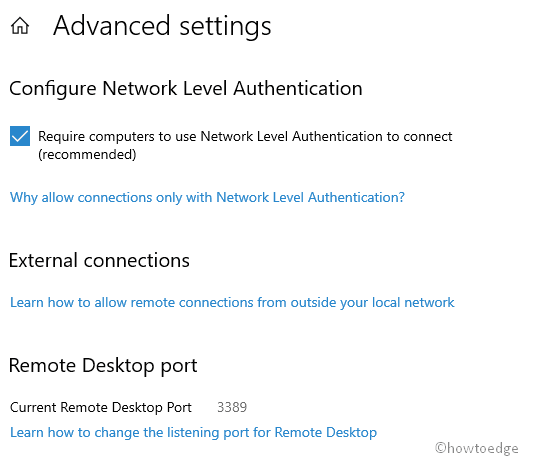
In case, you want more options to switch to the Advanced settings page. Here you will get more options like require computers to use Network Level Authentication to connect. This feature requires the user’s authentication to make network connections more secure. (see snapshot)

I hope you are now able to connect remote desktop easily without facing any complexity.
Disable Remote Desktop using Settings
If you want to turn off this feature, you need to just navigate to the following address-
Settings-> System-> Remote Desktop
Here, turn Off Enable Remote desktop toggle button.

Again tap Confirm option on the subsequent pop-up window to save the changes.
2. Enable Remote Desktop using Control Panel
Enabling or disabling Desktop remotely is also possible using Control Panel, however, this feature is available only for the Creator Fall or later version of Windows 10. Here are the steps to follow-
Go to Cortana and type Control Panel in the Text area, hit the same result to let open this Desktop app.
On the next window, select System and Security then Allow remote access option under the System category.
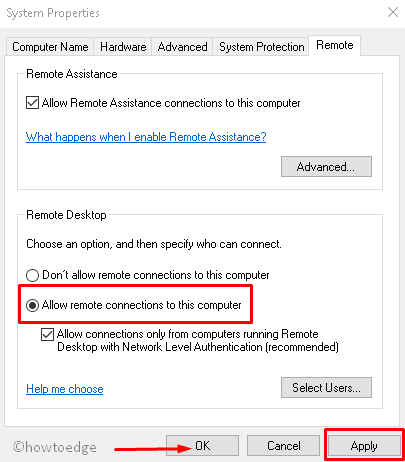
Henceforth, tap the Remote tab and tick against Allow remote connections to this computer radio button.

Lastly, hit Apply then OK to proceed with the changes made so far.
If you enable the remote desktop feature using Control Panel, Network Level Authentication (recommended) option will turn on automatically.
Disable Remote Desktop using Control Panel
To disable this attribute, you should browse the following path-
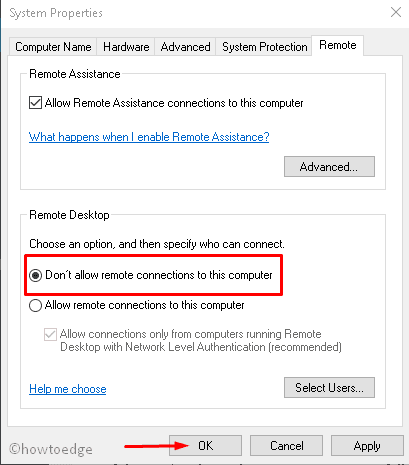
Control Panel-> System and Security-> System->Allow Remote access-> Don’t allow remote access to this computer-> Apply-> OK. (See the snapshot below) –

3. Enable Remote Desktop using Command Prompt
You can enable or Disable Remote Desktop using Command Prompt too. This process is a little bit complex as you need to be more careful while typing the command line. Here are is the complete procedure-
Note: Here we have outlined the necessary actions to manage Remote Desktop using Command Prompt. You can also use the same codes on Power Shell to perform similar tasks.
- Press Win & X hotkey together to open the Power menu, here select Run from the list.
- Type cmd in the text box and simultaneously press Ctrl+Shift+Enter to launch Command Prompt as Admin.
- If the UAC prompt appears up, tap Yes to sanction your permission.
- Now on the prompt area, write the following then hit Enter to execute this command line.
reg add "HKEY_LOCAL_MACHINE\SYSTEM\CurrentControlSet\Control\Terminal Server" /v fDenyTSConnections /t REG_DWORD /d 0 /f
After you finish the steps, you can use the Remote Desktop modern app or the old one to access your Desktop remotely even with firewall enabled.
Disable Remote Desktop using Command Prompt
In case you want to undo the above action, just run the following command on the elevated command prompt again.
reg add "HKEY_LOCAL_MACHINE\SYSTEM\CurrentControlSet\Control\Terminal Server" /v fDenyTSConnections /t REG_DWORD /d 1 /f
I hope this blog post helps you to access Desktop remotely, however, do note that; this can work when the Firewall is set to Turn ON.


