Here, we discuss five different ways that can help to disable Remote Desktop connection on Windows 10 PC –
1] Disable Remote Desktop connection using Settings
The settings app is the easiest way to disable the Remote Desktop connection on Windows 10 devices. Here are the steps to follow-
Step-1: At first, right-click on Start and choose the Settings option from Power Menu.
Step-2: Next, select System followed by Remote Desktop on the left-hand side.
Step-3: Jump to the corresponding right-hand side and turn Off the Enable Remote Desktop toggle switch.
Step-4: If the confirmation message appears, hit Confirm to save the changes.

2] Disable Remote Desktop using Control Panel
Control Panel does provide a workaround to disable remote desktop connection on the system. Here are the essential steps-
Before going through the below steps, make sure you have signed in with an administrator account.
- Press Win & S altogether to open the Search icon thereupon type Control Panel in the void area.
- Double Click on the top result and move to the System section on the new window.
- Henceforth, select the Remote settings option from the left side (See the screenshot below).

- Next, on the succeeding window, check the Don’t Allow Remote Connections to This Computer radio button.
- Lastly, tap OK to confirm the changes and reboot your PC.

3] Disable Remote Desktop connection using Command Prompt
Disabling remote desktop connection through the Command Prompt is a little bit complex as compared to the above ways. This is because you need to run a few command lines very carefully. Here is the complete procedure –
- Jointly press Win & R keys combination to open the Run dialog.
- In the void box, type cmd and simultaneously hit Ctrl+Shift+Enter to launch Command Prompt as admin.
- If the confirmation message appears, tap Yes to permit access.
- Near the blinking cursor, copy-paste the below code and hit the Enter key at the end.
netsh advfirewall firewall set rule group="remote desktop" new enable=No
- When the above code runs successfully, the desktop connecting app can’t access the remote desktop unless you set the firewall to enable the same.

Note: If you want to enable the desktop connection remotely, execute the following code on the elevated command prompt.
netsh advfirewall firewall set rule group=”remote desktop” new enable=Yes
4] Disable Remote Desktop Using Group Policy Editor
Group Policy provides another effective way to stop using Remote Desktop on Windows 10 PC. Here’s how to proceed-
- Hit the Win icon and type Group Policy Editor in the search field.
- Select the well-matching result and navigate to the following path-
Computer Configuration\Administrative Templates\Windows Components\Remote Desktop Services\Remote Desktop Session Host\Connections
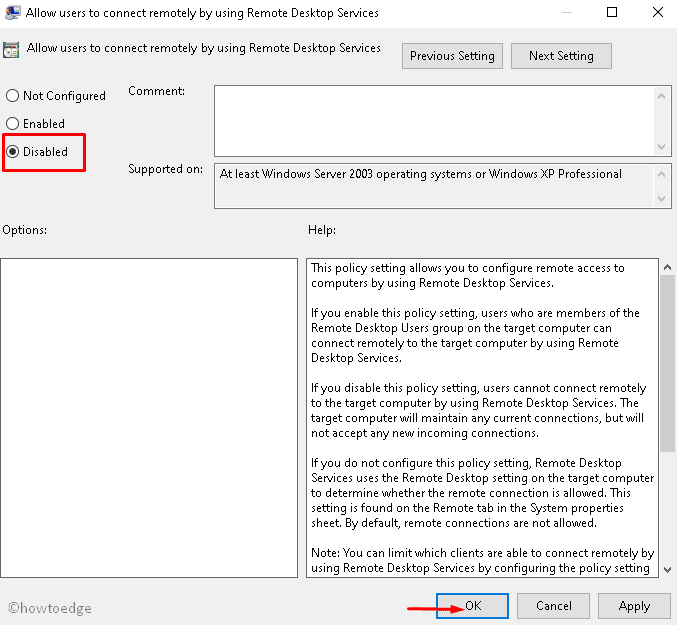
- Next, double-click on the Allow users to connect remotely by using the Remote Desktop Services policy under the connections section. (See the screenshot below)

- Check the Disable radio button and then hit OK to confirm this action.
- Once completed, close the current policy editor and restart your PC.
Note: The Local Group Policy Editor works only in Windows 10 Pro, Enterprise, and Education editions. Hence, if you are using Windows 10 Home, you can’t avail of this feature to disable remote desktop.
5] Disable Remote Desktop Using Registry tweak
You may disable the remote desktop on your Windows 10 PC via the registry editor as well. Go through the following guidelines to perform this task-
- Type Regedit in the search icon and hit the Enter key.
- When the UAC prompt appears, tap Yes to give permission.
- Next, navigate to the following address-
HKEY_LOCAL_MACHINE\SYSTEM\CurrentControlSet\
Control\Terminal Server\WinStations\RDP-Tcp
- Here, move to the corresponding right pane and explore the UserAuthentication option.

- Subsequently, change the value from 1 to 0 thereafter hit the OK button.
- After you complete the above steps, Reboot your PC so as to confirm the changes made so far.