We all love backing up important files or folders every now and then on Windows 10 PC. However, what if, you are not able to generate a new backup and instead start getting an error 0x8078011E? In this tutorial, we outline all possible reasons that may arise this problem along with five working ways to fix it. When backup failed on this error, you may encounter the following message as well –
Windows Backup failed to get an exclusive lock on the EFI system partition (ESP), Access is denied. Error code 0x8078011E.
This is quite clear from the above message that this bug occurred because some external application is preventing system backup to complete. Let’s explore the solutions in detail –
Windows Backup failed on Error 0x8078011E
If you are not able to create a new system backup on account of the error 0x8078011E, try out the below suggestions sequentially –
1] Restart Windows 10
This error mostly arises when your computer is stuck in a recursive loop. It doesn’t matter how many times you have tried creating a system image backup, this will keep failing on the 0x8078011E error. In such a case, all you require is to reboot your device. Rebooting Windows 10 will restart all functions and modules so that they don’t call to themselves repeatedly. If the error persists even after restarting your PC, follow the next set of solutions discussed below –
2] Disable Third-party Antivirus
Security apps are known to cause problems while generating new system backups on the computer. In case, you are using external antivirus software, make sure that you have temporarily disabled it. By doing so, you may create new backups without getting into the 0x8078011E error.
As per reports, Avast, ESET, Trend Micro, and AVG software are responsible for this bug as they keep on scanning all the files available at the EFI system partition. If the antivirus program is not providing options to disable it temporarily, use these steps to uninstall them from your computer –
- Right-click on the Windows icon and select Apps & Features.
- When the Settings app opens up, look for the third-party security app on the right pane.
- Once you find the same, click once over it, and hit the uninstall button.
Alternatively, you may also uninstall this software by visiting the Programs and Features section on the Control panel.
3] Configure the “Plug and Play” service
Any incorrect configuration on the Services window may also prohibit the system from generating new backups. “Plug and Play” is one such service that may fail to recognize any hardware wherein you want to create backups. So, you must check if this service is running properly on your device or not. Here’s how to properly configure this service –
- Press Win + S to launch the search bar.
- Type “services” and double-click over the top result to enter the Services window.
- Scroll down and locate the “Plug and play” service. Once found, right-click over it, and select the Properties option.
- Select Automatic using the drop-down menu next to the “Startup type” section.
| Note: In case this service was already running, stop it first and then change its startup type. |
- Now, click over the Start button.
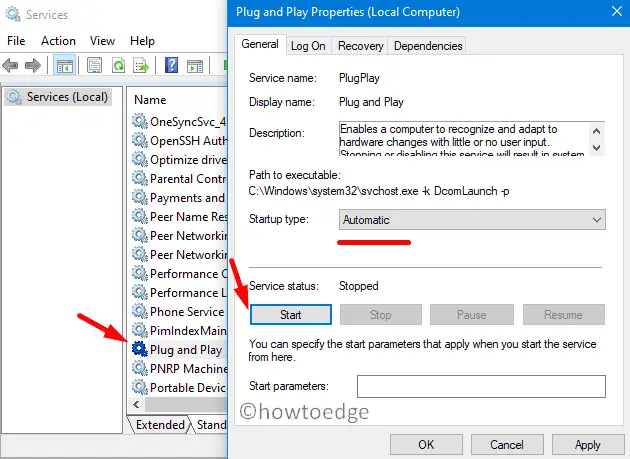
- In the end, hit Apply > OK, and restart your computer.
From the next sign-in, you should be able to generate a new system image backup.
4] Turn off Real-Time Protection
If you rely on Windows Defender to cleanse viruses or malware on your device, make sure that you have disabled this program as well. To do so, use these steps –
- Go and click the up arrow key available on the taskbar.
- When it expands, click over the shield icon.
- The system will then take you to Windows Security.
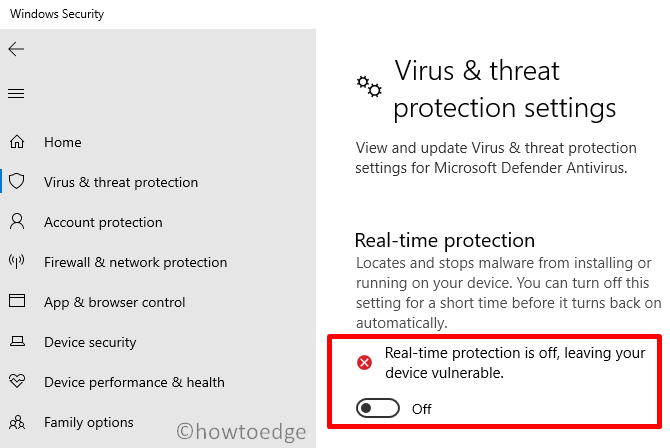
- Select the Virus & Threat protection tab on the left column.
- Move to the right side and click “Manage Settings” under Virus & Threat Protection Settings.
- Subsequently, turn off the following toggle switches –
- Real-time protection
- Cloud-delivered protection
- Automatic sample submission
- Tamper protection
- Come out of this window, and generate the system image backup.
- When the system image backup creation completes, restart Windows 10.
- From the next logon, you may re-enable all the protections that have recently disabled.
5] Boot into the Safe Mode on Windows 10
If none of the above solutions help, booting your computer into the Safe mode should fix the trouble. Clean boot in Windows 10 ensures no third-party apps or services start, even in the background. Since the error 0x8078011E occurs just because some 3rd-party application was using files on the ESP, going this way must resolve the problem. Here’s how to clean boot Windows 10 –
- Press Win + R.
- Type “MSConfig” and hit OK.
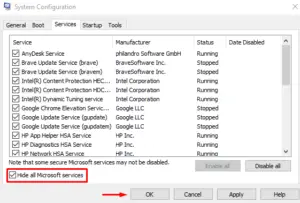
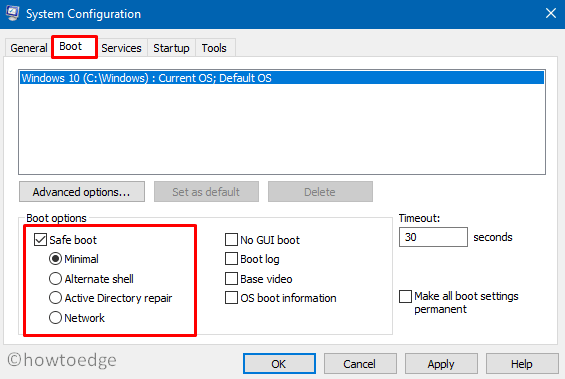
- On the System Configuration window, go to the Services tab.
- Mark the checkbox that reads “Hide all Microsoft services”, and hit Disable all.

- Now, go to the boot tab and tick the checkbox – Safe boot. By default, the minimal checkbox gets selected as well.
- Hit Apply then OK to confirm the recent changes.
- The next time you restart your PC will open the operating system into the Safe boot. You may now create a system image backup without getting into any error.
I hope this tutorial helps to resolve the backup failed error 0x8078011E on your computer. In case you have any queries or suggestions, let us know in the comment section.