Several users complained of facing some Camera error 0xa00f4240 <unknown> 0x800703e3 when they were trying to open it on Windows 11. Since you are here, you must also be encountering the same error code. In this guide, we have discussed what possibly could trigger this error code and five workarounds that might help you to overcome this issue.
Though this article is written for camera error 0xa00f4240, the solutions work equally well for other camera errors like 0x800703e3, 0x80070057, 0x80131502, and 0x80004003. Let’s explore the solutions in somewhat more detail.

What triggers Camera Error 0xa00f4240 on Windows?
A camera error mostly occurs because of some driver issues including both Camera and graphics. So, check if all your drivers are up to date or not. If not, you must consider updating them via Windows Update. Apart from corruption within the drivers, the camera error might also occur when the following conditions meet on your Windows PC –
- Denied access to Camera for several apps
- Internal glitches within the Camera app itself
- A third-party antivirus is running on your PC and is blocking the Camera opening
Before you apply any workaround, make sure to disable any third-party antivirus program running on your computer. The error 0xa00f4240 could also have been the work of a damaged Webcam. So, check for any physical damages on your Camera, and only when it seems fine, proceed ahead and apply the below fixes.
Note: In case you find your Webcam damaged, visit the nearest service center of your OEM manufactures and have the Camera replaced.
Ways to Solve Camera Error 0xa00f4240 on Windows PC
If you are struggling with an error code 0xa00f4240, 0x800703e3, 0x80070057, 0x80131502, or 0x80004003, you should attempt the below fixes and have this problem resolved.
- Troubleshoot Windows Camera
- Update Camera drivers
- Reset Camera App
- Check the Camera’s Privacy Settings
- Uninstall and then reinstall your camera app
1] Troubleshoot Windows Camera
When encountering an error opening Webcam on Windows 11, you should first try troubleshooting the Camera app. Thankfully, Microsoft provides such a tool in its Settings that may look into the reasons behind it and have the problem resolved.
To access the troubleshooting Camera setting, you need to follow these steps –
- Press Win + I to launch Windows Settings.
- Go to System > Troubleshoot, and click to expand Other troubleshooters.

- Scroll down to the Other section and locate the Camera inside it.
- When found, click the Run button available on it.

- Wait for the troubleshooting to complete, and as soon as it is over, restart your PC.
Sign back into your device again and check if you can start Webcam without receiving an error code 0xa00f4240. The troubleshooter can check for minor bugs and issues. So, if the error is still appearing, you must try out the below set of solutions discussed below.
2] Update Camera drivers
Since we all know Windows Camera functions based on a driver available inside Device Manager, any corruption within its driver may trigger some error codes. This error 0xa00f4240 might also occur if you haven’t updated the graphics driver for a long time.
Here’s how to check for corrupt drivers on Windows 11 and update them –
- Press Win + R to launch the Run dialog.
- Type “
devmgmt.msc” on it and hit OK. - When the Device Manager opens up, locate the Display adapters.
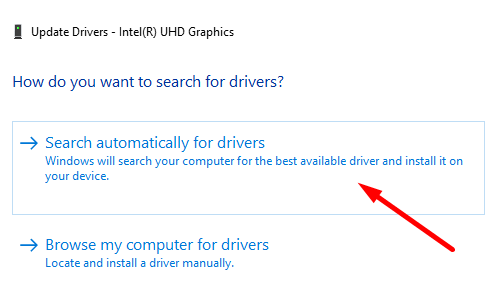
- Once found, right-click on it and choose the Update driver option.
- Select “Search automatically for drivers” on the subsequent screen.

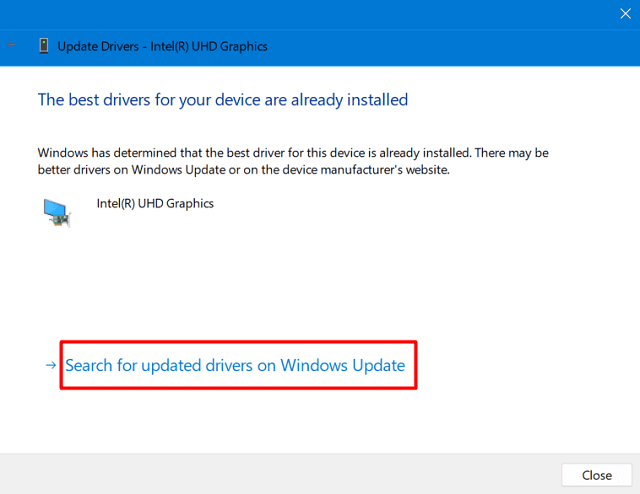
- With more options available in Settings, it is unlikely to receive any driver update on this screen. Instead, the system will suggest moving to Windows Update and checking for optional updates.
- You may click on “Search for updated drivers on Windows update” and the system will redirect you to the chosen location.

- Wait for the system to connect to Microsoft Servers online and check for pending camera updates. If this indeed finds any pending update, click Download and install.
After the driver installs successfully, restart your PC. From the next login, check if the error code 0xa00f4240 has been resolved on your Windows 11 PC.
Uninstall and Reinstall Camera driver from Device Manager
If there isn’t any pending update for your Camera app, you should try uninstalling and then reinstalling the Camera driver on your Windows PC. Here’s what you need to do –
- Right-click on the Windows icon and select Device Manager.
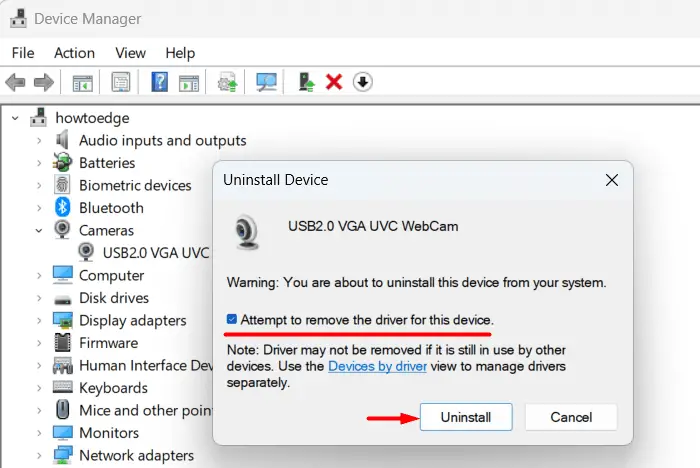
- Click “>” left of Cameras, and right-click on the driver present inside this section.
- Choose “Uninstall device” from the pop-up menu. Make sure to tick the box – “Attempt to remove the driver for this device” and hit Uninstall again.

- After this driver is uninstalled, repeat the same steps for graphics present inside Display adapters.
- Now that you have removed both graphics and camera drivers hit the Scan for hardware changes button.
The uninstalled drivers will come back and appear inside Device Manager. Launch Camera, and this time you won’t find it failing on some random error code.
3] Reset the Camera app
Resetting the camera app is the next good thing to try on Windows 11. When you reset the Camera app, this will purge all the unnecessarily stored cache on it. As a result of this, you might not encounter any random camera error while launching Webcam on Windows 11. Here’s how to perform this task –
- Press Win + X, and choose Installed apps/ Apps & Features.
- The system will now display a list of applications running or at least installed on your computer.
- Locate Camera, click the three dots available on its right end, and hit Advanced options.
- On the next screen, scroll down to the Reset section, and hit the Repair button. When you repair the Camera app, it doesn’t affect the old data stored on it. In case the error is still appearing, you should hit the Reset button.

Go and check if your Webcam starts functioning normally.
4] Check the Camera’s Privacy Settings
Webcam on Windows 11/10 works only when its privacy settings are configured properly. Go and check if all apps are set to use the Camera whenever the need arises. Here’s how you modify camera permissions and privacy settings –
- Use the Windows key and I to launch Settings.
- Select Privacy & Security on the left pane and head over to the right side.
- Scroll down to App permissions, and click on Camera.
- When this tab expands, enable the toggle switch next to – “let apps access your camera“. You may manually disable certain apps that you no longer use for video conferences or office meetings.

Now that you have allowed apps to access your Camera, check if you can launch the Camera app without getting into an error code 0xa00f4240.
5] Uninstall and then Reinstall Webcam
If none of the above fixes help you to overcome this Camera Error 0xa00f4240, and you have ensured of any physical damage to your Webcam, you should definitely reinstall the Camera application.
Windows 11 doesn’t provide an option to uninstall Webcam directly. So, you have to take the help of a command-line program and proceed with the uninstallation. Here’s what you need to perform on your Windows 11 PC –
- Press Win + X, and choose Terminal (Admin).
- The terminal will default open into Windows PowerShell having admin rights.
- Now, copy/paste the below cmdlet on it and press the Enter key.
Get-AppxPackage Microsoft.WindowsCamera | Remove-AppxPackage
- The above command will remove the Windows camera from your computer. To reinstall it back on your PC, execute this command –
Get-AppxPackage -allusers Microsoft.WindowsCamera | Foreach {Add-AppxPackage -DisableDevelopmentMode -Register “$($_.InstallLocation)\AppXManifest.xml”}
- Wait for a few seconds, and the Camera application reinstalls successfully on your Windows PC.
Do reboot your PC next so that the recent changes come into effect from the subsequent login. I hope you find this guide useful and easy to follow. Let’s know in the comment section if you are still struggling with this camera error code.
