It’s highly likely that you rely on the default Camera app in Windows as your primary means to view yourself. However, when you encounter an error 0xa00f4288 with the Camera app, this hinders accessing your webcam feed. This error code often accompanies an error message that reads the following –
Close other apps.
It looks like another app is using the Camera already.
If you need it, here’s the error code: 0xa00f4288 <AllCamerasAreReserved>

What causes Your Camera to stop working in Windows 11?
Windows Camera may stop working or display an error code due to different reasons. Here’s a list of all such issues that may prevent you from accessing your Webcam feed –
- Using a third-party faulty antivirus
- Some other apps are using the Camera
- Corrupted camera drivers
- Disabled required permissions for Windows Camera
Now that you know what possibly could trigger this error code in Windows, let’s learn the seven working fixes for it.
1] Restart your PC
Sometimes, a simple PC reboot resolves an ongoing error on your computer. This works when the error had appeared due to some internal glitches. Do it and check if you can access your Windows Camera normally.
2] Disable Antivirus
A third-party antivirus program running on your device may interact with the system files and make them corrupt. This may in turn cause Windows Camera to stop working. Disable the antivirus and check if this resolves the 0xa00f4288 error on your Windows PC.
3] Close other apps running in the background
If your camera app is already in use by some other app, you can’t use it on your desired app. For this to happen, you must close the application which is currently using your camera app.
Press Ctrl + Shift + Esc to launch Task Manager. Under the Apps category, locate the app that must be using the Camera app. When found, right-click on it and hit the option – End task. After you end a particular application from running, ensure that the same app doesn’t appear here inside the Task Manager.
Additionally, right-click on the not-in-use application and hit the button – End task. For example – Teams, Google Meet, etc. Hopefully, this resolves the camera error 0xa00f4288 on your PC.
4] Reinstall the Camera driver
At times, the problem lies within the camera itself or the drivers on which it operates. To fix this, you must uninstall the Camera driver first and then reinstall it on your computer.
Follow the below instructions on how to uninstall or reinstall a camera driver in Windows –
- Press Win + R to launch the Run dialog.
- Type “
devmgmt.msc” without quotes on it and hit OK. - Click the “>” sign next to Cameras and right-click on the device driver, available inside.
- When the context menu appears, select Uninstall device.

- Wait for a while and you will notice some changes on your desktop screen.
- Now, click the “Scan for hardware changes” icon and wait again.

- The Camera driver will reinstall automatically.
Try again to launch Webcam, the camera should work as intended.
Fix: Webcam Camera Error 0xA00F424F (0x80004001)
5] Troubleshoot Windows Camera
In case it is still throwing an error 0xa00f4288, try running the in-built troubleshooter for the Camera. This tool will look for the probable reasons causing it and address them. Here’s how to run this tool on Windows 11 –
- Press Win + I and select System.
- Go to Troubleshoot and then Other troubleshooters.
- When this expands, scroll down to Camera under the Other section, and hit the Run button.

- Follow the on-screen instructions to complete the remaining steps.
- Once this is over, close the troubleshooter and restart your PC.
I hope the problem resolves after the next login.
Note: If you are on Windows 10, you will find the troubleshooting setting by reaching out to the below path –
Settings (Win + I) > Update & Security > Troubleshoot > Additional troubleshooters
Locate the Camera option, and click on it. When this expands, hit Run the troubleshooter. The next steps are identical to that on Windows 11.
How to Fix Webcam Error 0xA00F4271 in Windows 10
6] Repair/Reset the Camera App
Another viable option to fix the error code 0xa00f4288 on Windows Camera is by either repairing or resetting it. You may find both these options under Advanced Options in Settings. The repair option keeps all your data intact while resetting will get rid of all stored information and default settings on the Camera app.
To repair or reset Windows Camera, do the following –
- Right-click on the Windows icon and select “Apps and Features“.
- On the upcoming screen, scroll down and locate the Camera app.
- When found, click the three vertical dots and choose – “Advanced options”.
- Scroll down again to the Reset section and hit the Repair button first.
- Check if the Camera app starts working normally. If not, hit the Reset button.

All your Camera data will be reset to its default settings. Restart your PC and hopefully, it should start working again.
7] Modify the required camera permissions
For Windows Camera to function properly, you need to comply with the requested permissions. If you had provided the permissions, however, remove them afterward, such errors may also occur. In order to fix this issue, you must check Camera permissions and allow them (if found disabled). Here’s how to recheck and permit the requested permissions –
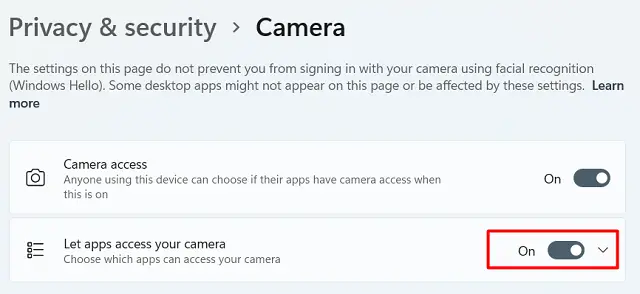
- Launch Settings (Win + I) and select Privacy & Security on the left pane.
- Head over to the right panel, scroll down, and click Camera under App permissions.
- Allow all the requested apps by sliding the main toggle switch to the right.
Restart your PC and check if you can now launch the Camera on Windows 11/10.
How to Fix “Another App is already using the Camera”?
If the camera is already in use, you need to first locate and close that app. You may press Ctrl + Shift + Esc to launch Task Manager. Under Apps, find the program that must be using your Camera. Right-click on that app, and hit the option – End task.
Now, that you have closed the application, you may restart the program on which you would like to start the camera.


