Some of you have recently reported Webcam Camera Error 0xA00F424F (and sometimes 0x80004001) while trying to take pictures with an integrated webcam. Sometimes the Camera app refuses to take any photos, but when you try to take another one, it prompts the error code. In that case, users have to restart the Camera app so that they could take another photo which is actually quite annoying.

However, this issue will not impact your PC’s performance and it won’t affect other applications as well. It comes with an error message that says:
Something went wrong
Sorry, we weren't able to save the photo.
If you need it, here's the error code: 0xA00F424F(0x803131500)
Fix Webcam Camera Error 0xA00F424F (0x80004001)
To fix the Webcam Camera Error 0xA00F424F (0x80004001), follow the steps:
1] Update All your drivers
The error 0xA00F424F mostly occurs due to driver issues on your computer. When you search for optional updates on Windows Update, this might not show any pending updates.
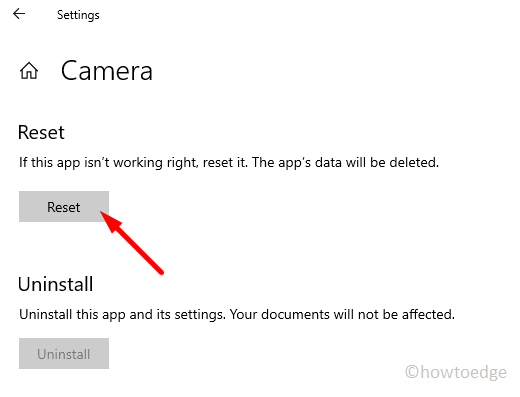
2] Reset the Camera app to fix Error 0xA00F424F
To fix this problem, you might want to reset your Camera app. Resetting the Camera app will also reset each item to default, so make sure it has not changed any settings within the app.
Windows 11:
- Go to Settings (Win + I), and select
Apps > Apps & features. - Scroll down and locate the Camera app.
- Click the three vertical dots available on its right end and select Advanced options.
- On the upcoming screen, come down to the Reset section and hit the Reset button.

Note: You may try the Repair button first as well. Using this option will preserve all your camera-related data. In case, this doesn’t work, go for the Reset button.
- Wait for the Camera to reset and restart your PC.
Sign back into your device again and check if you can access your Windows Camera normally.
Windows 10:
- Right-click on the Start button and select Apps and Features from the user power menu.
- On the right side, scroll and search for the Camera app.
- Once you find it, select it and then click on the Advanced options.
- Scroll until you find the Reset section.
- Click on the Reset button to delete the app’s data and other sign-in details.
- When the pop-up menu appears, click on the Reset button to confirm it.
3] Update your Camera drivers
If your problem is still continuing then there might be some issues with the Camera drivers or the app itself. In that case, try updating or reinstalling your camera drivers and see if it helps.
- Open the Run dialog box using the Windows+R shortcut keys.
- Type
devmgmt.mscin the text box and press enter. - In the Device Manager window, right-click on your Camera driver and select the Update Driver option.
- If you want to locate and install the driver manually, then select the Browse my computer for drivers option.
- Then click on the link saying Let me pick from a list of device drivers on my computer.
- On the next page, make sure the Show compatible hardware option is checked. If not then check it.

- Inside the box area, select USB Video Device and click Next to start updating the camera drivers.
- Once done, close the window and restart your computer.
4] Reinstall the Camera driver
If the above method didn’t work and still facing the same problem, you can try to reinstall your Camera driver and try again. To do this, follow the below steps:
- Right-click on the Start button and select Device Manager.
- On the next page, right-click on your camera driver and select Uninstall device.

- Once you uninstall the driver, restart your computer and open the Device Manager again.
- Go to the Action tab and select Scan for hardware changes.

- Your device should now identify the missing drivers and download its latest version automatically. Everything should work properly now.
5] Change Folder Permissions to fix Error 0xA00F424F (0x80004001)
Next, you can try to modify the permissions of your Camera Roll folder. When you use the Camera app to take photographs, it saves those images in a folder labeled Camera Roll (inside the Pictures library). In order to save the images, you should give it full control. Here is how you can do it:
- Open File Explorer by pressing the Windows + E keys.
- On the left-side navigation pane, locate and right-click on the Camera Roll folder.
- Select Give access to > Specific people.
- In the text field, type your name and click on the Add button.
- After changing the permission for your Camera Roll folder, follow the same steps, and change permissions for the Pictures folder and Videos folder as well.
How do I fix my camera on Windows PC?
If Windows Camera is not working on your computer for any reason, you should first uninstall it by opening the Device Manager. After then, hit the Scan for hardware change button, and let the system automatically reinstall the removed driver. Mostly, this alone method will suffice to resolve camera-related issues on Windows PC.


