There are several programs in Windows 10 that use the camera app to take snaps, pictures, or even videos. Some users recently reported encountering an error 0xA00F4243, the Camera not working when they were trying to launch the default Webcam on their devices.
This happens mostly due to the presence of corrupt software/driver and third-party UWP apps having the access to Webcam. Running Windows Store Troubleshooter is an effective way to let go of this problem.
However, if the issue persists, one may try resetting the camera app, reinstalling the display adapter, or disabling and then enabling the core services. Sometimes, merely disabling the camera access to third-party apps may also resolve this issue.
Ways to Fix Webcam Error 0xA00F4243 in Windows
Try out the below solutions one after another and check if any of these resolve the issue that you are struggling with.
1. Run Windows Store Apps Troubleshooter
The first tool to resolve such errors is by initiating the Windows Store Apps Troubleshooter. This is an in-built tool by Microsoft that finds and resolves the underlying causes behind this bug. Here’s how to use this utility program –
Windows 10:
- Launch the Settings app using Win + I shortcut key.
- Select Update & Security thereafter Troubleshoot on the left column.
- On its adjacent right, scroll down and hit Windows Store Apps.
- Now, click “Run the Troubleshooter” to start assessing the reasons behind error 0xA00F4243.
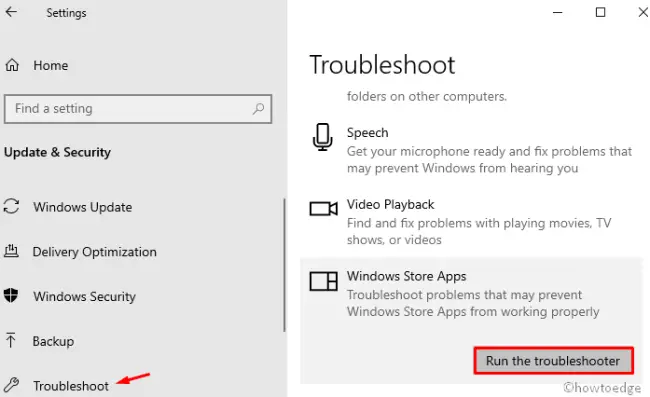
- Next, follow the on-screen instructions and wait for this to complete scanning.
- Lastly, restart the PC to save the changes performed so far.
Note: Usually, this solves different error types. However, if the error remains, follow the next method.
Windows 11:
Windows 11 users may navigate to the below path on their device and then hit the Run button. Wait for this tool to detect and resolve the underlying causes.
Settings > System > Troubleshoot > Other troubleshooters > Windows Store Apps

Hopefully, this method alone resolves the error 0xA00F4243 on your Windows PC.
2. Reset the Camera App
Resetting the Camera app when it is not working is always a nice workaround. Follow the below steps to reset the Camera App –
Windows 10:
- Right-click on the Window icon and select Settings.
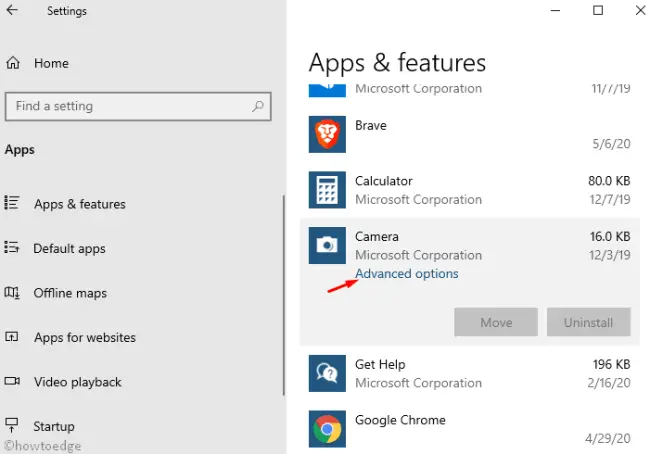
- Select Apps thereafter Apps & features. Move to the right side, scroll down, and click Camera.
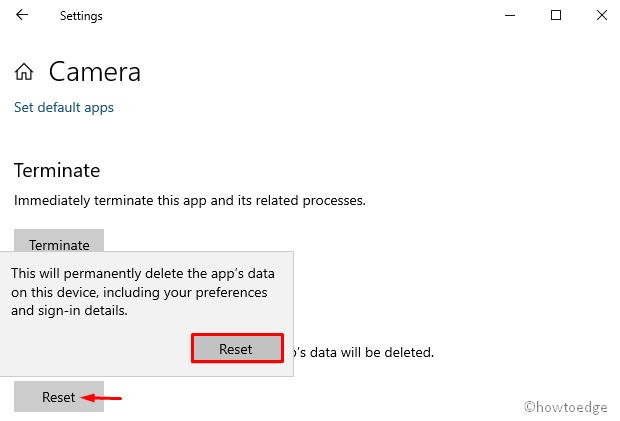
- Hit Advanced options, thereafter Reset on the succeeding screen.
- If any Confirmation window appears, click Reset again.
- Lastly, Reboot your PC and try connecting to the camera again.
Windows 11:
If you are facing this error code in Windows, go to Settings > Apps > Installed apps, and scroll down to Camera. Once found, click the three dots on its right end, and select Advanced options.
When this section expands, hit the Reset button under the Reset section.

Wait for the Camera app to reset and when it’s done, check if you can use your camera without getting into the same error code 0xA00F4243 again.
3. Uninstall/Reinstall the Camera driver
In case you have recently updated the related driver, this might also lead to the camera error 0xA00F4243. If this indeed is the case, upgrade the same to its next version or roll back the driver to its previous installation. To do so, use the following steps –
- Hold the Win key and press R to launch the Run dialog.
- In the text box, type devmgmt.msc and hit the OK button.
- Reach out to the Camera section, expand it, and right-click on the available driver.
- Select Properties using the context menu.
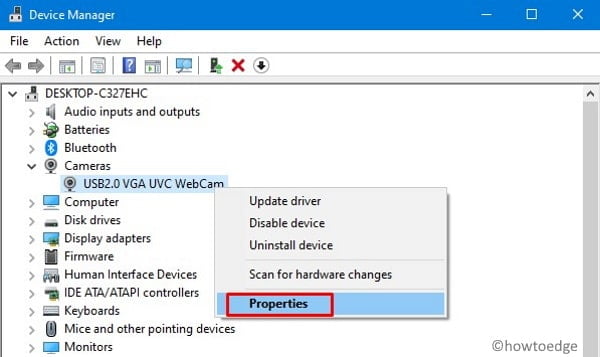
- Head over to the Driver tab and click Rollback driver.
- Hit OK again to save the recent changes and Restart your PC.
Note: If you are trying to remove this driver, right-click on it, and select Uninstall from the context menu. Once it is removed, visit this universal program from the official website.
4. Restart the core camera services
If somehow the core camera services are disabled, this may result in the “Camera not working” error 0xA00F4243. To overcome this issue then, check the running status of the essential ones by following these easy steps –
- Press Win + S, type Services, and click on the well-matching result.
- Now, locate and click the Intel(R) RealSense(TM) Depth.
- Go to the Startup Type and change this one to Automatic.
- Ensure the service status reads Running. If otherwise, hit Start to enable the same.
- Click Apply then OK to implement the above changes.
- Finally, Reboot the device and check whether the Camera app error 0xA00F4243 resolves or not. If not, try the next solution –
5. Scan/Repair corrupt system files using SFC
A random power fluctuation, if occurs, may corrupt the important system files. If you recently face such instances, use the SFC utility to scan and repair the damaged/missing core files. Here are the steps to work upon –
- Press “Window Key and S” together to launch Windows Search.
- Type Command Prompt in the text bar, right-click on the top result, and select Run as Administrator.
- If prompted by the UAC window, click Yes to proceed ahead.
- Now, type
sfc/scannownear the blinking cursor and hit Enter to start the scanning/repairing process.
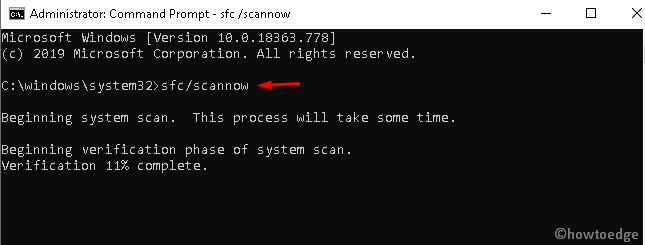
- This takes a few minutes to find and correct corrupt files, so wait accordingly.
I hope the camera starts functioning normally after the scan completes.
6. Disable third-party Apps that Utilize the Webcam
If you have allowed several programs to access the camera, preventing them might help to resolve this camera error 0xA00F4243. Here’s what you need to do to stop access to the Webcam for different systems or third-party apps.
- Type Camera in the search bar and click Camera privacy settings.
- This will redirect you to the Settings page. On the right pane, turn on the toggle switch under “Allow apps to access your camera“.
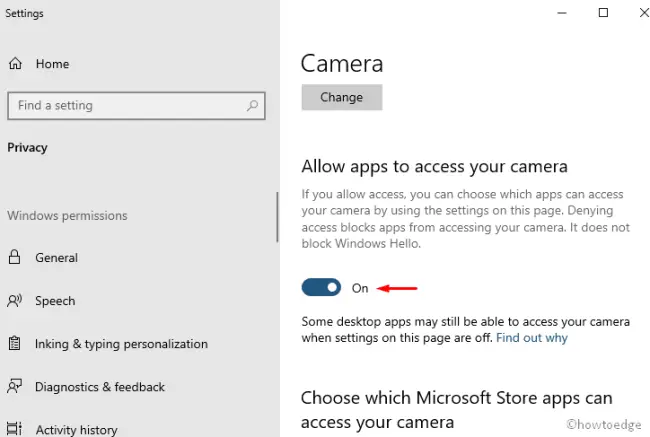
- Scroll down and disable all the switches except for the Camera.
7. Fix this issue using the Registry
In case the above fixes fail to resolve this bug, use the registry to enable certain Camera frames. Here’s how to perform this task –
Warning: Any incorrect changes under the registry may corrupt different apps or even the operating system. Hence, we recommend creating a registry backup in case something went wrong.
- Right-click on the WinKey and select Run.
- Type
regeditat the void and press Enter so as to start the Registry Editor. - When the UAC window comes into view, tap Yes.
- Next, browse to the below address –
Computer\HKEY_LOCAL_MACHINE\SOFTWARE\WOW6432Node\Microsoft\
WindowsMediaFoundation\Platform
- Right-click anywhere and choose New > DWORD (32-bit) and rename this to EnableFrameServerMode.
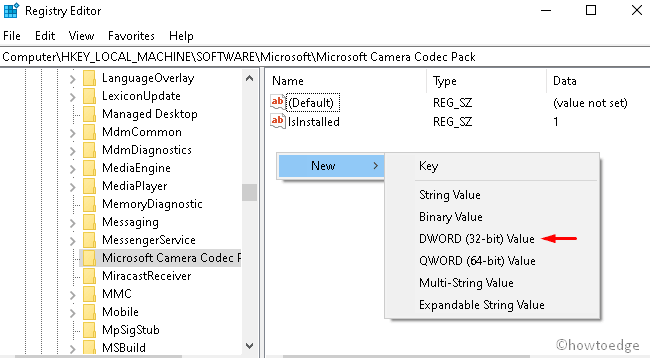
- Subsequently, open this entry and put “0” under its value data field.
- Click OK and Restart the computer so as to make the changes effective.
That’s it, I hope this article helps to resolve the Camera not working issue on Windows 11/10.


