Windows users run DISM to find and fix any corruption within their system. What if initiating DISM itself gets into an error code 0x800f082f? Well, in this post we have covered the reasons why this error occurs and six solutions that should resolve this issue on Windows 11/10.

What is Error 0x800F082F?
0x800F082F is a DISM error and it appears when you are running DISM Scan/Repair command in Command Prompt. Users attempt running these codes when they are struggling with some Update or Blue Screen Errors on their PCs.
The repetitive occurrence of this error code simply means that you may no longer use the DISM utility program. And, you need to repair its core function. In this guide, we will learn how to repair DISM effectively on Windows 11/10 PCs.
How to Use DISM Restore and Repair Windows Image
What causes DISM Error 0x800F082F in Windows
As stated above, this error occurs when using the DISM tool on Windows 11/10 PC. The prime reasons on account of which this error code appears are as follows –
- Windows app conflicts: If you have added or updated some program, that might not get along with DISM and thus result in an error code.
- Driver Issues: All device adapters must remain up to date to avoid getting into some DISM Error in Windows.
- Lack of permissions: If you’re attempting DISM in CMD without having admin rights, this may get into an error code 0x800F082F, causing DISM to fail.
- Windows system file troubles: Important system files being damaged or corrupted may also result in a similar error code. This may also occur when your device is missing some important files related to DISM.
Now that you know what possibly could cause this error code, let’s learn how to resolve it on Windows 11/10 PC.
Fix – DISM Error 0x800f081f – 1910, 1726, 1393, 112, 87, 50, 11, 3, 2
Fix Dism Remove Package Error 0x800f082f in Windows
Here are a few solutions to try when you’re facing a DISM error in Windows. Make sure to attempt the fixes in the same order as they were put in.
1. Check your internet connection
Before you apply any fix, it is essential to check if you are connected to a stable network. Not being connected to high-speed internet may also cause DISM to fail on arbitrary error codes.
Restart your router, or unplug/replug the Ethernet wire back into your computer and check if you are receiving proper network signals. If none of these helps, you may reset your network settings on contact your Internet Service Provider.
2. Update Everything
The second important thing to note down is that your device must remain updated to initiate DISM codes on it. In case there are any pending updates, you better download and upgrade to the latest OS Build version.
This also includes updating all device drivers, and optional updates including firmware updates. Do so and check if the 0x800f082f error resolves afterward.
3. Run System File Checker
Another important tool for fixing DISM is by running the System File Checker. This is also an in-built tool in Windows, however, it works to resolve missing files inside the System32 folder.
- Open Command Prompt as administrator, and copy/paste the below code on it.
sfc /scannow

- Press Enter and wait for the next 10-15 minutes while SFC is running on your PC.
After this command reaches 100%, check if you can run the DISM command as before. If not, try out the next set of fixes discussed below.
4. Run Command Prompt as Administrator
It is imperative to start Command Prompt as administrator before you initiate any DISM command on it. Not doing so might cause DISM to fail on some error codes including 0x800f082f.
Follow these instructions on how to initiate DISM code effectively on Windows PC –
- Press Windows + R to launch the Run dialog.
- Type CMD and press Ctrl + Shift + Enter keys altogether.

- When the UAC window prompts, hit Yes to authorize opening Command Prompt as admin.
Now that you have opened CMD as an administrator, check if you can run the DISM command successfully on the same prompt.
5. Configure the SessionsPending Registry Entry
There’s an entry inside the Registry Editor responsible for the incorrect working of DISM in Windows. If none of the above fixes help, you may configure this entry named “SessionsPending“. Here’s how to proceed ahead –
- Press the Windows button + R.
- In the Run dialog box, type “regedit” without quotes and hit OK.
- When the User Account Control prompt appears, click Yes.
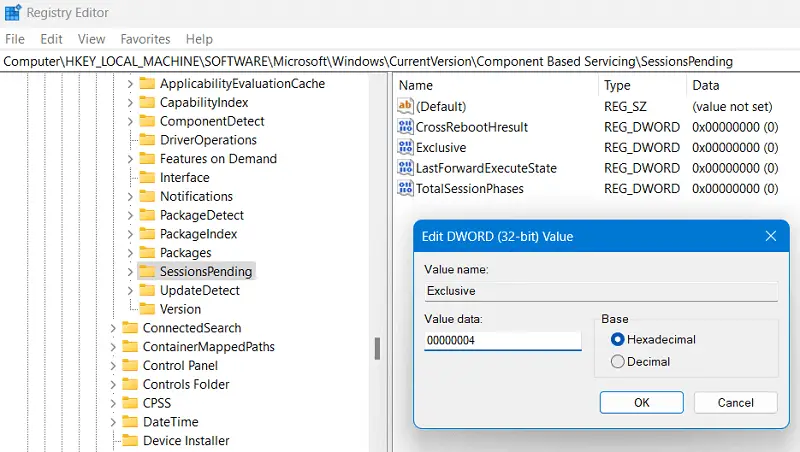
- Next, navigate to the below path inside the registry –
HKEY_LOCAL_MACHINE\SOFTWARE\Microsoft\Windows\CurrentVersion\Component Based Servicing\SessionsPending
- Head over to its right side and locate Exclusive. When found, double-click on it.
- On its properties window, change the Value data field from 00000000 to 00000004.

- Click OK to confirm the above changes.
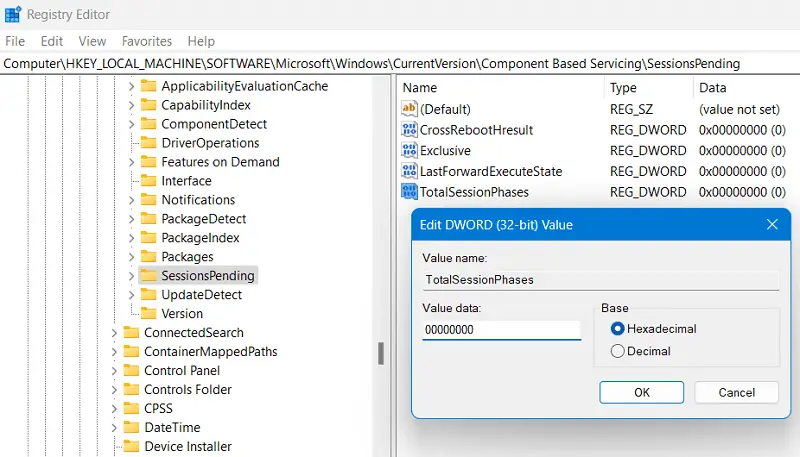
- Next, double-click on TotalSessionPhases to open its properties window.
- Change its Value data field from 00000001 to 00000000. Click OK again to confirm this change.

Close the registry window and restart your PC. Hopefully, from the next login, you will be able to run DISM without any further issues.
6. Boot into Safe Mode and Repair Component Store
If the above method fails as well, this error code 0x800F082F is beyond repair in normal boot. This is because some third-party apps might be preventing DISM from functioning well. In such cases, what you may do is boot into Safe Mode with networking, and run DISM code there.
Assuming you did boot into Safe Mode, open Command Prompt and run the following code on it.
dism.exe /online /Cleanup-Image /StartComponentCleanup
Wait for this code to run successfully. And, after it reaches 100%, run the SFC command next. The code you need to run is as follows –
sfc /scannow
After you execute both these codes successfully on the elevated console, close CMD, and restart your computer. You may now check if the error code 0x800F082F resolves this way.
How to repair Corrupt Windows 11’s Image using DISM?
After you have repaired the DISM tool in Windows 11, you may use this tool to remove any file corruption within your system image. Here’s how –
- Press Windows + S, and search for Command Prompt.
- Right-click on the top result, and select Run as administrator.
- On the elevated console, you may now run the DISM Scan, or Restore health commands as follows –
DISM /Online /Cleanup-Image /ScanHealth
DISM /Online /Cleanup-Image /RestoreHealth

Close CMD and check if the DISM command runs successfully on your Windows 11 PC.


