Several users complained of getting an error code 0x800F0950 when they were trying to install the latest .NET Framework 3.5 or 4.8 on their PCs. There are different reasons that may trigger this issue on Windows 11 or 10 PC. A few of them include – pending Windows updates, corrupted framework files, or disabled appropriate .NET Framework.
What happens when you encounter Error 0x800F0950?
Upon occurring, this issue will throw an error message that resembles the following –
The following feature couldn’t be installed:
.NET Framework 3.5 (includes .NET 2.0 and 3.0)
The changes couldn’t be completed. Please reboot your computer and try again. Error code: 0x800F0950
Now that you know when this problem occurs and what happens next, let’s explore how to solve it on Windows 11/10.
Fix .NET Framework Installation Error 0x800F0950
Here’s how you can solve this installation issue in Windows 11 or 10 PC –
1] Check for Pending updates
Most of the time, errors like this occur simply because your system is lacking some recent patches. Microsoft regularly releases new updates through Windows updates and uploads its standalone package on its Update Catalog site.
If you do know the missing update KB number, you may get it from Microsoft’s Update Catalog. Else, simply navigate to the path below, and hit the option – Check for updates.
Win 10: Settings (Win + I) > Update & Security > Check for updates
Win 11: Settings (Win +I) > Windows update > Check for updates

The system will connect to Microsoft’s servers automatically and download the pending updates from there.
2] Run the .NET Framework Repair Tool
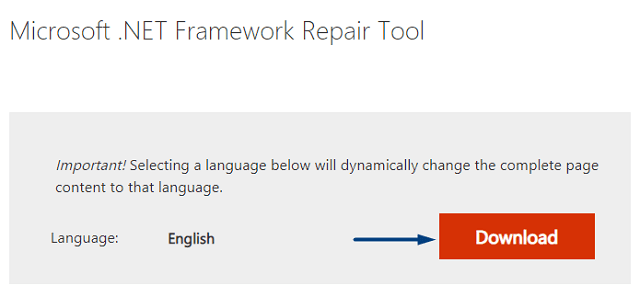
.NET Framework Repair Tool is an official tool by Microsoft and is developed to address all such issues including error code 0x800F0950. Running this tool will automatically look for the possible causes and try to fix them. Here’s how you can download and use this tool.
- Get the .NET Framework Repair tool first.
- Install it after the download completes by double-clicking over its icon.
- Run this tool having administrative privileges (right-click over it and choose the option – Run as Administrator).
- Follow the on-screen instructions next to repair the .NET Framework on your PC.
3] Enable .NET Framework Using DISM Command
If the above tool fails to recognize this issue, you may try to install the .NET Framework using installation media. Make sure to make this media bootable before you can run it via DISM. Here are the essential steps to work on –
- First of all, insert the USB containing the ISO file into one of your system ports.
- Note down the drive letter that contains this installation media.
- Launch CMD as administrator next. When the UAC window prompts, hit Yes.
- On the elevated console, copy/paste the following code, and press Enter –
Dism /online /enable-feature /featurename:NetFX3 /All /Source:E:\sources\sxs /LimitAccess
Note: The disk drive that contains the installation media is “E:” in our case. If this varies in your computer, replace the “E:” letter with the appropriate one.
- After you press the Enter key, the DISM tool starts running immediately afterward.
- Restart your PC next and see if this indeed resolves the issue that you were struggling with.
4] Manually install .NET Framework 3.5 or 4.8
In cases where even DISM fails to install the latest .NET Framework, you may install it via Windows features. Here’s how you can use Windows features to install the newer version of this framework –
- Press Win + R to launch the Run dialog.
- Type “
appwiz.cpl” in the text field, and hit OK. - The system will redirect you to the Programs & Features window inside the Control Panel.
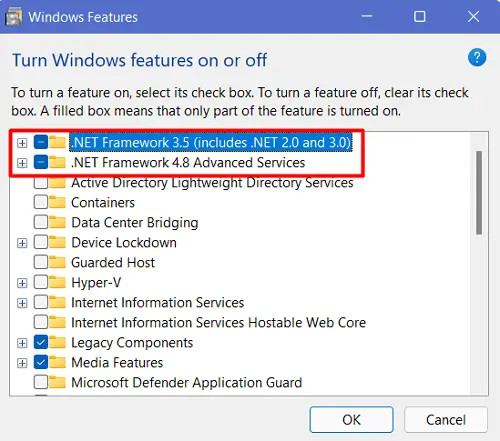
- On the left pane, you will find an option to “Turn Windows features on or off”.
- Click on it, and mark the checkbox – “.NET Framework 3.5”. Check this box only if you are still using Windows 10. In case you are on an advanced OS version i.e. Windows 11, tick the checkbox – “.NET Framework 4.8 Advanced Services”.
- Click OK and let the system search for any pending updates. If this search prompts you to download any update via Windows Update, select that option.
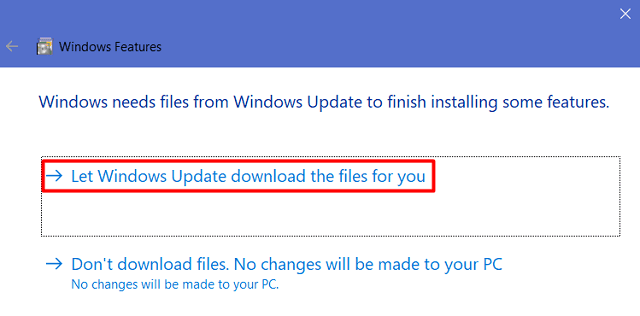
- The system will immediately start downloading the required files.
- When you receive the message – “Windows completed the requested changes”, hit Close.
Restart your PC next and check if this resolves the issue that you were dealing with.
How to install .NET Framework in Windows 11/10?
Installing .NET Framework 3.5 or 4.8 is quite easy in the Windows operating system. You may perform this task by visiting the official DotNET site and getting the installer from here.
Alternatively, you may also visit the official page for .NET Framework, and get the installer from here. After you have downloaded the installer, double-click on the executable file to begin its installation.
5] Create a Custom Script and run it via CMD
In case you are getting the error 0x800F0950 even after manually installing the respective .NET Framework, you may create a custom script and run it via Command Prompt. Here’s how to perform this task –
- First of all, download Windows 11 or 10 ISO (whichever is applicable in your case), and make it bootable.
- Right-click anywhere on the Desktop next and select New > Text Document.
- When the Notepad launches, copy/paste the following inside it –
@echo off
Title .NET Framework 3.5 Offline Installer
for %%I in (D E F G H I J K L M N O P Q R S T U V W X Y Z) do if exist "%%I:\\sources\install.wim" set setupdrv=%%I
if defined setupdrv (
echo Found drive %setupdrv%
echo Installing .NET Framework 3.5...
Dism /online /enable-feature /featurename:NetFX3 /All /Source:E:\sources\sxs /LimitAccess
echo.
echo .NET Framework 3.5 should be installed
echo.
) else (
echo No installation media found!
echo Insert DVD or USB flash drive and run this file once again.
echo.
)
pause
- In the DISM code line, the “E:” letter signifies the drive letter where the installation media resides. In case, it differs on your device, replace it with the appropriate one.
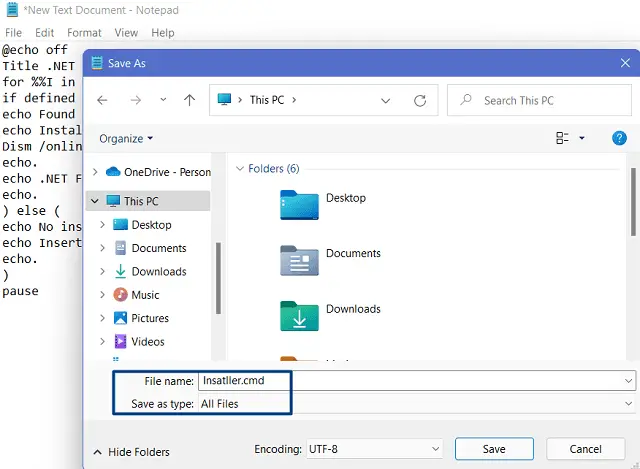
- Go to File on the notepad and select the option – Save as.
- Make sure to choose “All files” under “Save as type”, and put “
installer.cmd” under the File name.
- After you save this file, right-click on it, and choose the option – Run as administrator.
- When this script runs successfully, reboot your PC.
I hope the error 0x800F0950 has been resolved by now.
6] Repair Windows Operating System
If the error 0x800F0950 persists even after applying the above fixes, your operating system must have become corrupt. In such cases, what you can do is download a Windows installation media and use it to repair your corrupted OS.
I hope you find this article useful and have successfully resolved the .NET Framework issue on your Windows PC.


