Network Discovery not Working issue is one of the nagging bugs that arise after installing the latest Windows 10 updates. In general, we connect with Networking so as to share data across different IP addresses. However if the PC doesn’t connect for whatsoever reasons, it may hamper its smooth sharing attribute. Anyways, here we analyze the possible culprits behind this at the same time explore ways to fix encounter this bug.
After installing updates, certain services like SMB 1.0 (CIFS File Sharing Support) attribute might get blocked. This can account to be the main reason behind Network Discovery, not the Working problem. Disabled Network Discovery is on Windows Defender Firewall is again another possibility. As a workaround, you should permit all these utilities to default or as per the requirements of Network discovery. At last, incorporating a Network reset may regain its lost functionality.
RECENT GUIDE: How to edit quick action toggle in Windows 10 version 1903
- Set Certain Services to Auto-start
- Activate SMB 1.0/CIFS File Sharing Support feature
- Enable Network Discovery option in Windows Defender Firewall
- Reset Network Connection
Network Discovery not Working on Windows 10 Solution
Let’s explore all the possible workarounds to fix Network Discovery not Working issues on Windows 10.
1. Set Certain Services to Auto-start
Network Discovery relies on a few services installed on your system. Sometimes up-gradation of Windows may change the important status of these services, as result problems occur. If you are tackling such errors, try to set their specific settings to auto. Here are steps to follow-
- Jointly press Win & R shortcut key to the open Run utility.
- In the text box, type services.msc and click OK. This will launch the Services window.
- Here, locate below services among the installed listed tools-
-
-
DNS Client -
Function Discovery Resource Publication -
SSDP Discovery -
UPnP Device Host
-
Once you find these services, right-click on each one and choose Properties on the context menu.
- Under the General tab on the next window, tap the Stop button to de-activated its running status.
- In case the services are already stopped, leave it and check other’s status.
- Now switch to the Startup type drop-down menu and select Automatic.

- Henceforth, tap the Start button to re-generate the running status.
- Now hit the OK button to confirm these changes.
Repeat this procedure for all of the above services and set Start its running status to fix the problem.
- Next move to the Log On tab on the same page then press Browse… button.

- Under Enter the object name to select the entry box. Write the specified account name subsequently do the click on the Check Names button. This is to locate the names, if available.
- After that click OK to confirm these changes.
- Succeeding after the jump to the Password box and set the unique entry passcode to secure these changes.
Finally, Restart your system and work without receiving Network Discovery not a Working issue.
2. Activate SMB 1.0/CIFS File Sharing Support feature
If the Network Discovery still fails to work, the recent upgrade of Windows 10 might have blocked SMB1.0 services. If that’s the case, this may result in such an annoying bug. SMB is fully responsible for File Sharing Support feature on your device. Luckily, it is quite easy to enable this utility by following these quick steps-
Step-1: Simultaneously press Windows and R hotkey to launch Run dialog. Type control.exe in the text box then press Enter to begin Control Panel.
Step-2: On the new window, change View by: to sort by Category henceforth hit Program option.
Step-3: Now select Uninstall a programming tool under Program & features section.
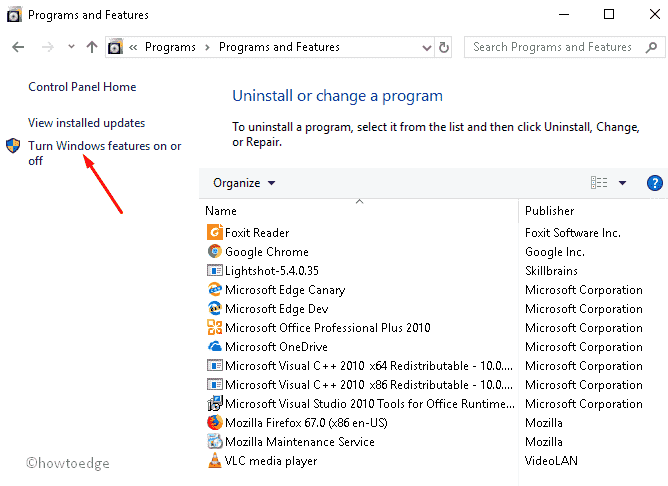
Step-4: Move to the left column on the next screen and hit Turn Windows features on or off thereafter wait till a new wizard pops-up.

Step-5: Again, on the next page, scroll the cursor downward and locate SMB 1.0/CIFS File Sharing Support option.
Step-6: Once found, tick the checkbox SMB 1.0/CIFS File Sharing Support and hit OK to confirm the changes.

At last, reboot your PC and see the if Network Discovery issue has solved or not. If not, try next workarounds.
3. Enable Network Discovery option in Windows Defender Firewall
Disabled Network Discovery may also arise with this bug. Hence, you must reset the Windows firewall and permit the Network Discovery tool to solve the problem. In order to perform this, follow the below steps-
At first, click on Start icon and type Command Prompt in the text area. Right-click on identical results and select Run as administrator from the shortcut menu.
If the UAC prompt appears up, select Yes to grant permission.
Now copy/paste the following code followed by Enter key to begin the process.
netsh advfirewall firewall set rule group="Network Discovery" new enable=Yes

Hold-up until you receive Operation completed successfully message.
When finished, Reboot your system and check whether the Network Discovery, not Working issue has solved or not.
4. Reset Network Connection
If Network Connection trouble still persists, you should reset this option under Network & Internet section. This will re-install the network drivers thus manage the bug. Here is the procedure to reset Network-
- Make a Right-click on Windows icon and select Settings from the power menu.
- When the Settings page comes across, hit Network & Internet afterward Status from the left category.
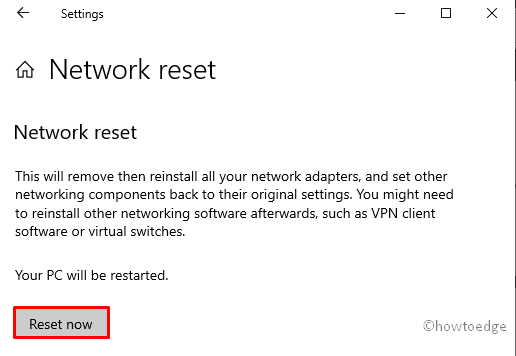
- Henceforth, switch to the right-hand side, scroll down the cursor and tap Network reset link.
- Succeeding that, hit Reset now button then go through onscreen instructions to finish the whole task.

At last, Restart again your system. Hope this time, you no longer receive Network discovery related issue.


