Several users report encountering an error 0x81000203 while creating or using system restore backups on Windows 11/10. We have searched for what causes this issue and found that users end up getting this bug only when they meet the following conditions –
- After installing or already using the TuneUp app
- Disabled Shadow copy services
- Or, when the Windows repository becomes corrupted
To get rid of the system restore error 0x81000203, use the workarounds – uninstall the conflicting third-party apps, enable the shadow copy services. Resetting the Windows repository after booting into the safe mode may also fix this bug. If the issue persists even after this, use Group Policy/Registry to disable then re-enable System Restore. Let’s explore the solutions –

System Restore Error 0x81000203 Solutions
To solve the System Restore Error 0x81000203 on Windows 11/10, try the following fixes –
1] Uninstall conflicting third-party apps
The presence of third-party apps like TuneUp utilities may corrupt the system restore causing 0x81000203 error. To solve this bug, you must uninstall such apps using the below steps –
Note: If you haven’t installed the TuneUp application, skip this method and scroll down to the next solution.
- Start the Run command (Win+R), type “
appwiz.cpl“, and press Enter. - Locate the TuneUp application among the list of third-party apps. Once found, right-click on the same and select Uninstall option.
- Make sure to restart your PC so as to delete any leftover files.
If you don’t want to remove the TuneUp application, you may turn off the Turbo Mode and check whether this solves the issue or not. If the issue prevails even after disabling the Turbo Mode, you have to remove this program.
Here’s how to disable the Turbo Mode –
- Type services in the Windows Search UI and click the top result.
- When this desktop app launches, locate and click the “TuneUp Utilities Start Center”.
- On the next screen, you see two options under the optimization tool – “Economy” or “Standard”.
- Click the settings icon next to the Turbo and disable the same.
2] Turn On the Shadow Copy Service
If you have disabled certain Shadow Copy services in the past, this may result in the system restore error 0x81000203. So, check whether this is running or not on your computer. If not, follow the below procedure to enable this service –
- Jointly press Win + R to start Run, type “
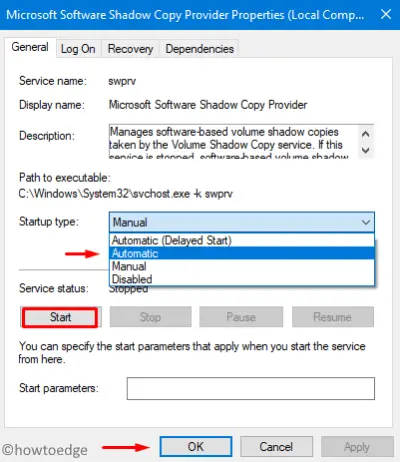
services.msc“, and press Enter. - When the Services window comes into view, locate and click “Microsoft Software Shadow Copy Provider“.

- On the succeeding screen, change its startup type to “Automatic” and hit the Start button. The service status must display “Running”.

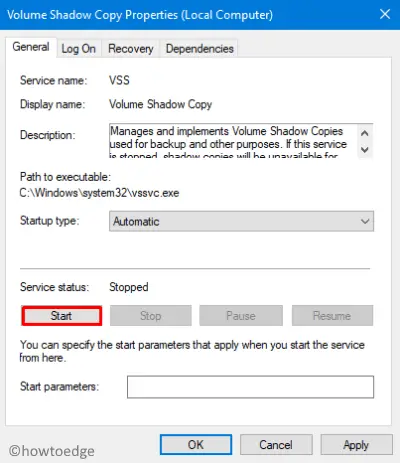
- Go back to the services window and start the “Volume Shadow Copy” service as well.

Now, as you have enabled the above two shadow copy services, check whether the System protection is enabled or not for the C:/ drive. Use the below steps to check and activate this setting –
- Launch the Control Panel and reach out to the following path –
Control Panel > System & Security > System > System Protection
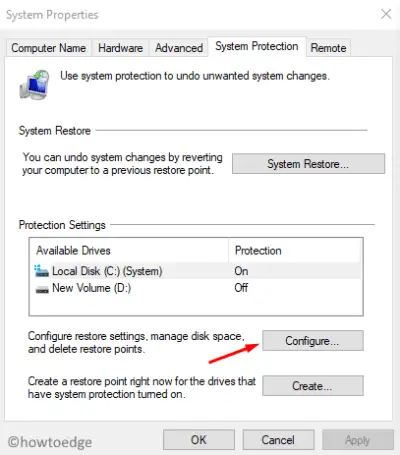
- On the system properties window, you can see the Protection status for the available drives.

- If not, hit the Configure button and check the radio button left to “Turn on System Protection”.

- Click OK then OK again to save the recent changes. Do Restart your PC so that changes performed come into effect.
3] Reset the Windows Repository
If the error 0x81000203 still occurs while using System Restore, reset the Windows Repository using the below steps –
- At first, boot into the safe mode and choose to start Command Prompt.
- Execute the below code to stop Windows Management Instrumentation service –
net stop winmgmt
- Next, browse to the location C:\Windows\System32\Wbem on the console and rename the repository to repository-old.
- Reboot your PC to save the above changes. After the next login, re-open the command prompt as Admin and run the following codes –
net stop winmgmt
winmgmt /resetRepository
- Restart your computer again, you should now be able to create a system restore manually.
4] Turn Off then On System Restore via the Group Policy Editor
Since this is a system restore-related issue, disabling then re-enabling this default program may resolve the error 0x81000203.
Note: This method is applicable only to Windows 11 or 10 Enterprise/Pro and Education users. Windows 10 Home users may skip this method and tweak the registry instead.
- Jointly press WinKey+R to start the Run dialog.
- Type “
gpedit.msc” at the text field and press Enter to start Group Policy Editor. - Now, browse to the following location –
Computer Configuration > Administrative Template > System >
- After reaching the above location, double-click the System Restore.
- On the succeeding screen, click “Turn off System Restore” thereafter “Not Configured”.
- Do Restart your PC so as to implement the above changes.
5] Disable then Enable System Restore using the Registry
The Group Policy Editor is not available for Windows 10 Home Users. Hence, they can’t perform the above workaround. However, such users may use the registry to apply a few tweaks that fix the system restore error 0x81000203. Here’s how to accomplish this task –
- Make a right-click on the Win icon and select Run.
- Type
regeditin the text field and press Enter to invoke the Registry Editor. - When the UAC window appears, tap Yes to move ahead.
- Now, navigate to the following address –
HKEY_LOCAL_MACHINE\SOFTWARE\Policies\Microsoft\Windows NT
- Check whether this folder contains a sub-entry named “SystemRestore” or not. If not, you may create such entry following the below course of actions –
Right-click on Windows NT > Select New > Key > Rename this to SystemRestore
- Now, search for a DWORD entry with the name “DisableConfig”. If not there, follow the below sequence –
Right-click anywhere and select New > DWORD (32-bit) value > Rename this to DisableConfig
- Double-click on this entry and put “1” instead of “0” at its value data. Doing so will block the System Restore.

- Lastly, Restart your PC so as to make the changes effective from the next logon.
Note: To re-enable the System Restore on your computer, change the value data back to “1”.
That’s it, I hope the above article resolves the System Restore error 0x81000203 on Windows 11/10. If you have any queries or suggestions, let us know in the comment box.


