Microsoft officially announced Windows 11 on 24th June MSbuildEvent 2021. With this, users across the globe are all excited and hyped to install this new operating system on their devices. However, many users are getting an error message when they try installing the new OS like – “This PC Can’t Run Windows 11”.
Well, this bug occurs because your device doesn’t meet the minimum system requirements laid down by Microsoft. This time, you must ensure two things on your device and they are “Secure Boot” and “TPM 2.0”. Though Secure boot is enabled in older PCs, the same is not the case for TPM. So, in order to successfully upgrade Windows 10, you must check if your device supports these two conditions.
How to solve This PC Can’t run Windows 11
If you are not able to install Windows 11 due to TPM issues, do the following –
1] Check if your device can install Windows OS as UEFI
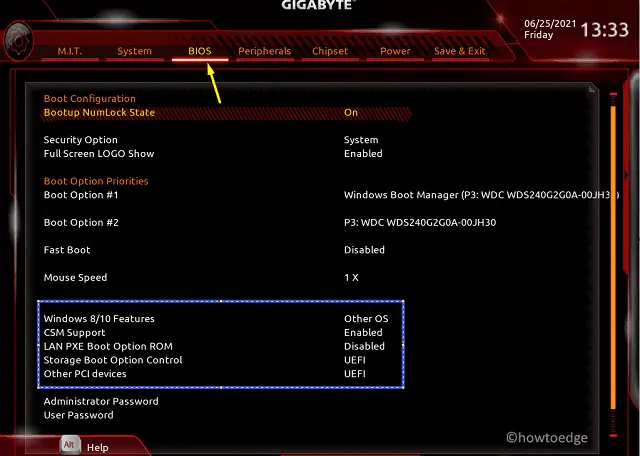
To install Windows 11, your PC must support installing Windows OS as UEFI (GPT). Go and check if your device supports this feature inside the BIOS. Here’s how to find and modify this setting –
- Restart your PC and when it’s loading, press the boot key.
- The boot key may vary from one device to another. For instance, press Esc on ASUS, f9 on HP, and f10 on Dell computers.
- Once you are inside the BIOS, check the current status of the following and see if you can change them to UEFI.
- Storage Boot Option Control
- Other PCI devices

Note: The above snapshot is taken for Gigabyte Processor. In case the processor differs in your case, visit your PC manufacturer’s official site and learn the right way to check your boot record.
2] Enable Trusted Platform Module (TPM)
TPM is normally disabled on older Windows PCs. So, you need to enable it first then only go for installing Windows 11 on your device.
Note: The process may vary for different devices as each manufacturer designs BIOS differently. However, as the approach is pretty simple i.e. enabling TPM, one can find this respective setting and turn it ON.
Here, we have discussed enabling this secure boot for HP devices –
- Restart your PC and when it’s loading, press the boot key.
- The boot key may vary from one device to another. For instance, press Esc on ASUS, f9 on HP, and f10 on Dell computers.
- Once you are inside the BIOS, go to the Security tab.
- If you haven’t changed TPM in the past, the TPM Device will display as “Hidden”.
- Click once over it and select Available.
- Next, go to TPM State, click over it and choose the option – “Enabled“.
- You may also opt to clear TPM, however, you need to clear this every time you go for installing a new operating system.

- Press F10 to save the changes and exit the Windows setup file.
On Gigabyte Processor, you will find this setting under the Peripherals. This setting may differ if you are on an updated version.

Now that you have enabled TPM, and your device is already set to install the operating system as UEFI, use the bootable media file to install Windows 11 on your computer.


