This post will provide details about the update error 0x800700ea, why it occurs, when it arises, and how it can be fixed on Windows 11/10. A corrupted update component, missing system files, or corrupted Windows Image can all cause this problem. Let’s take a closer look at how to fix it.
What Causes Windows Update Error 0x800700ea?

It is sometimes challenging for Windows to install updates because of security software. For this reason, we suggest temporarily disabling your antivirus software and then updating your system. After you fix the problem, reactivate your antivirus software.
You may also experience problems updating Windows due to a lack of disk space. If you want the Windows Update to install successfully, you need the following:
- If you have a 32-bit Windows OS, you should have at least 16 GB of free space.
- In the case of 64-bit Windows, at least 20 GB of free space is required.
In order to make room on your hard drive, you should remove redundant files.
Update Error 0x800700ea Solutions
If you are not able to upgrade your system because of an error code 0x800700ea, apply these workarounds, and see if any fixes this issue –
1] Run Windows Update Troubleshooter
The first solution to fix 0x800700ea is by running the update troubleshooter. This is basically an in-built tool on Windows that upon call looks for possible causes and addresses them properly. Here’s how you may run this tool –
Windows 11:
- Press Win + I to launch the Settings app.
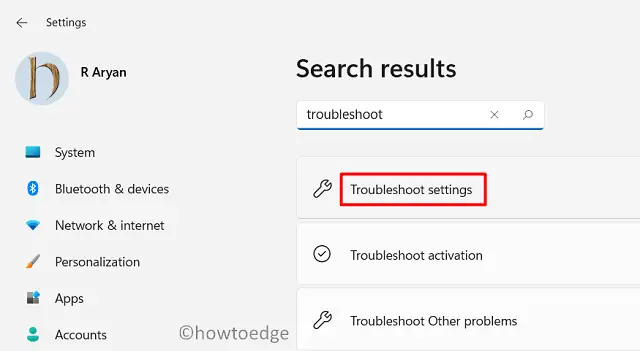
- Type “troubleshoot” in the search box, and press Enter.
- Expand the section – “Troubleshoot settings” and click Other troubleshooters.

- Under the “Most frequent” section, you will find a “Run” button on Windows update.

- Hit Run and the troubleshooting begins immediately afterward.
- Follow the on-screen instructions to complete the remaining steps.
Windows 10:
- First of all, navigate to the path below –
Settings (Win + I) > Update & Security > Troubleshoot.
- Go to the right pane, and click – Additional troubleshooters.
- Subsequently, click over Windows update to expand it, and hit Run the troubleshooter.

- When the troubleshooting window opens up, hit Next, and follow the on-screen instructions.
This tool alone is enough to find and fix any update-related issues on Windows 11 or 10 PC. However, if the 0x800700ea is still there, attempt the next set of solutions discussed below –
2] Run SFC or DISM scans
Though the troubleshooter can fix issues related to third-party apps or some other services, it simply can’t repair the files that went missing or are damaged on your device. To do so, you may take the help of in-built tools like – SFC or DISM.
Here’s how you may initiate an SFC scan on your PC –
- Open Command Prompt as an administrator.
- When it launches, type sfc /scannow, and press Enter.
- Let this code run for 15-20 minutes.
- In case it is taking more than the above-said timings, let it continue.
- Once it reaches the 100% mark, close CMD, and restart your PC.

Check if you can now upgrade to the Build OS to which you are willing to. DISM, on the other hand, is a system image correction tool that runs to find and repair any issues inside the Windows image. Here’s how you may use this tool –
- Re-open Command Prompt (as discussed above) having administrative privileges.
- When it does start, type the following, and press Enter.
DISM /Online /Cleanup-Image /RestoreHealth
- This command also takes 15-20 minutes to find and fix any issue with the system image.
3] Reset Windows Update Components
Now that you have corrected the Windows Image and system core files, check if you can install pending updates on your device. In case it is still not working, the components must have become corrupted. To resolve it then, one should stop and restart all services along with purging the cache folders. Here’s how you may reset update components –
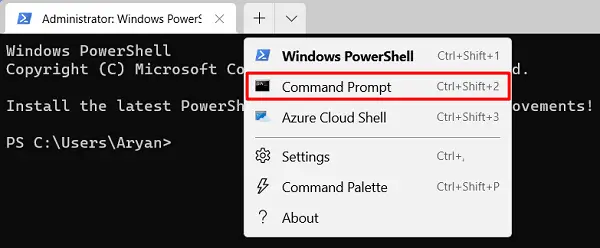
- Press Win + X, and choose Windows Terminal (Admin).
- By default, this will open into PowerShell.
- Use the down arrow key and select Command Prompt.

- When CMD opens up having administrator rights, run the below codes one by one –
net stop wuauserv
net stop cryptSvc
net stop bits
net stop msiserver

- Rename the SoftwareDistribution and Catroot2 folder by running the codes below –
ren C:\Windows\SoftwareDistribution SoftwareDistribution.old
ren C:\Windows\System32\catroot2 Catroot2.old
- Restart all update-related services that you had stopped recently i.e. BITS, Cryptographic, MSI Installer, and the Windows Update Services.
net start wuauserv
net start cryptSvc
net start bits
net start msiserver

- Type Exit and press Enter to close the running Windows console.
- Restart your PC next and when it does, check if you can now update your operating system.
4] Manually download and install Standalone packages
I hope the update error code 0x800700ea must have been resolved by now. If not, you may download the standalone package, and install it manually on your computer. For this, you need to know the “KB” number which is failing to install. Once you know the cumulative update number, learn how to manually download/install the latest patches on your computer.
How to fix Windows update not installing?
There are some general things you can try if the Windows update does not work on your system:
- Turn off Windows Defender or third-party antivirus applications temporarily.
- Delete files that are no longer needed to free up space on your hard drive.
- Disconnect all hardware except the keyboard and mouse from your computer and try updating Windows.
Read Next: How to Fix Update Error Code 0x80070437 on Windows 11/10


