Did you lately encounter the 0x8007012f issue while upgrading your Windows 10 to its latest version? Well, this bug may also occur while installing app updates, system updates, or even feature updates. Users have reported receiving two different error messages associated with this issue. They are as follows –
There were some problems installing updates, but we’ll try again later. If you keep seeing this and want to search the web or contact support for information, this may help: (0x8007012F)Or,
ERROR_DELETE_PENDING, The operation has failed, The file cannot be opened because it is in the process of being deleted. Error code: 0x8007012F
Whatever is your case, use these different methods in order to fix this issue on your Windows 10 devices.

Update Error 0x8007012f Solutions
If you are receiving the 0x8007012f error while trying to install security updates for Adobe, go through the below list of solutions sequentially –
- Delete pending.xml file
- Enable the BITS service
- Clear the BITS queue with jobs
- Run Windows Update Troubleshooter
- Clean Windows Cache Folders
- Manually install Cumulative Updates
1] Delete Pending.xml Files
This error typically arises when there lie some pending XML files that should not be there. To overcome this scenario, all you require is to open Command Prompt as an Admin and execute the below code –
Ren c:\windows\winsxs\pending.xml pending.old
- Press the Enter key to start executing this code.
- Running this code will rename the pending.xml files to something “pending.old”.
You may now attempt again to apply the security patches. This time, it should work flawlessly.
2] Enable the BITS
The BITS service must remain enabled for an efficient update process. Since you are getting an update-related issue, check the current state of the Background Intelligent Transfer service on your device. And if you find this turned off, restart this using the following steps –
- Press Windows key and R to launch the Run dialog.
- Type services.msc in the text field and press Enter.
- Subsequently, locate and right-click on Background Intelligent Transfer service.
- If the start option appears in the context menu, hit the same.

Now that you have enabled the BITS service, check if you can upgrade your operating system or not. If not, follow the next set of solutions –
3] Clear the BITS queue with jobs in a Transient Error state
If there are any pending jobs inside the BITS, this will simply prevent new jobs from being downloaded or applied. You may clear all such BITS queues by following the below guideline –
- Right-click anywhere on the desktop and select
New > Text Document. - Open this notepad and copy/paste the below cmdlet inside –
@echo off
net stop BITS
ipconfig /flushdns
ren "%ALLUSERSPROFILE%\Application Data\Microsoft\Network\Downloader\qmgr0.dat" qmgr0.dat.old
ren "%ALLUSERSPROFILE%\Application Data\Microsoft\Network\Downloader\qmgr1.dat" qmgr1.dat.old
net start BITS
- Go to the File tab and select
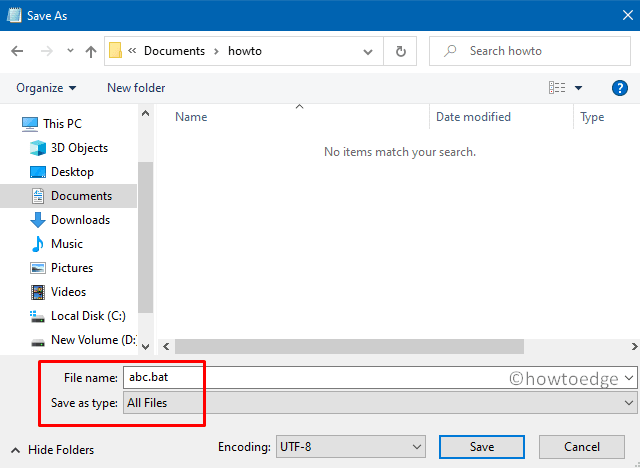
Save as...option. - Use the drop-down menu to select All files under the Save as type.
- Put abc.bat under the File name and click Save.

- Now that you have saved this file as a batch file, right-click on this and choose Run as Administrator.
Note: You may clear the BITS queue of any ongoing jobs by simply executing a single line code on the Command Prompt having administrative privileges. The code is – bitsadmin.exe /reset /allusers. |
4] Run Windows Update Troubleshooter
By default, Microsoft provides a great utility program that can look over the files blocking the update process and fix them. This is none other than the “Update Troubleshooter“. Here’s how to run this program –
- At first, reach out to the below path –
Settings > Update & Security > Troubleshoot
- Jump to the right side, click “
Additional troubleshooters“. - Moving ahead, click Windows Update and hit “Run the troubleshooter“.

- That’s it, your system will take care of the remaining steps.
- Once over, Restart your PC.
From the next sign-in, you may not encounter the 0x8007012f issue while upgrading Windows 10.
5] Clean Windows Cache folders
If the Windows cache folders get corrupted somehow, this might also prevent installing security updates on the computer. To get rid of this error then you must clear all such folders like SoftwareDistribution and Catroot2. Make sure to disable the update process before proceeding to clean the cache folders. Here’s how to clear these folders –
- Click the Start Menu and start typing services.
- When a similar option appears in the results, hit upon it.
- Scroll down to Windows Update in the Services window, make a right-click, and select Stop.
- Next, open the File Explorer using Win + E shortcut key.
- Browse to the following locations one by one, use Ctrl + A to select all items.
- Next, go to the Home tab and hit Delete.
C:/Windows/SoftwareDistribution
C:/Windows/System32/Catroot2
Note: Alternatively, you may also rename the above two folders to sd.old and catroot2.old respectively to avoid any data losses.

- Lastly, re-enable the services that you have stopped earlier.
6] Manually Update Windows
If none of the above fixes resolve the 0x8007012f issue, you may opt to manually install the pending updates. Here’s how to download and apply the standalone package on your device –
- Go to the Windows Update History webpage.
- Select Windows 10 version on the left column then scroll down to “In this release”.
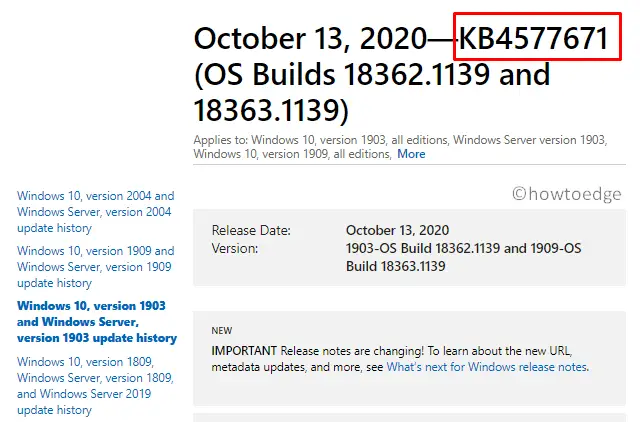
- Click the first link and copy the cumulative number starting with “KB”.

- Press Ctrl + T to enter a new tab, type Update catalog in the address bar, and hit Enter.
- Click the top result and paste the copied cumulative number in the search bar.
- Pressing Enter will display all relevant updates containing the typed-in number.
- Pick the one that matches your system architecture and hit Download next to it.
- After the download completes, open the folder containing this file, and double-click the setup file.
- Wait for the standalone package to install successfully. Once over, you won’t get this error while installing the security updates to Adobe.
That’s it.


