Windows Update Error 0x80070714 is not a new issue as it occurs way before on other versions of Windows as well. Usually, when this occurs, it prohibits the smooth downloading and installing of either Builds or monthly patches. In this guide, we will discuss what may trigger this issue including six ways that may counter this problem. When you encounter this issue, you may receive an error message as well that reads the following –
“Something happened and the Windows couldn’t be installed, Please try again, Error code: 0x80070714”.
What causes Error 0x80070714 and how to fix it?
This error might occur when your device meets one or more of the following conditions –
- Presence of corrupted system files and folders
- After installing a buggy Windows update, monthly security patches, or optional updates
- Corruption inside the Update Components
- Corrupted System Image
If you are encountering this bug, Run Windows Update troubleshooter, Try DISM Tool, Reset Windows components, and Pause updates should address this problem. If none of these workarounds fix this problem, perform a clean installation of Windows 11/10 using the Media Creation Tool.
Fix: Windows 10 Update Error 0x80070714
To resolve the Update Error 0x80070714 on Windows 10 PC, try the following methods –
- Use the Update troubleshooter
- Reset update services
- Run DISM
- Install updates using the installation media
- Use the Media Creation Tool
- Perform a clean re-installation
1] Use the Update troubleshooter
Microsoft team has developed this troubleshooter to resolve various update-related errors on Windows 11/10. If you are struggling with the Error 0x80070714, perform these steps –
On Windows 11:
- First of all, navigate to the following path –
Settings (Win + I) > System > Troubleshoot > Other troubleshooters
- Click the Run button available beside Windows Update.

- Wait while this tool detects and resolves any underlying issues on your Windows PC.
On Windows 10:
- Press Window and I key together to launch Settings.
- Inside the Update & Security category, select Troubleshoot from the left pane.
- Move to the right-hand side and press the Windows Update option.
- Next, do the click on Run the Troubleshooter.
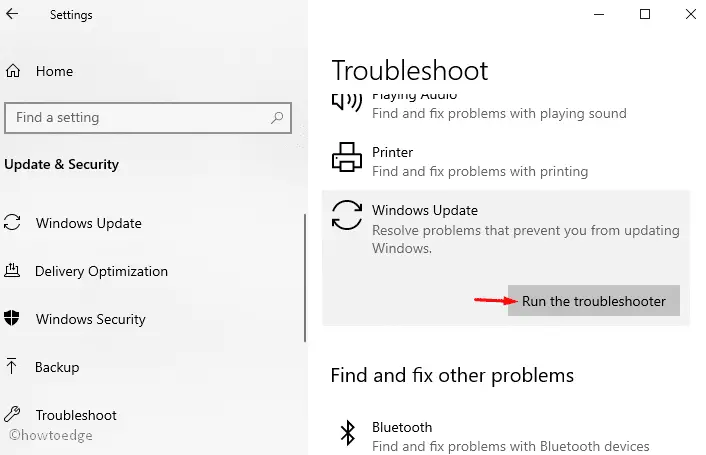
When the repairing process completes, Restart your PC to save the recent changes.
2] Reset Windows Update Services
In general, certain services become obsolete as time passes by, hence you need to update them. To repair this bug, we suggest deleting the Software Distribution folder and resetting the Windows components as well. Here is the complete procedure –
- Jointly press Win and S and type cmd in the text field.
- Make a right-click on Command Prompt and hit Run as administrator.
- Tap Yes on the User Account Control window to proceed ahead.
- Here, copy-paste the following codes one by one followed by the Enter key.
net stop wuauserv
net stop bits
net stop cryptsvc
Ren %systemroot%\SoftwareDistribution\SoftwareDistribution.bak
Ren %systemroot%\system32\catroot2 catroot2.bakwindows 10 error 0x80070714
net start wuauserv
net start bits
net start cryptsvc

Lastly, Restart your PC to save the changes performed so far.
3] Perform DISM Scan
When the update size is larger than the installed patch up, this may arise update-related issues. If that’s the case, the Deployment Image Servicing and Management tool works as the repairing tool. Let’s see how to run this tool –
- Click on the Search icon and type Command Prompt.
- Right-click on the well-suited result and select Run as administrator.
- If UAC prompts, tap Yes.
- Now copy-paste the following codes and hit Enter at the end of each command.
DISM /online /Cleanup-Image / ScanHealth
DISM /Online /Cleanup-Image /RestoreHealth
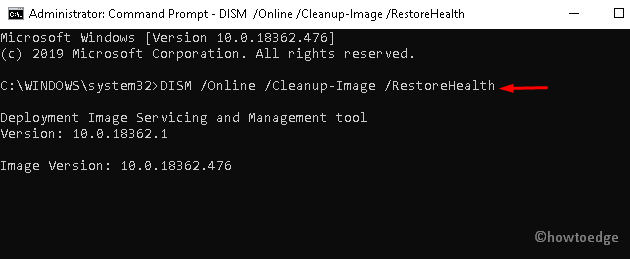
- This will take approx 10 minutes, so wait accordingly.
- Lastly, Restart your system and try downloading the updates without receiving the Update Error 0x80070714.
4] Pause the update installation
Eventually, if all the methods fail to resolve the Error 0x80070714, disabling updates is the best option. This will pause the upcoming or pending cumulative updates for the predefined period. Microsoft rolls customized patches to solve several errors. Here’s how you may stop automatic Windows updates –
On Windows 11:
- First of all, navigate to the following –
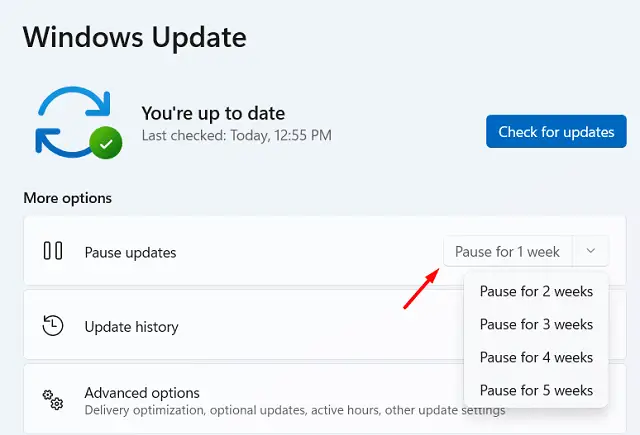
Settings > Windows Update > Pause Updates
- Use the drop-down menu to specify a date up to which you would like to disable automatic updates.
On Windows 10:
- Press Win and I to launch the Settings app.
- Inside the Updates & Security, select Windows Update.
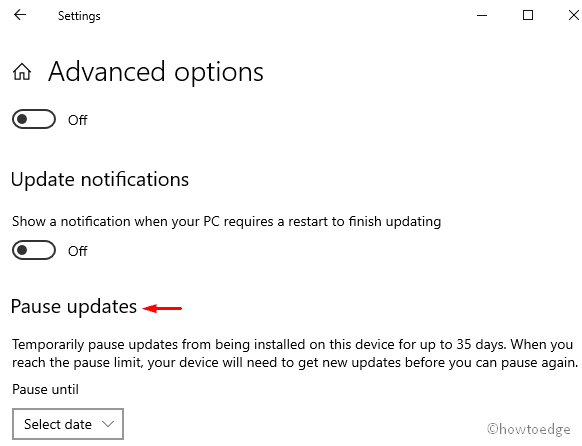
- Switch to the right pane and choose Advanced options.
- Scroll down and specify the date (till you want to restrict updates) using the drop-down menu under Pause updates. See the Snapshot below –
Now that you have stopped receiving automatic updates, you may manually install the pending updates on your device.
- For Windows 10 Users – Manually downloading and installing pending updates.
- For Windows 11 Users – Download Standalone Package and manually apply it on your computer.
5] Apply the latest Cumulative Updates using the installation media
In case, you fail to update Windows 11/10 PC via check for updates, you should use installation media and perform this task manually. All you need is to create a bootable USB or ISO device containing a Windows setup. Here’s how to proceed –
- Plug the external storage (at least 8 GB free space) into its port.
- Next, visit the Microsoft official website to download the Media Creation Tool. Windows 11 users may find this tool on this webpage.
- When the setup file is downloaded, make a click on the .exe file and accept the license terms & conditions.
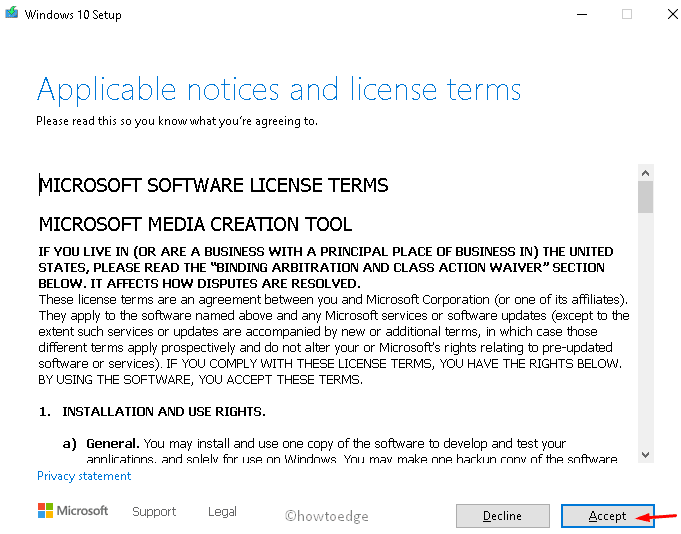
- Select the Create installation media (USB flash drive, DVD, or ISO file) for another PC radio button.
- Going ahead, select the preferred language, architecture, and edition followed by the Next button.
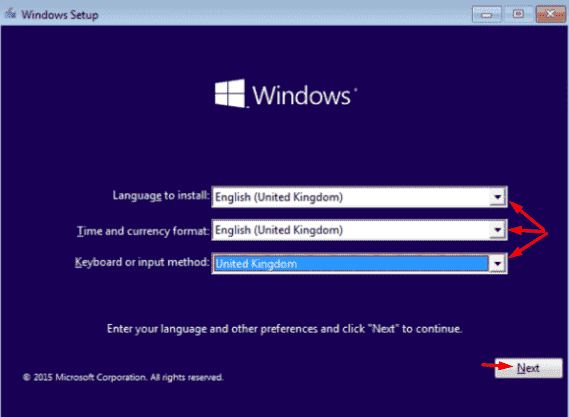
- Pick the USB flash drive thereafter hit the Next button again.
- The system will start copying the installation file to the USB flash drive, wait till this finishes.
When this process completes, your USB is bootable and ready to install downloaded Windows ISO Image on your PC.
6] Upgrade your PC using Media Creation Tool
If you still fail to overcome the Update error 0x80070714, you should perform a fresh Windows 11 or 10 installation using Media Creation Tool. All you need is to download and install the updates manually following these easy steps –
- Download Media Creation Tool for Windows 10. For Windows 11, try this link.
- When you download the Windows setup, right-click on it and select Run as an administrator.
- On the following wizard, Accept the Licence Terms followed by Next.
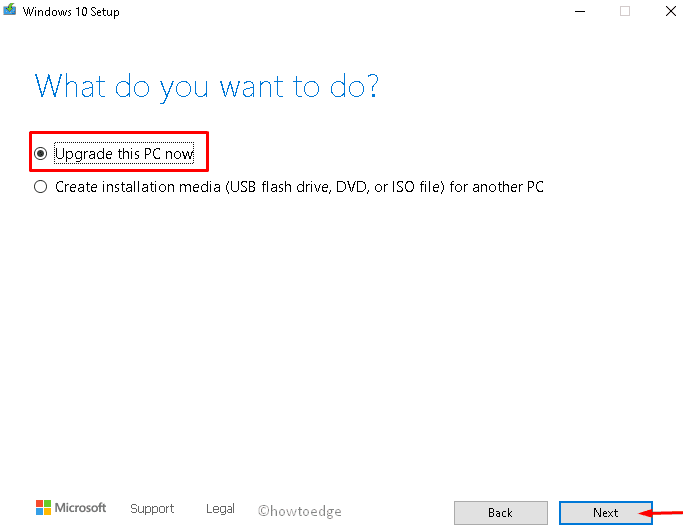
- Afterward, hit Upgrade this PC radio button and wait till this downloads all the patches.
- Now install all the cumulative updates and Restart your PC.
We hope this guide helps to overcome the Update error 0x80070714 on Windows 10 PC.


