Did you encounter an update error 0x80070bc2 while installing the latest cumulative update on your Windows 10 PC? Since you are here, you must be looking for the reasons behind this bug and the probable fixes. Well, read this article till the end and you will be able to update your operating system without getting into this update error.
This error often accompanies an error message that reads the following – “Requires a restart to finish installing“. Let’s have a look at the reasons causing this bug and the relevant fixes in the below sections.
What may trigger an update error 0x80070bc2?
There are different reasons that may cause the Update Error 0x80070bc2 on your computer. The commonly occurring issues are as follows –
- Disabled Windows Update service
- Unnecessarily stored cache at SoftwareDistribution
- Corrupt Windows update components
- After you install the recent update incorrectly on your Windows PC
When encountering this error, the check for updates button normally doesn’t work. Visit Microsoft Update Catalog, and download the recent update standalone package from there Make sure to download the cumulative update matching your system architecture. If not, the update will fail to install no matter how many times you try.
If the error persists even after this, you may try out these solutions –
- Configure the Windows Services to Auto mode
- Run Windows Update Troubleshooter
- Delete the existing cookies or cache
- Perform a clean boot, and retry to update Windows 10
- Reset corrupt Windows update components
Let’s explore these solutions in detail so that you can update your Windows 10 operating system normally.
Fix: Update Error 0x80070bc2 on Windows 10
To solve the Update Error 0x80070bc2 on Windows 10 PC, try out the following workarounds one after another.
1] Change Windows Update Services to Automatic
The update-related issues usually occur when the update services are set to run manually. Go and check the current status of all essential services and modify them to run automatically. Here’s how to configure the update services on Windows 10 –
- Jointly press Win and R to launch the Run dialog.
- Type CMD on it and press Ctrl + Shift + Enter keys altogether.
- When the UAC window prompts, hit Yes to authorize opening the Windows console.
- Next, run each one of the below codes separately followed by the Enter key –
SC config wuauserv start= auto
SC config bits start= auto
SC config cryptsvc start= auto
SC config trustedinstaller start= auto
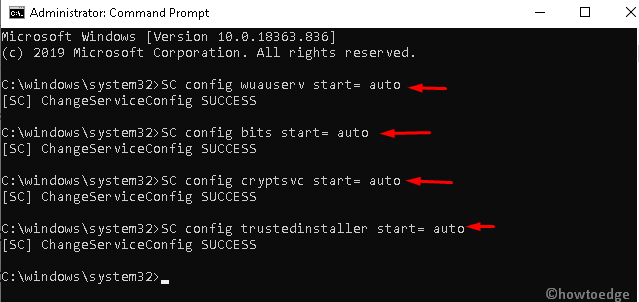
- The above set of commands will set the update services to Auto mode.
Restart your PC and check if the updates download and install automatically. In case the error persists even after this, try the next solution.
2] Run Windows Update Troubleshooter
The most effective way to solve an update issue is by running the Windows Troubleshooter. When you run this tool, it automatically checks for corrupt files and folders and repairs them. Here’s how to run this utility program –
- Open the Settings window by pressing Win + I keys together.
- Select Update & Security thereafter Troubleshoot on the next window.
- Head over to the “Get up and running“/ “Most frequent” section on the right pane, and locate Windows Update.
- When this option expands, hit the Run the troubleshooter button.
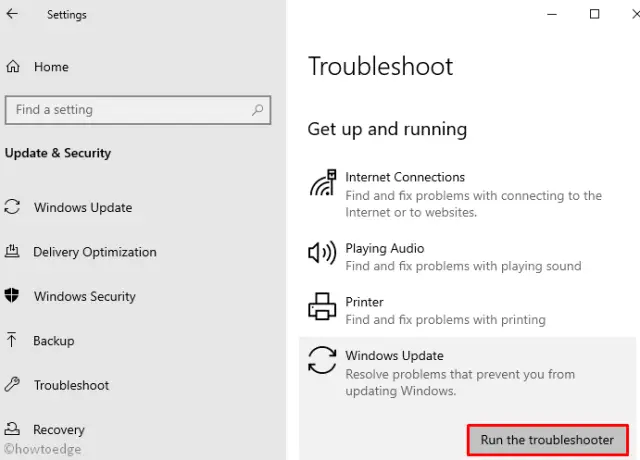
- The scanning process will start immediately afterward, so let it does the check-up.
- Follow the on-screen instruction to complete the scanning and repairing process.
Once this gets over, restart your PC so as to implement the recent changes. When Windows 10 reloads, check if you can update your operating system without getting into the error code 0x80070bc2.
3] Purge stored cache on your Windows 10 PC
If you are running your device for quite a long time, there must lie some unnecessarily stored cache on it. This may also prevent the update process from being carried out and lead to an error 0x80070bc2. Get rid of these cache files and folders and check if the update issue resolves this way. Here’s how to purge stored cache on Windows 10 –
Note: Before you proceed ahead, make sure to temporarily disable the Windows Update Service.
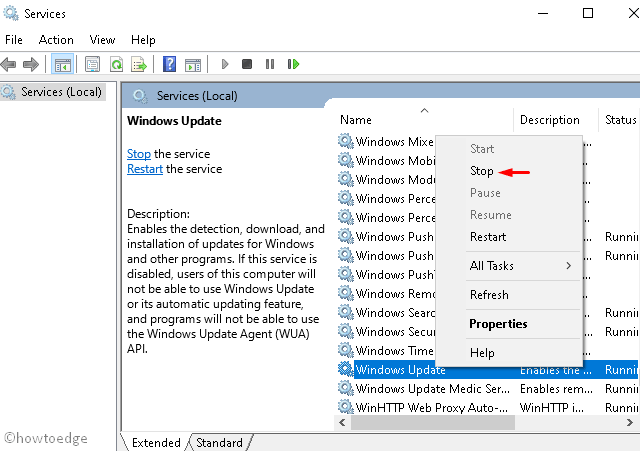
- Open the Run dialog (Win + R), type “
services.msc“, and hit OK. - Scroll down to Windows Update, right-click on it, and hit the Stop button. See the Snapshot below –
- Afterward, press Win + E to launch the File Explorer.
- Navigate to the below path on the explorer next –
C:\Windows\SoftwareDistribution\Download
- Press Ctrl+A to highlight all the items inside this folder. Perform a right-click and hit the Delete button.
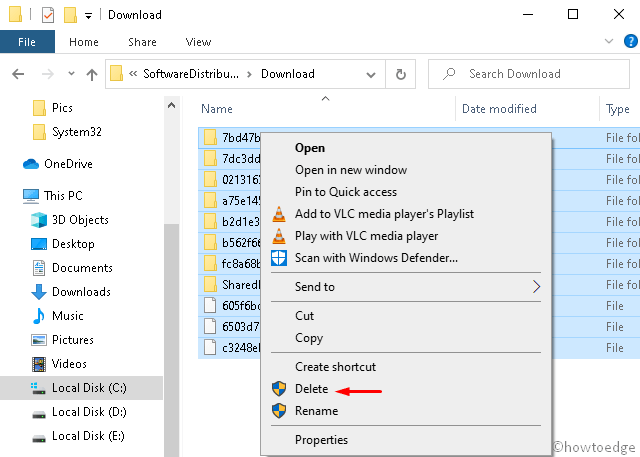
- Now, re-visit the Services window and start the “Windows Update” service.
Finally, Reboot your PC and check whether you can update your Windows 10 operating system normally now.
4] Manually Install Windows Update
There are times when your device can’t connect to Microsoft servers and as a result of this, updates start failing on some error code. In such scenarios, one may manually download the relevant standalone package and install that on his/her computer. Let’s learn how to achieve this manual update on Windows 10 –
- First of all, note down the Cumulative update number that you are unable to install.
- Go to the Microsoft Official website and type the KB number in the search bar.
- Subsequently, press the Download button next to the cumulative update links. Make sure to check the system architecture (x86, x64, ARM64, etc.) on your device.
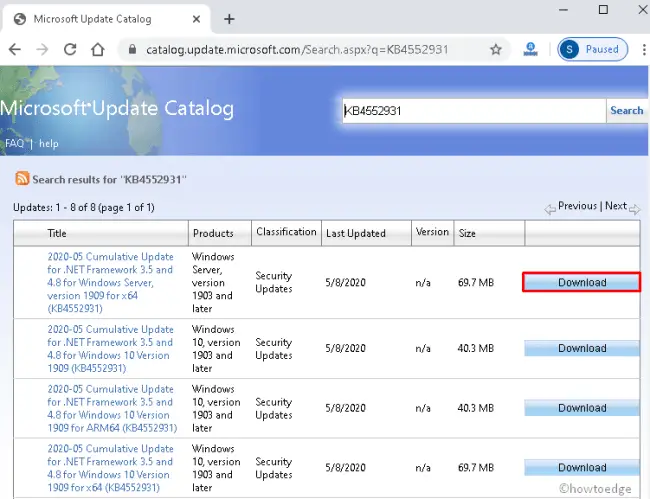
- A pop-up window will appear, hit the top link so as to download the .msu file.
- Lastly, go to the Download folder and click twice on the set-up file to upgrade the existing OS build version.
5] Boot into the Clean Boot and retry updating Windows
The presence of a faulty application or its leftover files (when uninstalled) may also result in an error code 0x80070bc2. You may solve such conflicts by simply booting into the Clean boot on and retrying the Windows update. Here’s how to perform this task –
- Press Win + S to launch Windows Search.
- Type “
msconfig“on it without quotes and hit Enter. - When the System Configuration window pops up, go to the Startup tab and click “Open Task Manager“.
- Select each one of the running programs and hit Disable.
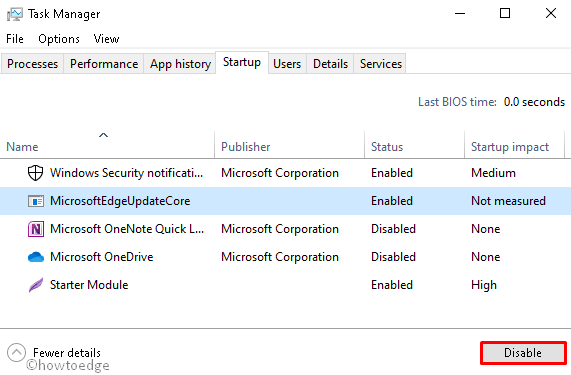
- After disabling all of the running applications, close Task Manager, and Reboot the PC.
6] Reset Windows Update Components
If you are still unable to install the security patches due to error 0x80070bc2, there may lie some issues with the Update components. So, you need to reset these system components using the Windows Console. Follow the below guidelines to do this –
- Press Win & S shortcut and type cmd in the text box. Right-click on the well-matching result and choose Run as Administrator.
- When the UAC window appears, tap Yes to proceed ahead.
- On the elevated prompt area, enter the below codes one by one. These commands will stop some of the essential services like BITS, Windows Update, Cryptographic, etc.
net stop bits
net stop wuauserv
net stop appidsvc
net stop cryptsvc
- Next, remove the qmgr*.dat files executing the below code –
Del “%ALLUSERSPROFILE%\\Application Data\\Microsoft\\Network\\Downloader\\qmgr*.dat”
- Subsequently, copy/paste cd /d %windir%\\system32 and press Enter.
- Now, re-register the .dll files running the below codes –
exe atl.dll
exe urlmon.dll
exe mshtml.dll
exe shdocvw.dll
exe browseui.dll
exe jscript.dll
exe vbscript.dll
exe scrrun.dll
exe msxml.dll
exe msxml3.dll
exe msxml6.dll
exe actxprxy.dll
exe softpub.dll
exe wintrust.dll
exe dssenh.dll
exe rsaenh.dll
exe gpkcsp.dll
exe sccbase.dll
exe slbcsp.dll
exe cryptdlg.dll
exe oleaut32.dll
exe ole32.dll
exe shell32.dll
exe initpki.dll
exe wuapi.dll
exe wuaueng.dll
exe wuaueng1.dll
exe wucltui.dll
exe wups.dll
exe wups2.dll
exe wuweb.dll
exe qmgr.dll
exe qmgrprxy.dll
exe wucltux.dll
exe muweb.dll
exe wuwebv.dll
- Once over, Restart the Windows Services that you stopped earlier. To do so, run the following commands –
net start bits
net start wuauserv
net start appidsvc
net start cryptsvc
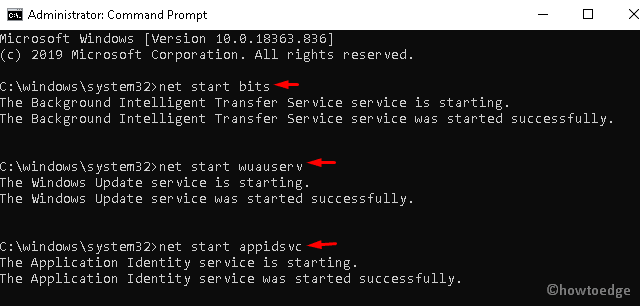
- At last, Reboot your system and see if the “Check for updates” works on your device or not.
7] Use System Restore
You must have resolved the update error 0x80070bc2 by now. If not, you are left with only one option and that is clean installing Windows 10. In case you have generated a restore point, you may use that to revert back to an earlier state when everything was functioning normally. To revert back your device using the restore point, use these steps –
- First of all, log into your device as an Administrator.
- Press Win & S shortcut and type System Restore in the Search box.
- Click on the top result to enter the System Protection wizard.
- Tap the System Restore button then Next to proceed further.
- Here, pick the recent restore file and click Next again.
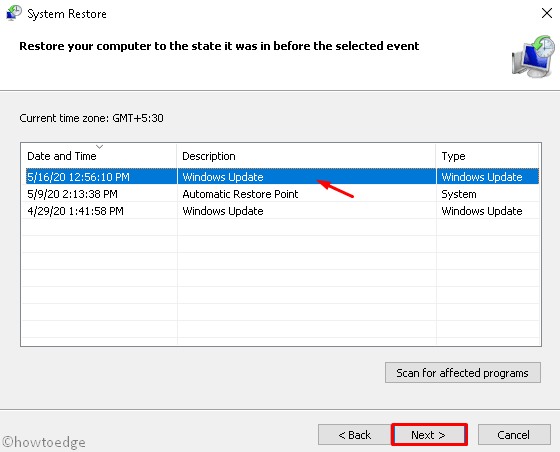
- Hit Finish and wait for this task to complete.
That’s it, I hope the above set of solutions indeed fixes this update error 0x80070bc2. If you have any suggestions or queries related to this article, let’s know in the below comment section.


