The error 0x80240019 is an update-related issue and when it occurs, it prevents you from installing available updates on your PC. If you are also facing this issue on your Windows 11/10 PC, then read this guide till the end.
Let’s learn the common reasons behind the update error 0x80240019 occurrence and six possible ways that might fix it on Windows 11/10 PC. This error normally comes with a warning message that resembles the following –
WU_E_EXCLUSIVE_INSTALL_CONFLICT – An exclusive update cannot be installed with other updates at the same time.

What causes Windows to fail on error code 0x80240019?
Windows 11 or 10 may fail on an error code 0x80240019 when your system meets one or more of the following issues –
- Corrupted Windows update components
- Unnecessarily stored cache inside SoftwareDistribution or Catroot2
- Not having enough disk storage on the C:\ drive
- Presence of pending.xml files
Windows Update Error 0x80240019 Solutions
If you are facing problems installing Windows updates because of an error code 0x80240019, try the below fixes –
1] Manually install Windows updates
The best way to resolve the error code 0x80240019 is by manually installing the update that was earlier failing on your PC. For this to happen, you need to know the latest security patch number. In case you don’t know that, you may get it from the Windows update history page.
- After you know the cumulative update number, visit the Microsoft Update Catalog.
- Type the KB number in the search bar, and press Enter.
- A list of matching results will appear on the Display Screen.
- Pick the one that best matches your system architecture, and hit the Download button.
- Click the top link to begin downloading the standalone package.
- After the download completes, double-click on the setup file to complete its installation.
- Your PC may restart several times during the installation.
Though this is an effective way to resolve different update-related issues on Windows 11, the error may occur again when the next patch becomes available. This will reappear only when there are some internal glitches on your device. To fix them, you may try these fixes.
2] Run Windows Update troubleshooter
Windows Update Troubleshooter is an in-built tool by Microsoft designed to automatically find and repair any update-related issues on Windows 11 or 10 PCs. Here’s how you may run this utility program –
- First of all, open the Settings app by pressing Win + I.
- Go to System > Troubleshoot > Other Troubleshooters next.
- Under Most Frequent, you will find the Run button inside Windows update.

- Well, click on it. On the troubleshooting window, hit Next and follow the on-screen instructions.
3] Clear pending.xml files
If you had tried downloading Windows updates earlier as well and that doesn’t download properly, there may be some pending.xml files on your computer.
Try clearing them first and you will find the error 0x80240019 resolves as well. To clear such files, do the following –
- Open Command Prompt having admin rights.
- On the elevated console, copy/paste the following, and press Enter –
Ren c:\windows\winsxs\pending.xml pending.old
- After you clear the Windows update files, check if you can update Windows now.
4] Ensure proper Disk spaces for Windows 11 updates
Not having enough storage space on the C:\ drive may also result in different update-related issues on Windows 11. So, go and check if your root drive has sufficient disk space or not.
If not, try clearing the unused files, old installations, temporary files, etc. using the Disk Cleanup Tool.
After you clear the above-elaborated files, there should be enough disk space for new Windows updates. So, go to the path below, and hit Check for updates –
Settings > Windows update > Check for updates
5] Reset update Components
Many a time, update issues occur just because of corruptions inside the Update components, disabled update services, or unnecessary files stored inside the Windows cache folders. There’s no point in resolving them one by one.
Instead what you can do is open CMD as administrator and run the codes below one by one. To understand it better, we have partitioned the resetting process separately and they are –
- Disable/Stop update-related services
net stop bits
net stop wuauserv
net stop appidsvc
net stop cryptsvc
- Purge Windows Cache folders
rmdir %systemroot%\SoftwareDistribution /S /Q
rmdir %systemroot%\system32\catroot2 /S /Q
- Restart the services that you had stopped earlier
net start bits
net start wuauserv
net start appidsvc
net start cryptsvc
Note: The codes above should be sufficient enough to reset update components. However, if the error was occurring because of some missing DLL files, you may re-register them. To do so, follow this post.
After you execute all the codes provided above, visit Windows Update and hit Check for updates. Let the system find and install pending patches on your computer.
6] Check the Windows update Log file
I hope the error 0x80240019 must have been resolved by now. In case it doesn’t, you may check the Windows update log file, and see what is displaying there.
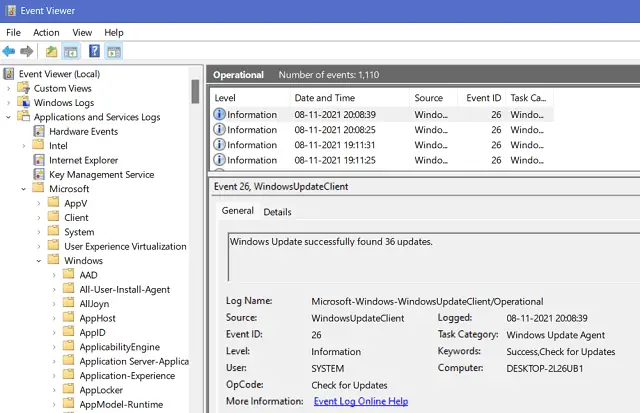
In general, whenever your device encounters an update-related issue, the same is logged inside the Windows update log file. Accessing this file will provide a fair idea of why the issue is still occurring. Here’s how you may access this log file –
- Press Windows + S to launch the Search window.
- Type “Event Viewer”, and double-click on the best matching result.
- On the Event Viewer window, go to the path below –
Applications & Services Logs > Microsoft > Windows > WindowsUpdateClient > Operational

- Once you are inside the Operational section, check if this displays any critical message or warning at least.
- Here, you will find the applicable ways to address the error code 0x80240019.
What to do if Windows 11 is still not updating?
If the Event Viewer doesn’t suggest any ways by which you can get rid of the error code 0x80240019, and Windows 11 is still failing, we recommend going for a fresh installation of Windows.


