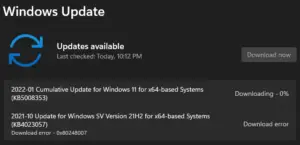
Keeping Windows OS up-to-date is challenging these days. Users receive new kinds of bugs and errors on their computers every now and then. The 0x8024a21e error is one such issue that may arise due to bad system components or the update services not being set to occur automatically.
Whatever the reason behind this error in your case, follow this guide and eliminate this persisting error. Sometimes even a simple rebooting of the device addresses this error, so do restart your PC for once. If the problem persists even after restarting your computer, read and apply the below workarounds –

Windows 11/10 Update Error 0x8024a21e Solutions
Attempt the fixes below to solve the update error code 0x8024a21e on your Windows 11/10 PC. You may follow any order; however, we suggest proceeding in the same order as outlined below.
1. Reset Windows Update Components
Windows 10 users mostly encounter the update error 0x8024a21e on account of bad system components. The cache folders like SoftwareDistribution and Catroot2 become corrupted after a certain interval of time and thus result in new bugs and errors. To resolve the newly generated issues, you must clear these folders from time to time. Here’s how to perform this task –
- Launch the Command Prompt having administrative rights.
- Stop the basic update services by running the below codes on the elevated console –
net stop wuauserv
net stop cryptSvc
net stop bits
net stop msiserver
- Now that you have stopped the required services, rename the cache folders by adding the
.oldextension at the last of their names.
ren C:\Windows\SoftwareDistribution SoftwareDistribution.old
ren C:\Windows\System32\catroot2 Catroot2.old
- After renaming both SoftwareDistribution and Catroot2 folders, restart those services that have been stopped recently. To do so, run the following commands –
net start wuauserv
net start cryptSvc
net start bits
net start msiserver
- Lastly, type exit and press Enter to come out of the prompt area.
Sign back into your device and check if the error 0x8024a21e gets resolved or still exists.
2. Set Windows update services to start automatically
If the Windows update services are not set to start automatically, this may result in the 0x8024a21e bug. Here’s how to reset update services to perform automatically –
- Press Win + S to open the Search window, and type CMD in the text field.
- Right-click on the top result and select Run as Administrator on the context menu.
- When the Windows Console opens up, execute the following codes one after another.
SC config bits start= auto
SC config cryptsvc start= auto
SC config trustedinstaller start= auto
SC config wuauserv start= auto
- After successfully running the above commands, restart your PC.
From the next logon, check whether you are now able to download and install updates or not. If not, you may try the next set of solutions below.
3. Start the BITS service
Just like Windows Update, Background Intelligent Transfer Service (BITS) is also an essential service to get timely updates on your computer. If the same gets disabled somehow, your PC can’t get recent patches automatically. Here’s how to re-enable BITS on your device –
- Use WinKey + R to launch the Run dialog.
- Type
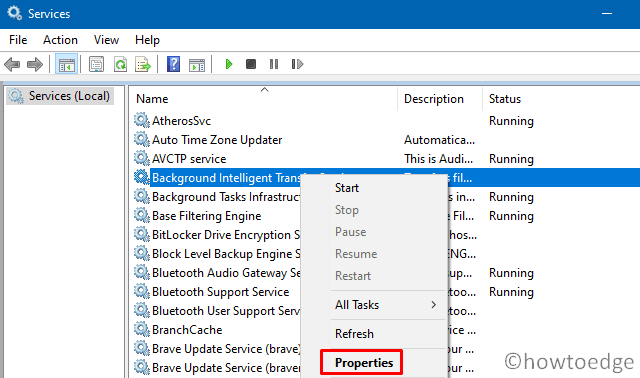
services.mscin the text field and press Enter. - When the services window comes into view, scroll down to the Background Intelligent Transfer service.
- Once found, right-click on it and choose the Properties option.

- Use the drop-down menu next to
Startup typeand select “Automatic“.

- Click the Start button to activate this service on your computer.
- Lastly, hit Apply then OK.
- Now, reach out to the below path and click Check for Updates.
Settings (Win + I) > Update & Security > Windows Update
The Windows update process should work as before. If not, you may try to manually install the pending updates.
4. Manually Install Cumulative Updates
If the 0x8024a21e error persists even after configuring the update services, you may manually download and install the pending cumulative updates. To do so, follow these easy steps –
Note: If you are running Windows 11 and are facing this trouble, learn how to manually download and install pending updates on your PC.
- Go to the location –
Settings > Update & Security > Windows Update. - On the right pane, click View update history.
- Note down the cumulative update number that displays “Failed to install“.
- Visit the Update Catalog site, type the noted-down KB number in the search field, and hit Enter.

- Doing so will display a list of well-matching standalone packages.
- Pick the one that suits your system architecture and hit the Download button.
- Subsequently, click the top link to start downloading the updates in
.msufile format. - When the download completes, open the folder containing this file, and double-click on the setup file.
I hope this completes without generating error code 0x8024a21e again. If not, you may try the next set of solutions.
5. Run Windows Update Troubleshooter
If none of the above solutions address the 0x8024a21e issue, you may take the help of an internal tool i.e. Windows update troubleshooter. Running this tool will look for any bugs or errors that are preventing the update process from occurring automatically and fix them.
To troubleshoot Windows update on Windows 11 PC, follow these steps –
- Press Win + X and select Settings.
- Go to System > Troubleshoot, and hit Other troubleshooters.
- When this expands, locate Windows Update and click the Run button.

- When the troubleshooter launches, click Next and follow the on-screen instructions.
- Hopefully, the problem should be resolved and you may try again to update your Windows 11 PC.
If you are on a Windows 10 PC and are facing this trouble, follow these easy steps –
- Use the Windows key and I to launch the Settings app.
- Select Update & Security followed by Troubleshoot on the upcoming screen.
- Jump to the right side and click the Additional Troubleshooter link.
- Tap once over the Windows Update and hit Run the troubleshooter.

- Doing so will initiate a scan on your computer.
If any problems were discovered during the scanning process, this will present a resolution to fix them as well. After applying the resolution it provided, Restart your PC.
In case the troubleshooter doesn’t report any issue, use either previously created system restore points or clean install Windows 11 on your device.


Thanks for these detailed directions. I managed to get through step #1 after changing these statements in your code:
– Under “Stop the basic update services…,” net start wuauserv should be net stop wuauserv
– Under “Now that you have stopped the required services…,” C:WindowsSoftwareDistribution should be C:\Windows\SoftwareDistribution and C:WindowsSystem32catroot2 should be C:\Windows\System32\catroot2
– Under “After renaming both softwaredistribution and catroot2 folders…,” net start wauserv should be net start wuauserv.
I’m still waiting for Windows to finish checking for updates to see if this solved the problem.
Thanks for pointing out the details. Edited and re-published.