In this post, we will cover update error code 0x800f0986, why it occurs, and what are the possible ways to solve it on Windows 10/11 PC. Update-related services set to ‘Manual’ is the prime reason why this bug appears. However, this may also occur due to accumulated cache inside the Cache Folders, missing system files, or faulty update components.
To solve this, check and restart all the services that are responsible for an automatic update process. If the error persists even after that, troubleshoot Windows Update. I hope the error code 0x800f0986 resolves automatically applying these two workarounds. If not, you may go for resetting all Windows Update components including the cache folders.
Manually downloading and installing the latest security/non-security patches often resolve different update error codes in Windows 10. So, instead of applying the above tweaks, you may go for this solution as well.

Solutions – Update Error Code 0x800f0986
To fix update error code 0x800f0986 on Windows 10/11 PC, try out these suggestions one after another –
1] Check the current status of a few services
Many a time, such errors simply because the concerned services are either disabled or not working properly. Before applying the workaround, you need to first check the current status of these services. Here’s how to check and restart update-related services on Windows 10/11 –
- Press Windows + S to launch the Search window.
- Type “services” in the text field, and click over the top result.
- When the Services window comes into the view, locate these services –
- Windows Update
- Cryptographic Services
- Background Intelligent Transfer Service (BITS)
- Once located, check their current status. If you find any one of them disabled, right-click on them, and hit the Properties button.
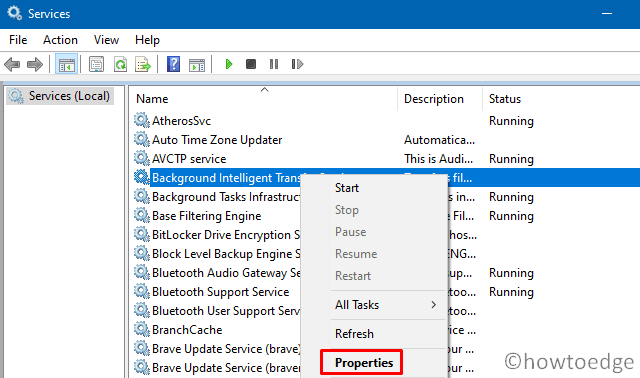
- Use the drop-down menu next to Startup type and select Automatic. Click Apply then OK to confirm this setting.
- If the above-mentioned service is already running on your computer, perform a right-click, and stop the service first.
- After the service gets disabled, right-click again on it again, and select the Properties button.
- Select Automatic under the Startup type and press OK.

- Restart your PC next and check if you can now install the latest build update on your device.
2] Troubleshoot Windows Update
If the error code 0x800f0986 occurs again while updating Windows, you may run an in-built tool i.e. Troubleshooter. Running this will find and resolves issues that are preventing Windows Update from occurring. Since there’s a UI change in Windows 11 in comparison to Windows 10, its location differs in both versions, however, performs the same task i.e. troubleshooting.
Windows 10 users follow these steps –
- Press Win + I to launch the Settings app.
- Select Update & Security > Troubleshoot.
- On the adjacent right pane, click over the link – Additional troubleshooters.
- Subsequently, click to expand Windows Update and hit Run the troubleshooter.

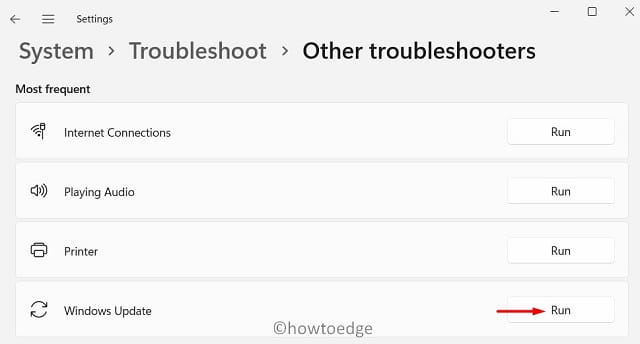
For Windows 11 users, this setting has moved to a new location –
Settings (Win + I) > System > Troubleshoot > Other troubleshooters
- After reaching the above path, click over the Run button next to Windows Update.
Follow the on-screen instructions to complete the troubleshooting process. When this completes, restart your PC and check if you can now update Windows without getting into error code 0x800f0986.
3] Reset Windows Update Components
The error code 0x800f0986 may also occur when the update components get corrupted somehow on your computer. In order to fix this, you should stop/start all the update-related services along with renaming the cache folders. There are two such folders and they are SoftwareDistribution and Catroot2.
You may reset Windows update components by running a few codes on Command Prompt (Admin). The codes that you must execute are as follows –
Net stop wuauserv
Net stop cryptSvc
Net stop bits
Net stop msiserver
Ren C:WindowsSoftwareDistribution SoftwareDistribution.old
Ren C:WindowsSystem32catroot2 Catroot2.old
Net start wuauserv
Net start cryptSvc
Net start bits
Net start msiserver
- The first four and the last four commands represent stopping and restarting update-related services.
- The two codes starting with ‘Ren’ in the middle will rename the cache folders to something different.
- Restart your device next and the cache folders get generated automatically.
- From the next logon, check if you can now install pending Windows updates or still not.
4] Manually Install Pending Windows 11/10 Updates
In this method, you may manually download and install the standalone packages that get uploaded over the Microsoft Update Catalog site.
Here’s how to manually update your device to the next available Windows 10 Build version. Windows 11 users may follow this article instead.
Note: Since Windows 11 is still available for insiders, you can’t use this solution on your Windows 11 PC. What you can do at the max is roll back to Windows 10 Build OS or perform a clean install.


