Have you recently encountered the update Error Code 0x80240020 while upgrading the Windows 11/10 OS? Well, if yes, then follow this troubleshooting guide to know the probable causes along with a few working ways to solve the same. If the sign-in info section inside Windows Update remains disabled, this may lead to this error code.
This error code comes with an error message that says – The operation did not complete because there is no logged-on interactive user. Here are some possible ways to resolve the problem on Windows 10/11.

What causes Update Error Code 0x80240020
This problem generally occurs when your Automatic Updates request fails to get processed and certain updates cannot be downloaded. There are a few workarounds available to help resolve this issue. Check out the solutions in detail.
Ways to Fix Update Error Code 0x80240020 in Windows 10
To solve the Update error 0x80240020 on a Windows 10 PC, use the following methods –
1. Enable “Use my sign-in info” inside the Windows Update
Before proceeding to the actual solutions, one should configure the “Sign-in info” settings inside the update section. To do so, follow these easy steps –
- Press the Win+I hotkey together to open the Settings window.
- On the next page, select Accounts > Sign-in options.
For Windows 11
- Go to the Additional Settings option.
- Turn on the toggle switch for Use my sign-in info to automatically finish setting up after an update.
For Windows 10
- Scroll down to the Privacy section.
- Turn on the feature that reads Use my sign-in info to automatically finish setting up my device and reopen my apps after an update or restart.
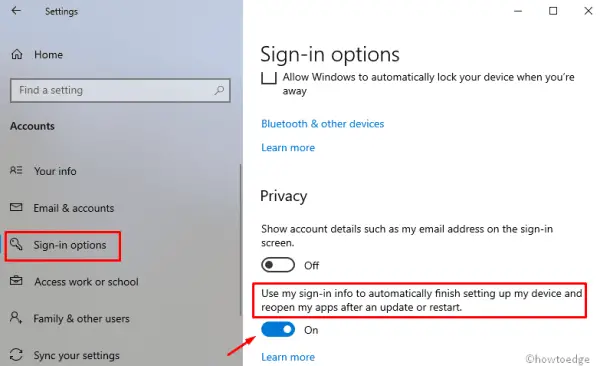
- Reboot your PC and from the next login, the following error message may no longer exist.
2. Run Windows Update Troubleshooter
Since this update issue is due to corrupt device drivers, following the above fixes should resolve the underlying cause. However, if you still encounter the error 0x80240020 while upgrading the existing Build OS, run the Windows troubleshooter. This tool can easily detect faulty files and repair them if possible. Here is the complete procedure –
For Windows 11
- Open the Settings menu using the Windows+I keys.
- Go to System > Troubleshoot > Other troubleshooters.
- Next to Windows Update, click on the Run button.

For Windows 10
- Open the Run dialog using Win and R shortcuts.
- In the text box type, ms-settings: and hit the OK button.
- Navigate to Update & Security > Troubleshoot > Windows Update.
- Now, click the Run the troubleshooter button to begin the searching/repairing task.
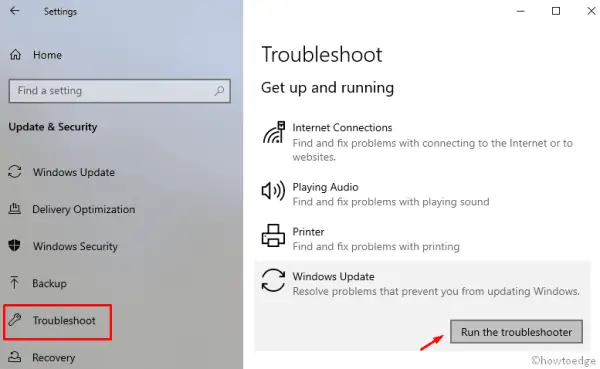
- Once over, Restart the PC and install any pending updates on the computer.
3. Enable the BITS service
Background Intelligent Transfer Service (BITS) acts as the communicator between Microsoft’s servers and your PC. This is why if anything goes wrong or this service is stopped, you won’t be able to receive new patch updates from the company servers. Since you are already getting an update-related issue, you should check whether BITS is working properly on your computer or not. Here are the steps to work on –
- Click on Start, type Services, and press Enter.
- Locate and double-click on the Background Intelligent Transfer Service.
- On the next screen, go to the General tab and check if the Service status is Running.
- However, if it’s Stopped, click on the Start button to make it run.
- Click on the OK button to save the changes.
4. Delete/Recreate the SoftwareDistribution folder
Many a time, the system doesn’t perform an upgrade owing to some missing or corrupt files. In such cases, one should definitely try to delete and recreate the SoftwareDistribution folder. Performing so does not only solve the error 0x80240020 but fixes several other update-related issues. Here’s how to proceed –
- Press the Win and R shortcuts to invoke the Run dialog.
- Here in the text bar, type the services.msc and hit the OK button.
- When the Services page comes up, scroll down and locate the below services –
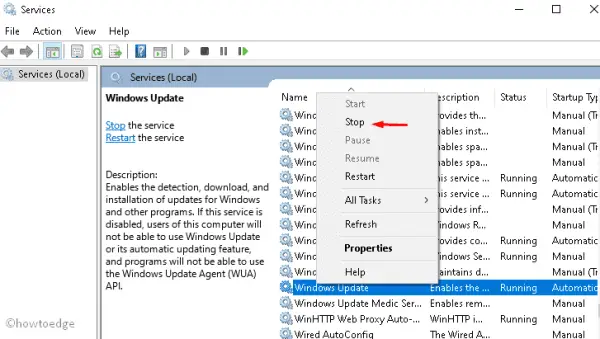
Windows Update service
Background Intelligent Transfer service
Cryptographic services
- Double-click on each one of these services and hit the Stop button.
- Press the Win and E shortcuts to open File Explorer.
- Navigate to C:\\Windows\\SoftwareDistribution\ and delete all the contents inside this directory or rename this folder to “softwaredistribution.old“.
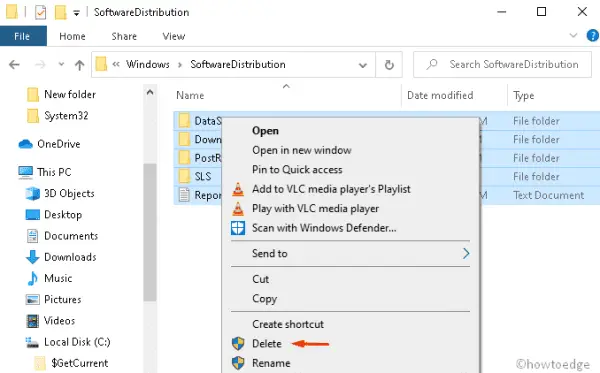
- Now, launch the Command Prompt as an Admin and execute the below code –
wuauclt.exe /updatenow
- Wait for a while as this takes some time to finish. Once over, close the Windows console and go back to the Services window to restart the services that you stopped earlier.
Windows Update service, Background Intelligent Transfer service, and Cryptographic services.
- Lastly, reboot the computer so that the changes come into effect immediately.
From the next login, you may update Windows 10 OS without receiving any error messages.
5. Perform a few changes inside the Registry
If none of the fixes above resolve the error 0x80240020, tweaking key values of certain entries inside the registry may solve this issue. However, be careful as any incorrect changes may corrupt the entire operating system. We also suggest creating a system backup before processing the below steps –
- Right-click on the Windows icon and select Run.
- Type regedit in the text box and press Enter to open the Registry Editor.
- When the UAC window appears, tap Yes to authorize the access.
- Now, expand the folders present on the left column to reach out to the following address –
HKEY_LOCAL_MACHINE\SOFTWARE\Microsoft\Windows\CurrentVersion\WindowsUpdate\OSUpgrade
- In case, you don’t find any such file inside the WindowsUpdate folder, create a new Key and name this OSUpgrade using the below sequence –
Right click on WindowsUpdate > Select New > Key
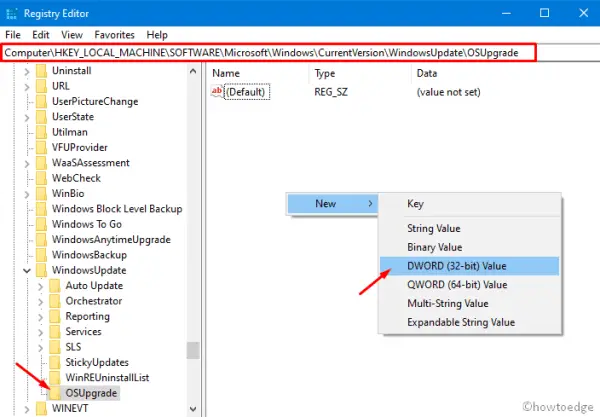
- After entering the newly created key, right-click anywhere and select
New > DWORD (32-bit) value. - Rename this entry as “AllowOSUpgrade” and set its value to “0x00000001” without quotes.
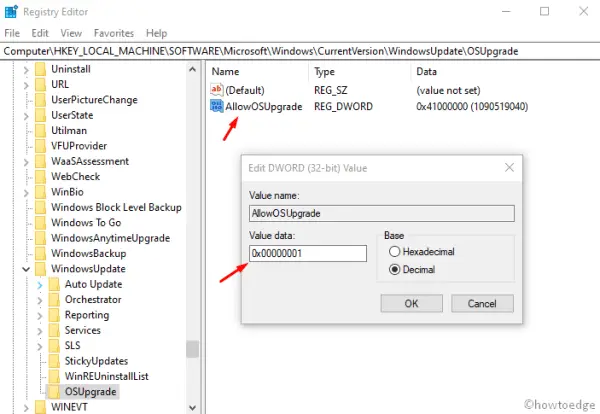
- Restart your PC so that the changes made so far come into effect.
That’s it, I hope this post helps you to get rid of the nagging update bug check 0x80240020. If you have any queries or suggestions related to this article, do convey us through the comment box.

