Like any other update error in Windows, error code 0x8024ce16 has also been reported to occur while installing new patches on Windows PC. When this occurs, you will find your device performing certain tasks less efficiently or the pending update gets stuck in between.
Sometimes, you may not even be able to do the regular update through cumulative updates. In this post, we will discuss all possible causes that might lead to this error along with a few working solutions.

What causes Update Error code 0x8024ce16
Amongst several reasons that may cause the error 0x8024ce16, the corrupt graphics driver is the prime one. Hence, we suggest regularly updating the device drivers on your PC. Sometimes, this might be due to LCU-containing bugs. You can always uninstall such patches via Windows Update Section.
Besides, Windows Troubleshooter is also an effective tool that can help to resolve any update-related bugs. If none works, roll back Windows 10 Build version using the system restore point.
Ways to Fix Update Error 0x8024ce16 in Windows
To solve the update error code 0x8024ce16 in Windows 10 PC, use the following workarounds –
1] Update the Graphics Card driver
The update error code 0x8024ce16 primarily occurs due to conflicting graphics drivers. So, you should first identify and repair the faulty device driver on your computer. To do so, use these steps –
- Press Win and X shortcut keys to launch the Power Menu.
- From the menu list, click Device Manager.
- On the next window, expand Display adapters.
- Right-click on the Intel graphics chipset and select Update Driver using the context menu.

- Next, click Search automatically for updated driver software.
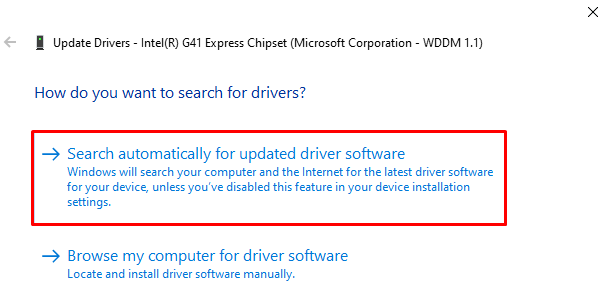
- The system will then start searching for the latest version over the internet and righteously download/update the specific display adapters.
Note: Just make sure that you are not on a metered connection, otherwise the whole process may stop in between as well.
- Once over, Restart the PC and see whether the error code 0x8024ce16 resolves or remains as usual.
2] Uninstall the individual Updates
Sometimes, installing recent cumulative updates (containing bugs) may result in such error messages. If that’s indeed the case, all you need is to uninstall the lately installed patches. Here’s how to proceed –
For Windows 11
- Press the Windows+I keys to open the Settings app.
- From the left pane, select Windows Update.
- Then click on the Update history on the right side of the page.

- Scroll down to Related settings and click Uninstall updates.
- Select the faulty cumulative update and click Uninstall.
For Windows 10
- Jointly press Win & I keys combination to launch the Settings window.
- Click the Update & Security category thereafter Windows Update on the succeeding window.
- Head over to the right panel and tap View Update history.
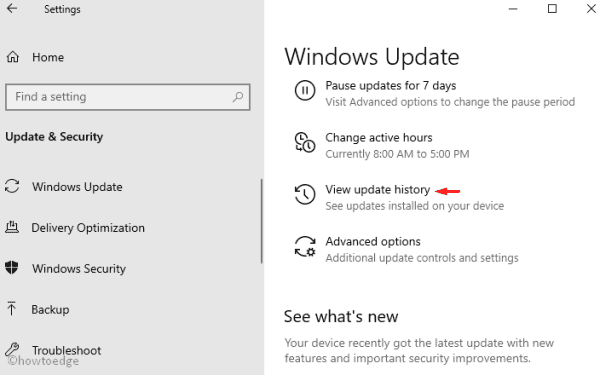
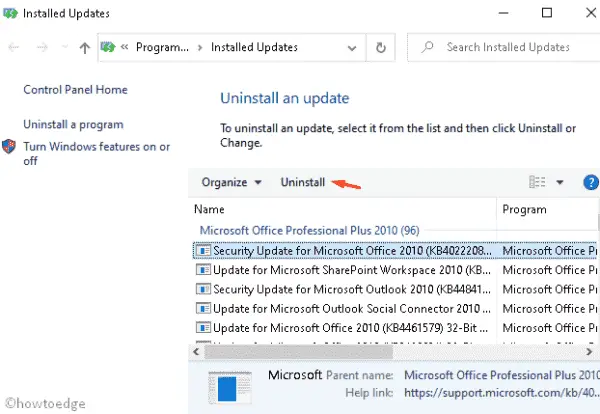
- Then click Uninstall Updates to show their installed list.
- Now, select the latest CU that is causing trouble and click the Uninstall button. See the Snapshot below –
- After the uninstallation completes, reboot the Windows and check if this solves the persisting issue 0x8024ce16 or not.
3] Run Windows Update Troubleshooter
Since this update issue is due to corrupt device drivers, following the above fixes should resolve the underlying cause. However, if you still encounter the error 0x8024ce16 while upgrading the existing Build OS, run the Windows troubleshooter. This tool can easily detect faulty files and repair them if possible. Here is the complete procedure –
For Windows 11
- Open the Run dialog using Win and R shortcuts.
- In the text box type, ms-settings: and hit the OK button.
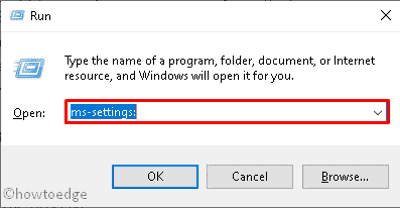
- Navigate to System > Troubleshoot > Other troubleshooters.
- Next, go to Windows Update and click on the Run button.
For Windows 10
- Press the Windows+I keys to open the Settings menu.
- On the next page, click on the Update & Security category.
- Then click Troubleshoot > Additional troubleshooters.
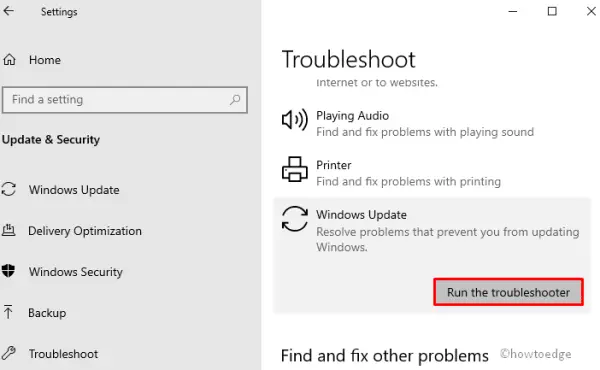
- Switch to the right side, scroll down, and select Windows Update.
- Now, click the Run the troubleshooter button to start the repair process.
- Once over, Restart the PC and install any pending updates on the computer.
4] Traces in the Event Viewer
The event viewer, in general, keeps all the data related to system processing. There is a possibility of it being the culprit behind the error code 0x8024ce16. Here’s how to confirm whether this issue is associated with the Event viewer or not –
- Right-click on the Windows icon and choose Event Viewer from the list.
- In the left column, expand Windows Logs > System.
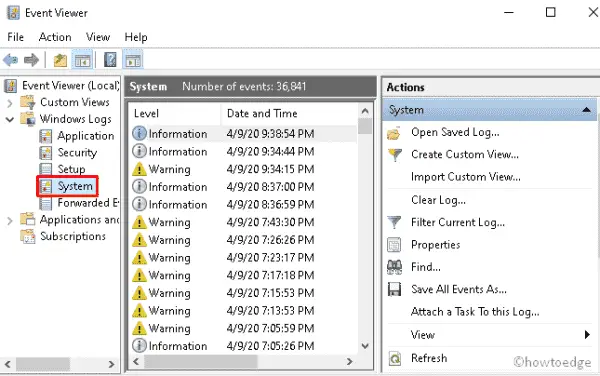
- Head over to the mid-panel and look for any suspicious files. If indeed there is one, delete the same and Restart your PC.
5] Use the System Restore Point
If one of the above methods solves this error message, it’s time to roll back your Windows 10 OS to an earlier state where it was completely okay. Yes, you guessed it right, we are talking about System Restore Point. All you need is to follow the below steps sequentially.
Note: If you hadn’t created a system backup previously, it’s high time you create one and for the time being clean install Windows 10 on your PC.
- Press the Windows key and type System Restore on its text field.
- Select Create a Restore point from the result list.
- Head over to the System Protection tab, and hit System Restore > OK.
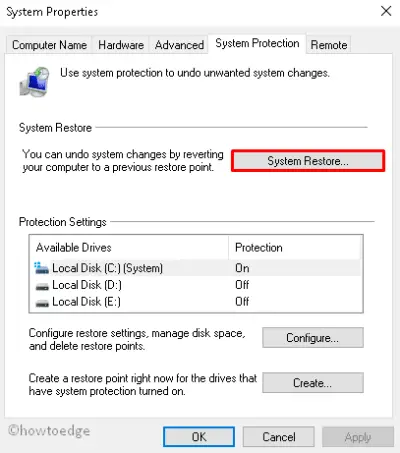
Note: In certain cases, the System Restore option appears idle. This is because you haven’t created any restore points on your PC. To create one, select the disk (like C:) and click configure. On the upcoming window, select the Turn on system Protection radio button and press Enter.
- When the Restore system files and Settings window pops in, tap Next.
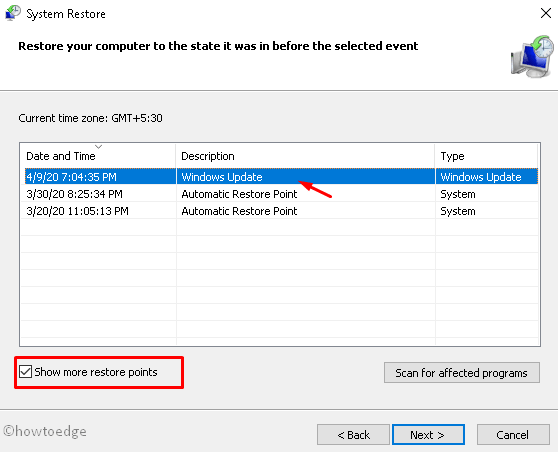
- Now, tick the box against show more restore points to see the available list of backups.
- Here, select the recent backup file as per the date of creation and click Next again.
- Subsequently, hit Finish if any confirmation window appears.
- Once over, Restart your computer so that it reverts back to an earlier state.
The error 0x8024ce16 should have gone by now. If you have any queries/suggestions related to this article, drop a message in the comment box.


