It’s frustrating when an app that you rely on stops working. The Camera app in Windows 10 is designed to help you capture life moments to share with friends and family. This app is also great for taking selfies, giving presentations, or capturing other video clips of your favorite moments. But what do you do when the Camera app not working? Here are a few fixes you can try if your Windows 10 Camera app not working.

Why my camera app isn’t working
There is a surge in video-calling apps like Zoom, Skype, etc. as more and more people are working from their homes. However, this also adds up to several new camera-related bugs and errors. In general, such troubles arise due to the non-compatibility of relevant drivers, pending Windows 10 updates, corrupt device drivers, and others. Well, in this post, we guide some quick tips to fix or avoid the “Camera App not working” issue on Windows 10 devices.
Fix the Camera not working error in Windows 10
Before proceeding to the solutions, make sure that the issue appears while connecting to other ports as well. If otherwise, you just need to replace the bad port to fix this bug. In certain scenarios, rolling back the driver to its previous state, and re-installing the WebCam Driver may also diagnose the problem. Let’s explore the solutions in detail –
To solve the Camera app not working issue on Windows 10, use the following workarounds –
- Check Webcam connection
- Install the pending Updates
- Check the Access permission of the Camera App
- Run Full Scan
- Check the Camera running compatibility
- Update Webcam Driver
- Reinstall Webcam driver
- Reinstall the Camera App
1] Check your Webcam connection
This is applicable to Desktop users only as they install a separate camera and related drivers. Those who have a pre-installed camera app on their device may head over to the next section.
A loose connection may result in the “camera not working” issue. Hence, we suggest checking its USB properly for any wear and tear thereafter make sure that it is properly connected to the port.
2] Download/Install pending Windows 10 updates
Often the pending Windows updates lead to different bugs and errors including “camera app not working”. If that’s the case, you must install the latest cumulative updates on your PC using the below steps –
- Press Win + X to start the Power Menu, and click Settings.
- Select Update & Security > Windows Update.
- Switch to the right and hit Check for updates.

- Wait until the PC finishes the downloading process and Restart the PC once completed.
From the next login, check whether the camera app is working fine on Windows 10 or not.
3] Check the Access permission of the Camera App
If any app is not allowed access to the camera and its feature, restarting that app may result in such errors. Here’s how to correct this –
- Launch the Settings app (use Win & I hotkey) and hit Privacy.
- Click Camera at the left column and jump to the corresponding side.
- Go to the “Allow apps to access your camera” section and turn On the toggle switch.
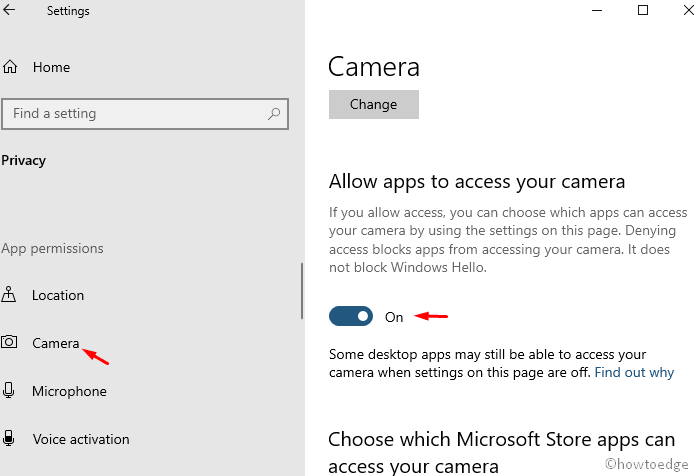
- Restart the computer and see if it resolves the problem.
4] Run Full Scan
It is often a malicious attack that interferes with the proper functioning of the camera, or even the entire system. It may happen if your Windows Security is outdated or you haven’t updated it for a long time. We recommend performing a full scan in order to identify the underlying cause and repair the corrupt files –
- Right-click on Start and select Settings.
- Then go to the following:
Update & Security > Windows Security and then Virus & threat protection.
- Under Virus and Thread protection check its running status.
Note: The green symbol means “no action needed” and the application is up to date.
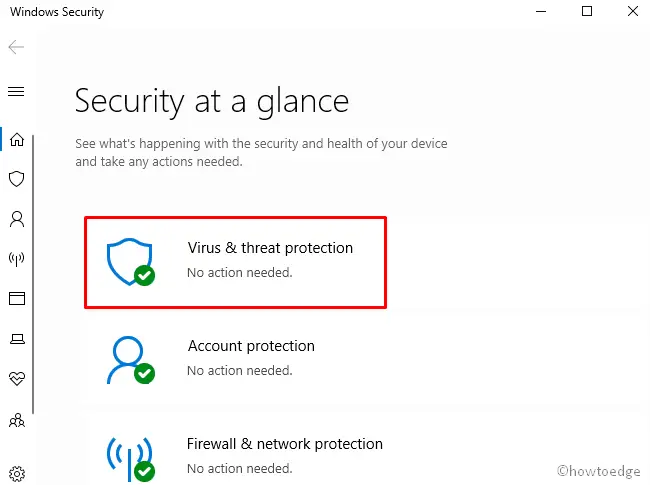
- Go to the Virus and threat protection section and hit Scan options.
- Next, check the Full Scan radio button and click the “Scan now” button.
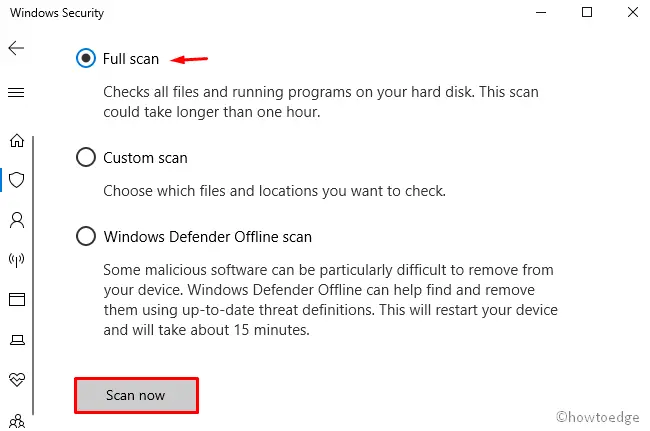
- The virus detection process begins now, wait till this gets over.
- Lastly, Restart your system so as to incorporate the latest changes.
5] Check the Camera running compatibility
The presence of stream.sys file under the camera driver may also prevent access to the Webcam app on Windows 10. So, check its availability by following the below steps –
- Type Device Manager in the search bar and click the top result. Locate and expand the Camera driver.
- Next, right-click on the relevant driver and hit Properties.
- Switch to the Details tab and find if there lies any stream.sys file or not.
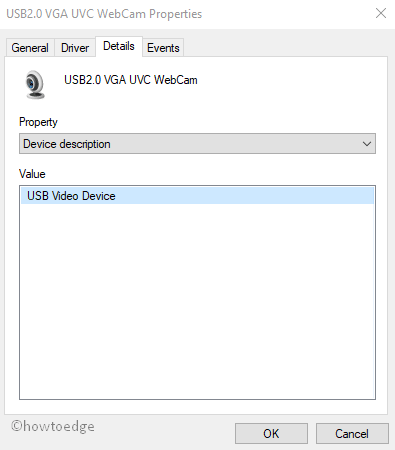
- If such files do exist there, this implies that the webcam is not compatible with Windows 10. However, if not, proceed to the next solution –
6] Update Webcam Driver
Sometimes, it’s the driver that is causing “Camera not working” trouble on the computer. So, go and check whether the camera-related driver is working fine or needs an update. Here’s how to proceed –
- Jointly press Win+X and select Device Manager.
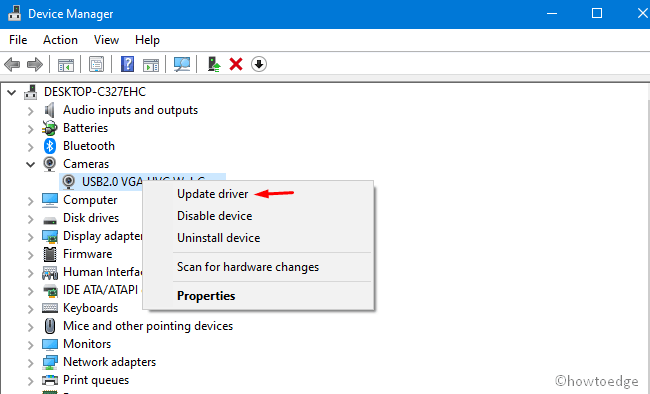
- Expand Cameras, do the right-click, and hit Update Driver. See the snapshot below –
- On the subsequent page, hit Search automatically for updated driver software and let the system finish this task.
- At last, Restart your system and check whether the Camera app is working properly or not.
Note: If you have recently updated the Camera driver and start to encounter this bug, roll back the driver to its previous state. To do so, use the below guide –
- Open the Device Manager and reach out to the Camera driver.
- Do the right-click and select Properties.
- Switch to the Driver tab and hit “Rollback Driver“.
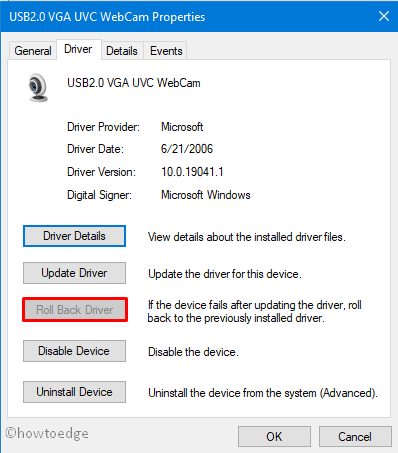
- Next, pick the appropriate cause to go back and hit Yes to confirm the rolling back.
- At last, Reboot your system and see whether the Camera app starts working or not.
7] Uninstall/Reinstall the Webcam driver
If the Windows Camera is still not working, uninstall and reinstall the related webcam driver. To do so, follow these steps –
- Press WinKey + R to launch the Run window.
- Type devmgmt.msc and hit OK.
- Next, right-click on the specific camera driver and click the Uninstall device.
- If any confirmation window appears, tap Uninstall again.

- When this gets over, Restart your PC to implement the recent changes.
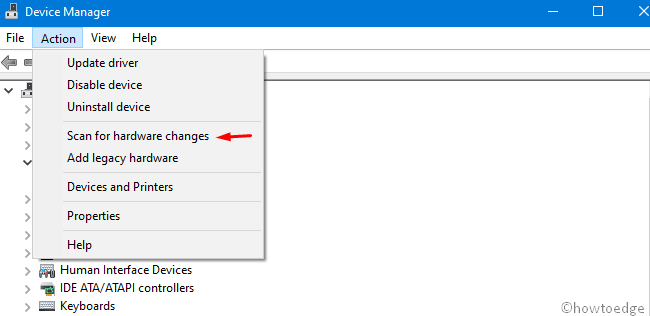
- After the next login, re-launch the Device Manager and head over to the Action tab.
- Next, click Scan for hardware changes to identify the missing driver. Let the system find and install the missing camera driver.
8] Uninstall/Reinstall the Camera App
If none of the solutions above resolve the issue, you should uninstall the Camera app and then reinstall it back. Here’s how to proceed –
- Open the PowerShell with admin access.
- When the UAC window comes into view, tap Yes to continue.
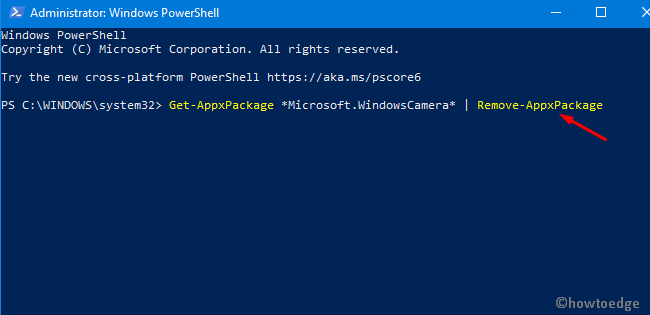
- On the elevated prompt, copy/paste the below code and press Enter –
Get-AppxPackage *Microsoft.WindowsCamera* | Remove-AppxPackage
- When the Camera app is uninstalled, Restart your PC so as to delete any leftover files.
- You may now go to the Microsoft Store and download/install the Windows 10 Camera app.
I hope this post helps to resolve the “Camera not working” issue on Windows 10 PC.


