Windows 11/10 receives new updates on a regular basis through either monthly patches or Insider Builds. When you update your existing OS to a newer version, sometimes the update process may fail on different error codes. The update error 0x8007042B – 0x2000D is one such anomaly that interrupts the intermediate processes including Windows Update. When it appears, this won’t let you upgrade the Windows operating system no matter how many times you try.
What causes an update error in Windows 11/10?
Faulty USB peripherals, third-party apps or antivirus software, corrupt system files, or problematic updates are some of the reasons that may trigger an update error on Windows 11 or 10.
With Windows continually evolving, you have several in-built features that can easily resolve update-related issues on your device. Unplug and then replug the secondary devices, uninstall third-party programs, and locate & repair missing or corrupted files are a few ways that may help to overcome this issue.
Use System Restore Points or Clean Install Windows 11/10 if none of the above solutions work.
Fix – Windows 11/10 Update Error 0x8007042B – 0x2000D
If you are unable to install pending updates or upgrade your Windows 11/10 PC because of an error code 0x8007042B – 0x2000D, attempt the below fixes one by one. Hopefully, this will resolve after applying the below solutions –
1] Remove additional USB peripherals
Sometimes the Installation failed Error 0x8007042B – 0x2000D might appear due to the presence of additional secondary peripheral devices. To fix this issue, just unplug these devices and thus resolve the unable to install updates conflict. If the error still appears, try the next workaround –
2] Uninstall Third-party Antivirus
There’s a great antivirus program pre-built in on your Windows 11/10 PC that goes by the name “Windows Security”. Enabling this software automatically scans for possible viruses and malware and repairs them. However, a few users still go for a third-party antivirus to do this task.
Having a third-party antivirus not only keeps the viruses intact but also slows down your computer. Since they interact with system files too often, it may corrupt the essential system files. As a result, error 0x8007042B – 0x2000D appears on your PC. In order to fix this error, one must uninstall external security apps or at least disable them. Here’s how to perform this task –
- Right-click on the Windows icon and select Settings from Power Menu.
- Next, select the Apps category and move to the Apps & features section from the left pane.
- Scroll down and right-click on the installed anti-malware application.
- Hit the Uninstall button followed by Uninstall again on the popping menu to confirm the deletion.
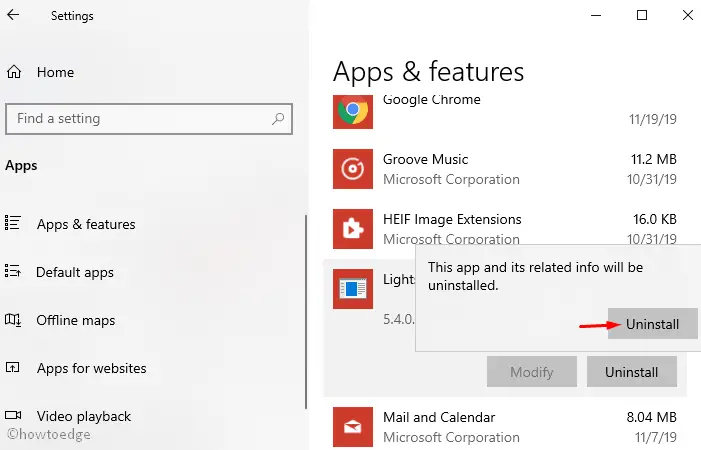
- Finally, Restart your PC.
3] Download and install the pending updates manually
After disabling the third-party software, try downloading the pending updates manually. To circumvent the Error 0x8007042B – 0x2000D, visit the Microsoft website and download the specific cumulative files directly by going through the below steps –
- Note down the KB number that is causing the update issue from the Windows update section.
- Now visit the Microsoft Update Catalog and type the exact Knowledge-base number in the search bar then hit Enter.
- Here from the updates list, click Download that is suitable as per your system architecture.
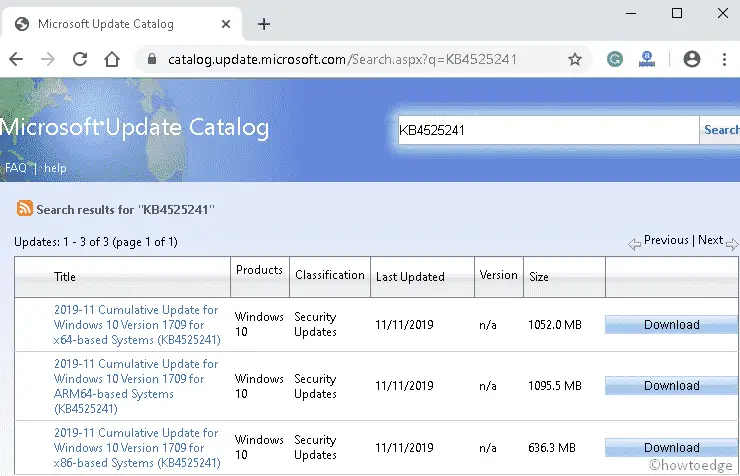
- When the setup downloads, click the .exe file to install the same.
Once the above task completes, Restart your system and check if the Installation failed Error 0x8007042B – 0x2000D is resolved or not. If you have upgraded your system to Windows 11, follow this tutorial on how to manually install pending updates.
4] Remove the recent changes to applications
A new app or driver installation may lead to Windows stuck issues. Hence, disabling the latest changes on existing apps or removing new applications will resolve the Update Error 0x8007042B – 0x2000D. Just follow these simple steps –
- Click on the Search icon and type Control Panel.
- Tap over the well-matching result.
- Next, select Programs & features.
- Now, put right-click on the recent apps and hit the Uninstall button.
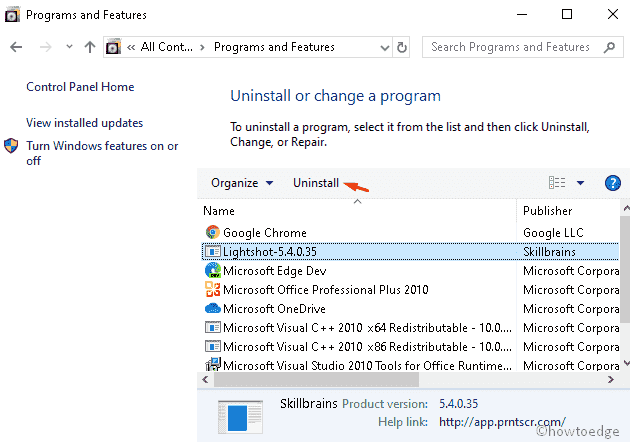
- If User Account Control appears, tap Yes.
When the uninstallation finishes, Reboot your PC.
5] Scan System files using SFC
The presence of corrupt system files may also bring the installation failed error 0x8007042B – 0x2000D on Windows 11/10. It is thereby suggested to perform sfc/scannow to identify and repair such files. Here are the essential steps to follow –
Step-1: Press Win and S jointly and type Command Prompt in the text bar.
Step-2: Put the right-click on the well-matching result and choose Run as administrator.
Step-3: When UAC appears, hit Yes.
Step-4: Type sfc/ scannow and press Enter to start scanning the system files.
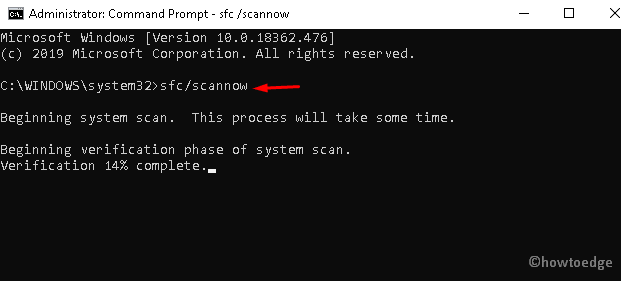
Step-5: This will take approx 15 minutes to complete, hence don’t perform any other task.
When the above task completes, Restart your PC to let the system save the recent changes.
6] Perform DISM code
In case, SFC doesn’t fix the Installation failed Error 0x8007042B – 0x2000D, you should try executing the DISM code as well. Running this built-in tool will find and fix any corruption inside the Windows Image. Here’s how to use this utility program –
- Click on the Search icon and type Command Prompt.
- Move to the right pane and select Run as administrator.
- Press Yes on the UAC prompt, to allow access.
- On the elevated console, type the following code and press Enter.
DISM /Online /Cleanup-Image /RestoreHealth
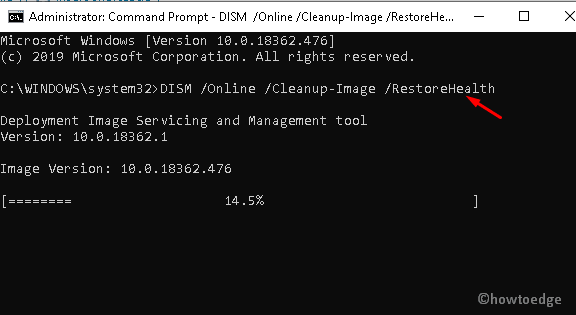
- The scanning process will start immediately afterward, keep patience and let this scan complete.
- Lastly, Restart your system and see if it resolves the 0x8007042B – 0x2000D issue.
7] Rename SoftwareDistribution and Catroot2 folder
Since the working performance of the system relies on certain services, a corrupt one may arise 0x8007042B – 0x2000D bug. If that’s the case, you should reset the Windows update components following these steps-
- Jointly press Win & X hotkey to launch the Power Menu.
- Select Run from the list of options.
- Inside the text area, type cmd and simultaneously hit Ctrl+Shift+Enter keys.
- When the UAC prompt appears, tap Yes.
- On the elevated console, type these codes one by one and hit Enter at the end of each command.
net stop wuauserv
net stop cryptSvc
net stop bits
net stop msiserver
ren C:WindowsSoftwareDistribution SoftwareDistribution.old
ren C:WindowsSystem32catroot2 catroot2.old
net start wuauserv
net start cryptSvc
net start bits
net start msiserver
pause
After you run these commands successfully, install the pending cumulative updates and check if the problem resolves or not.
8] Rename the Migration directory to Migration.old
The renaming of the Migration directory may also fix the Update error 0x8007042B. Here’s how to proceed –
- Press the Windows key and E together to open the File Explorer.
- When File Explorer prompts, navigate to the following path –
C:\ Windows\System32\Migration
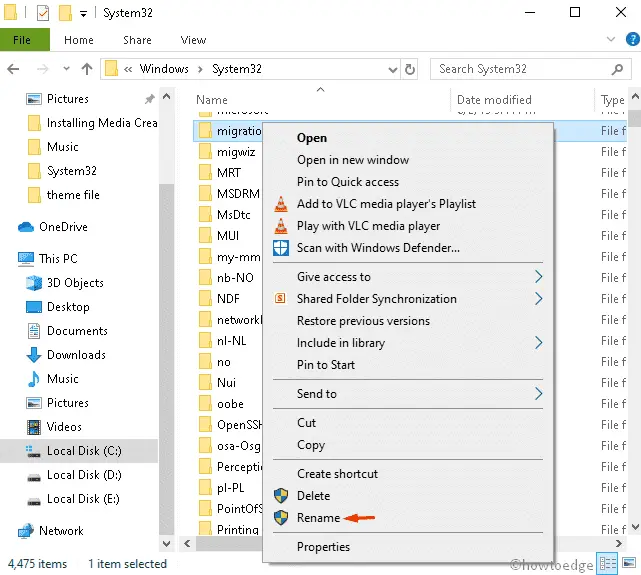
- From the list of directories, right-click on the migration folder and select Rename using the context menu.
- Now change the directory name to
Migration.old. - Once this task is over, Restart your PC to save the changes performed so far.
9] Use Earlier System Restore Point
If you have ever created a restore point on your device, you may use that one to retrieve Windows OS to that state. Though this has nothing to do with the error code 0x8007042B – 0x2000D, this will help any bugs that occur afterward. To do so, follow the below guideline –
- Type Create a Restore Point in the search bar and hit Enter.
- Under the System Properties wizard, tap the System protection tab.
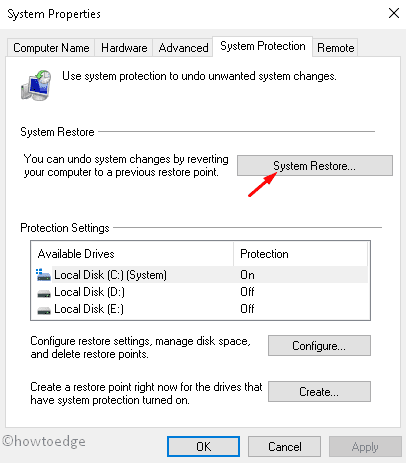
- Now click on the System Restore button followed by Next.
- The list of restore points will appear; select the latest one and let it scan the affected programs.
- Afterward, tap Next then Finish to save the changes.
- Once the Restoration process is over, “Restart your PC”.
10] Upgrade Windows 11/10 using the Media Creation Tool
If none of the fixes elaborated above resolve the update Error 0x8007042B – 0x2000D, you should perform a clean installation of Windows 11/10. Here’s how to proceed –
Note: Windows 11 users may read this article on how to upgrade or clean install the new OS on their PCs.
- Download the Media creation tool by visiting Microsoft’s official website.
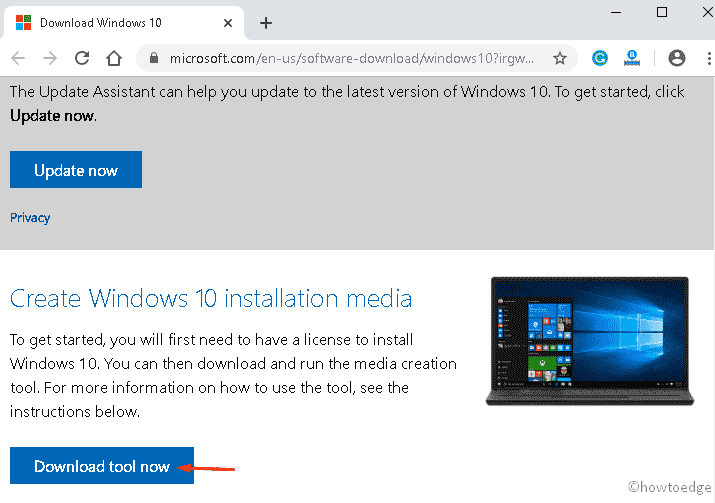
- Next, double-click on the .exe file to install this application.
- Select the Upgrade this PC now radio button thereupon Next to start installing the setup.

- Choose the Download and install updates (recommended) then Next.
- Tap the Accept button to acknowledge all the terms and licenses.

- Check to Keep personal files and apps thereafter press Next.
- Now, go through the on-screen instructions to install the Windows setup successfully.
That’s it, we hope, you can now update your Windows 11 or 10 OS without receiving the Update Error 0x8007042B – 0x2000D.


