The error 0xc7700112 is basically an update-related issue and often occurs when you try installing an in-place upgrade to Windows 10. According to a few users, they receive this error code when they were trying to upgrade their Windows OS via Update Assistant. Whatever is the reason in your case, you should read this article till the end. In this post, we will discuss four ways that upon applying will definitely fix this issue.
What triggers an error code 0xc7700112 in Windows 10?
The error code 0xc7700112 usually occurs when there is a conflict between the present installation and an attempt to install earlier updates. To solve it, you may try disabling or uninstalling the running third-party antivirus, or simply troubleshoot Windows Update. If the problem persists even after that, delete the “$Windows.~BT” folder or remove orphaned Windows Setup entries from the BCD store. Let’s explore the solutions in detail –
Fix: Windows 10 Upgrade Error code 0xc7700112
To solve Windows 10 upgrade error code 0xc7700112, use the below methods sequentially –
1] Disable third-party Antivirus Program
Many a time, such errors erupt due to running third-party antivirus programs on the computer. They indeed help to protect your PC from malware infection, Trojans attack, etc. However, sometimes they may prevent Windows from updating for reasons unknown. So, try disabling such software temporarily and check whether you can update or Windows or not.
Note: If you are using a free 3rd-party antivirus program, we suggest removing the same and rather switch to Microsoft Defender. This is an in-built anti-malware program by Microsoft and is well sufficient to remove any viruses on Windows 10 PCs. Besides, the company regularly provides a security update to this on patch Tuesday.
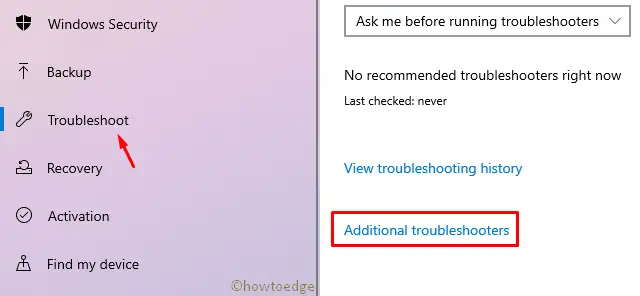
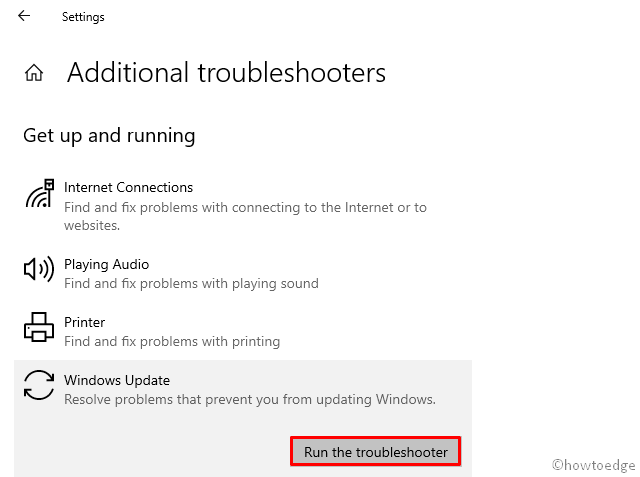
2] Run Windows Update Troubleshooter
Windows Update Troubleshooter is the best tool to resolve any update-related trouble on the computer. If you are struggling with the error 0xc7700112 on Windows 10, here’s how to use this troubleshooter –
- Launch the Settings UI (using Win+I).
- Choose Update & Security then Windows Update.
- Next, click “Additional troubleshooters” on the right pane.

- Moving to the next page, click Windows Update thereupon “Run this troubleshooter“.

- Now, follow the on-screen instructions and this tool will take care of the rest.
3] Delete C:\$WINDOWS.~BT
If you are still getting the update error 0xc7700112, try deleting the $Windows.~BT folder on the root drive (C:\). Here’s how to perform this task –
Note: Make sure to enable “Show hidden files” settings on your device before following the below steps.
- Jointly press Win+I to start the File Explorer.
- Next, reach out to the following location –
C:\$WINDOWS.~BT
- Make a right-click on this folder and hit “Delete“.

- This may launch a pop-up window ~ “Folder Access Denied”. If there’s a “Continue” option, hit it to delete the folder using admin rights. If not, you need to first access “administrative privileges” for this folder then only can delete the $Windows.~BT folder.
Or, execute the following codes after opening Command Prompt as an Administrator –
takeown /F C:\$Windows.~BT\* /R /A
icacls C:\$Windows.~BT\*.* /T /grant administrators:F
rmdir /S /Q C:\$Windows.~BT\
Imp: If the root drive varies on your PC, replace “C” with the actual drive letter in the above command lines.
- Restart Windows to incorporate the recent changes. Sign back in and check whether you still get the update error 0xc7700112 or not. If yes, try the next solution –
4] Remove Orphaned Windows Setup entries from the BCD
If none of the above fixes resolve the 0xc7700112 error, this might be due to traces of an earlier setup installation attempt within the Boot Configuration Data file. To solve this, you need to remove the orphaned Windows Setup entries from the BCD store using the below steps –
- Press WinKey + R to launch the Run dialog.
- Type “cmd” at the void and hit Ctrl + Shift + Enter keys together. This starts the Command Prompt with admin rights.
- Next, execute the code –
bcdedit /enum all. - There appear multiple sections as depicted in the below snapshot –

- Now, you need to pipe out the data to a text file. To do so, run the command –
bcdedit /enum all > D:\bcd.txt
Note: You may replace the “D:\bcd.txt” part with the exact path where you want to store the above information.
- In the snapshot above, you may see the Windows Setup description inside the “Device Options”. These are basically the leftover files from earlier attempts and are blocking the current installation. All you need is to delete these entries so that Windows 10 in-place upgrade occurs successfully.
- Copy the identifier inside the {} brackets for each one of the Windows setup sections. Now, delete them one after another running the codes as below –
bcdedit /delete {your-identifier}
For Example – bcdedit /delete {cbd971bf-b7b8-4885-951a-fa03044f5d71}
- Repeat the above process for each one of the Windows setup entries under the Device Options. There’s no need to worry about the excess Windows Recovery entries.
- After you remove each one of the setup file entries successfully, Reboot Windows.
- Once again, start Windows Console as an Admin and run the code –
bcdedit /enum all. - There should not appear any further Device options running the above code. In case, there do exist a few entries, try deleting them as done above.
Once there doesn’t appear a single Windows upgrade old file, Restart Windows again. From the next login, you may upgrade your Windows 10 device without getting the 0xc7700112 error again.


