In this guide, we will see why the “Windows 11 Start Menu Not working” issue evolves, the reasons behind it, and what you may do to fix it on your computer. The Start menu may stop working due to several reasons like – a corrupted search build index, damaged registry, or certain services not running in the background.
In addition to this, Start Menu problems may also occur when you have recently installed some third-party apps and have provided them access to Windows Search. Whatever the issue in your case, you may fix that by following the workarounds discussed in this post. Let’s have a look at them one by one –

Windows 11 Start Menu Not Working Solutions
If the Search Menu is not working effectively on Windows 11 PC, go through the below list of solutions, and see which one does the charm. The workarounds are as follows –
1] Restart Your PC
Restarting your PC is the best solution to address any kind of problems or issues on the Windows Operating system. So, do it and check if the problem persists even after this. If it does occur again, try out the solutions listed below –
2] Rebuild Search Index
The Start Menu is nothing but a pictorial representation of Windows Search. Any issues with the search index may also corrupt the Start Menu. So, check if this problem is occurring just because of any indexing issues or not. The best way to know about this is by rebuilding the Search index. Here’s how you may perform this task –
- Open the Run dialog by pressing WinKey + R.
- Copy/paste the following and press Enter –
control /name Microsoft.IndexingOptions
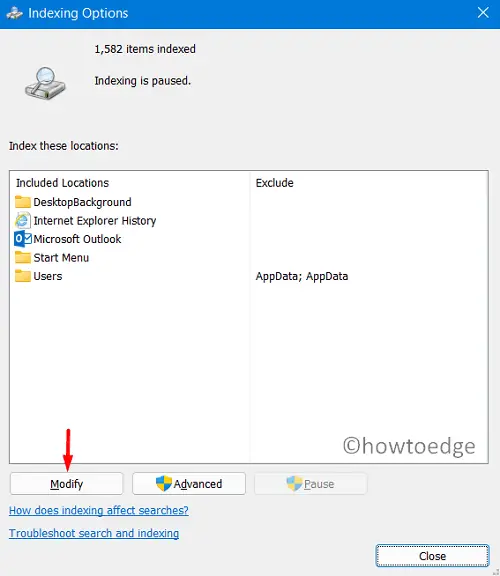
- When the Indexing options window pops up, click Modify.
- Moving ahead, click Show all locations.
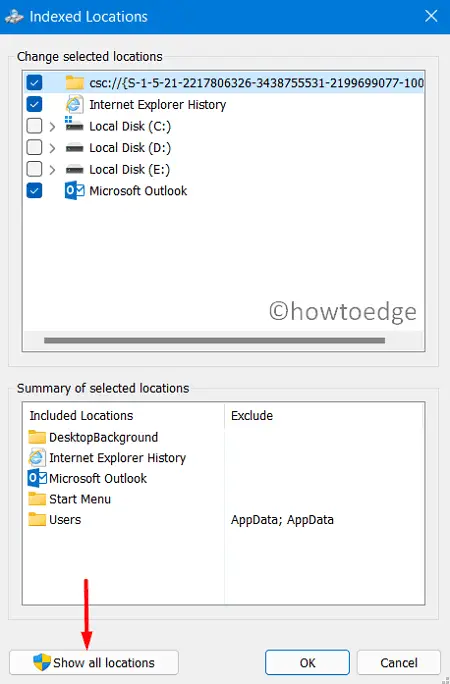
- Uncheck all the options from where you don’t want the files to appear on the Search window.
- After you have unmarked the checkboxes, hit OK to confirm the changes made so far.
- Coming back to the Indexing Options window, click Advanced.
- Subsequently, click Rebuild under Troubleshooting, and hit OK.
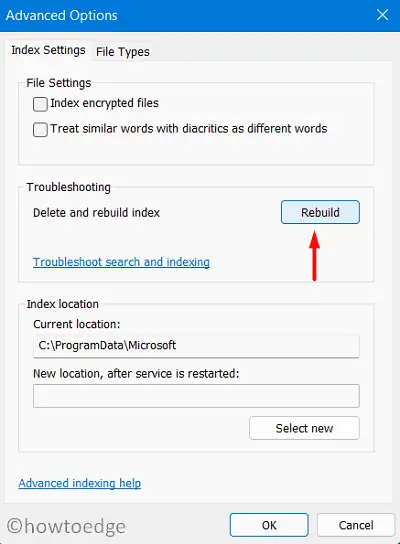
The system will now start rebuilding the search index. Wait till the whole search rebuilding process is completed. When this is over, reboot your PC. This is to ensure that changes made become effective from the next login.
3] Remove Third-party access to the Start Menu
Many of us love custom-changing the default Start Menu via third-party apps like Classic Start, WinAero Taskbar, etc. Though these programs provide a new or classic old look to your Windows, they may interfere with the system settings as well.
The problem starts happening only when the installed program is not compatible with Windows running on your computer. So, if you have recently installed any such program, consider removing them at once.
After you have successfully removed third-party access to the Start Menu or for that matter, Taskbar, restart your PC. From the next logon, the Windows 11 Start menu should work completely fine.
4] Restart Windows Explorer
If the start menu is not functioning properly on your Windows 11 PC, try restarting Windows Explorer for once. As per several users, doing this alone fixes the Start menu crashing issues on their devices. Follow these instructions to restart File Explorer –
- Right-click on the Start menu and select Task Manager.
- On the subsequent screen, scroll down and locate Windows Explorer.
- When found, right-click over it, and hit the Restart button.
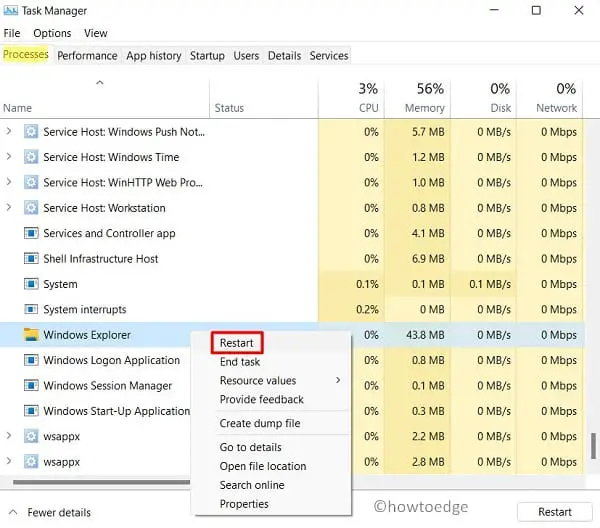
- Wait for a few seconds, while the explorer resets itself.
5] Restart Windows Background Services
There are certain services that must be running in the background for the Start Menu to work properly. These services are – SearchIndexer, SearchHost, and RuntimeBroker. All of them are executable files and thus appear in the file format – .exe. Go and check the current status of each one of them. If you do find any services stopped, restart them by following these steps –
- Press Win + R to open the Run command.
- Type “
services.msc” and hit OK. - When the services window comes into the display, locate the three services that we discussed just before.
- See their current status.
- If you find either one of them “stopped”, right-click over that, and hit Restart.
Similarly, there are certain services that upon run may hinder the Start Menu from working normally. You must disable or delete such services by following the below guideline –
- Press Ctrl + Alt + Del, and choose Task Manager.
- When the task manager opens up, go to the “Details” tab.
- Scroll and locate “StartMenuExperienceHost.exe” here.
- When found, right-click on it, and hit Delete/End Task.
Reboot your PC and when it does, check if the Start Menu starts working alright or not.
6] Reinstall the Start Menu via PowerShell
If the Start Menu issue is not resolved by following any of the above workarounds, uninstalling and then reinstalling the Start program might help.
There’s no way to reinstall the Start Menu normally. Hence, we will use PowerShell (Admin) to perform this task –
- Press WinKey + X and choose Windows Terminal (Admin).
- By default, this opens up as Windows PowerShell.
- When the UAC window prompts, hit Yes.
- On the elevated console, copy/paste the following, and press Enter –
Get-appxpackage -all *shellexperience* -packagetype bundle |% {add-appxpackage -register -disabledevelopmentmode ($_.installlocation + “\appxmetadata\appxbundlemanifest.xml”)}
- Though the above cmdlet runs perfectly fine, this may throw an error message as well. Just ignore the message that you have encountered before.
- Don’t forget to restart your PC and when it does, rebuild the Search Index.
If you are still struggling with the above issue, you may perform these checks as well –
7] Perform a Full Scan via Windows Security
The presence of viruses or malware may also result in Windows 11 Start Menu not working correctly. In case you have installed any program recently, uninstall that immediately. If the problem remains as it is, go and perform a full scan via Windows Security.
8] Check For System Update
Windows 11 Start Menu may fail to start correctly on account of some issues in the recently installed cumulative updates. One may fix this simply by finding any incompatibility issues that exist on your computer and removing them.
To download and install system updates, do the following –
- Press “Windows key + I” to enter the Settings app.
- Select Windows Update on the left pane and head over to the right pane.
- Hit Check for updates.

- The system will then search for any available updates. If it finds any, the same gets automatically installed on your computer.
Check if doing so resolves the issue that you are struggling with.
9] Update Your Driver
Similar to that of system updates, the presence of corrupted device drivers may also trigger the Windows 11 Start Menu not working issue on your computer. To fix it, you may use Device Manager and update the required ones.
Here’s how you may update drivers –
- Right-click on the Windows icon and select Device Manager.
- Double-click on Display adapters to expand it.
- Right-click on the first option and select the option – Update driver.

- Hit Search automatically for the driver next.
- Let the system find and download the required patch updates.
10] Sign Out Of Microsoft Account And Sign In With Local Admin Account
Though this should not be considered a solution, you may try switching to a local admin account and see if the issue resolves after this.
You may sign in to your Microsoft account anytime you want to once the Start Menu starts working all right. Here’s how to perform this task –
- Press “Windows key + I” altogether to open the Settings window.
- Select Accounts > Family & other users.
- Click “Add account” under the section – Other users.
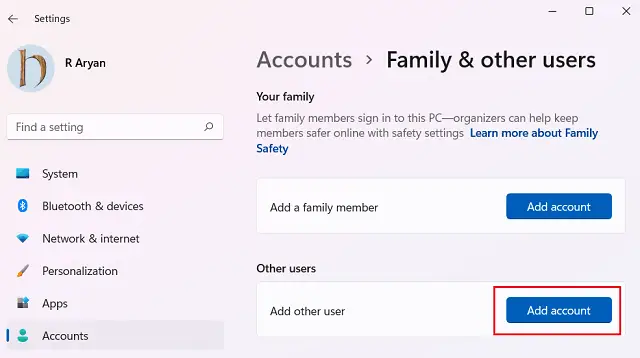
- When prompted, click I don’t have this person’s sign-in information.
- Click Add a user without a Microsoft Account next.

- Fill in the necessary details to create your new local account.
- After you have opted for a username and its password, hit Next again.
- That’s it, the system will automatically generate your new local admin account.
- Log out of the current profile and use the newly created account’s credentials to sign in to it.
11] Reset your PC
If you had zero luck with all of the previous methods, we think you should try a Windows Reset. Doing this will renew your operating system with no loss of personal files or folders. Here’s how you may reset your PC –
- Press WinKey +X, and choose the option – Windows Terminal (Admin).
- When the UAC prompts, hit Yes.
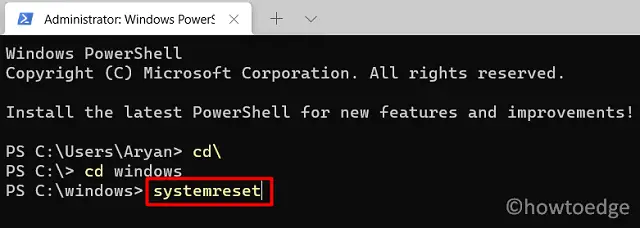
- By default, the terminal opens into C:\Users\<username>.
- Type “cd\” and press Enter to go to the root drive.
- Type cd Windows\system32 to enter the System32 folder.
- Now, type “
systemreset” to open the Windows Reset panel.
- This panel presents two options to choose from, select “Keep my files”.
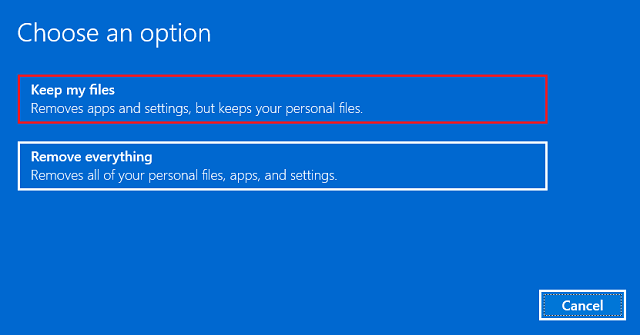
- Follow the on-screen instructions that come afterward.
- In the end, you will find a list of apps that will be removed if you go with the reset PC option.
- Note down these apps and hit Next to proceed ahead.
Windows will now initiate resetting your operating system. The whole resetting process might take 1-2 hours, so wait patiently.


