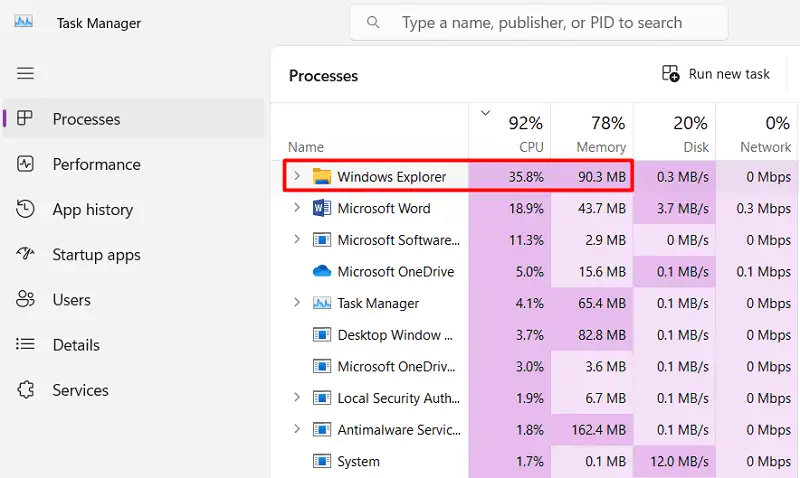
Windows Explorer is the default file-managing application on all versions of Windows. Usually, this system app works fine and lets you manage all your files with no issues whatsoever. However, when it does get into trouble, you start getting very high CPU Usage for Windows Explorer in Task Manager.
What’s the normal memory usage of Windows Explorer?
Ideally, File Explorer consumes up to 60-100 MB of Memory with the CPU utilization percentage ranging between 1-5%. This figure increases with more Windows and Tabs opened in File Explorer. You don’t require to do anything as it comes back to normal levels in a few seconds.
However, if the system resources being utilized by Windows Explorer always remain high with Explorer crashing every now and then, you must check one or two things and get it working again. In this post, we have discussed what possibly causes a hike in CPU usage by Windows Explorer and 7 relevant fixes for this.
What causes Windows Explorer’s High CPU Usage Issue?
Being a system app, Windows Explorer doesn’t consume much CPU. When you open this app in Task Manager, you will see it consuming between 1-5% only. However, if you see it consuming more than this percentage with no active tasks on Windows Explorer, it is a matter of concern.
Most probably, this could be due to some internal glitches which you can resolve by simply restarting File Explorer. If this issue persists even after this, you must check for the following items on your computer –
- Windows.old or Temporary Files: More the files, the more would be system resources utilized by Windows Explorer. Get rid of all such files, and File Explorer starts working normally.
- OneDrive constantly in use: If you add or remove big files on Windows every now and then, you better unlink your OneDrive account. This way, there won’t be any unnecessary cloud integration and thus resolve the high CPU utilization by file explorer.
- Modified Power Plan Options: If you have recently changed the default Power Plan settings, and this error started occurring afterward, you better restore the default Power Options.
- Corrupt Searching Index: One should rebuild the Searching Index once a year so that there won’t be any corrupt indexing on your computer. If you haven’t done this yet, make sure to do it now.
- Presence of Malware inside your PC: You may ensure this by performing a full scan of your PC using the default security app i.e. Windows Defender.
Now that you know what may cause the high CPU usage issue in Windows Explorer, let’s learn how to mitigate this issue on Windows 11/10 PC.
1] Restart Windows Explorer
The most effective way to resolve Explorer-related issues is by restarting this application. Since Windows Explorer is consuming high system resources, you better restart it and check if this resolves the issue you are struggling with –
- Press the Ctrl + Shift + Esc keys simultaneously to open the Task Manager.
- In the Task Manager window, click on the “Processes” tab.
- Scroll down the list and locate “Windows Explorer” or “explorer.exe“.
- When found, right-click on it and select Restart from the context menu.

The Taskbar will disappear for a few seconds. When Windows Explorer restarts, go and check if it still utilizing high CPU resources or has come down to its normal values.
2] Delete old Windows and Temporary files
When you reinstall Windows on your computer, all your files and folders from the previous Windows installation move to a folder titled “Windows.old“. This folder is quite big in size as it contains all your important data and previous app settings.
Temporary files are those files that accumulate over time and can take up a significant amount of disk space. Both these Windows.old and Temporary files are non-significant and consume valuable system resources. Deleting them can help improve the overall performance of your computer, especially if your hard drive is nearly full.
Disk Cleanup is an in-built tool on Windows that you may utilize to find and remove all such files from your Windows PC. Here’s how to use this tool in Windows –
- Click on the Search icon on the Taskbar, type in disk cleanup, and press Enter.
- Use the drop-down menu to select your root drive and click on OK.

- Locate and click Clean up system files. Select your primary drive again using the drop-down menu, and hit OK.

- Under Files to delete, tick all the checkboxes and hit OK.
- When a confirmation window prompts, click Delete Files.
Wait for this tool to delete all selected folders, and when this is over, restart your computer. Sign back into your device again and check if File Explorer starts working normally now.
3] Unlink your OneDrive Account
Back in Windows 8.1 or earlier versions, there was no cloud integration within File Explorer. However, with Windows 10, Microsoft introduces OneDrive and it keeps your user account inside Windows Explorer always connected to the Cloud.
The moment you put any files inside your user account, they start uploading to OneDrive, provided you are connected to the Internet. Though this syncing feature lets you access your files from any device, this may sometimes slow down your computer.
To avoid this, disconnect your OneDrive account from Windows and this will resolve the high CPU Usage by explorer.exe. Here’s how to unlink your OneDrive account from Windows –
- Locate the cloud icon on the system tray and click on it. If you don’t see such an icon, click on the up-arrow key, and when this expands, select OneDrive.
- Click the gear icon next and when it expands, select Settings.
- Go to the Account tab, and select Unlink this PC on the right pane.
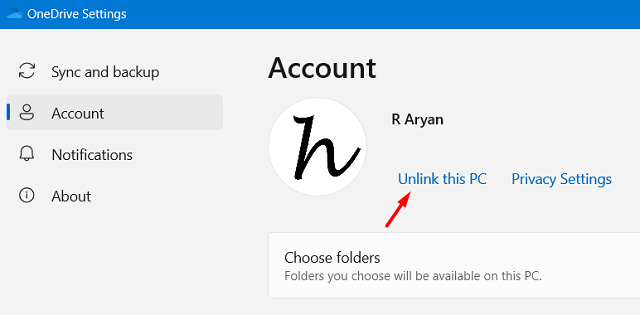
- A pop-up window will appear next asking if you really want to unlink your PC.
- Well, click Unlink account, and your OneDrive account gets signed off immediately afterward.
Restart your computer and when it does reboot, check if you can use Windows Explorer normally now.
4] Restore Power Plan to their default settings
By default, Windows comes with a Balanced Power Plan for all its users. Modifying this plan often causes performance issues in Windows, including high CPU usage in File Explorer. Reset the power plan to its default settings and check if this resolved the issue you are struggling with. Here’s how –
- Launch Control Panel and select Power Options.
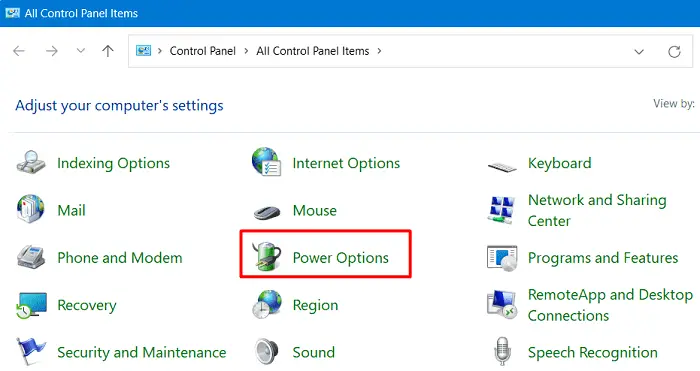
- Under Selected Plan, click Change Plan settings.
- On the succeeding screen, click “Restore default settings for this plan” available at the bottom, and hit Yes when a prompt appears.
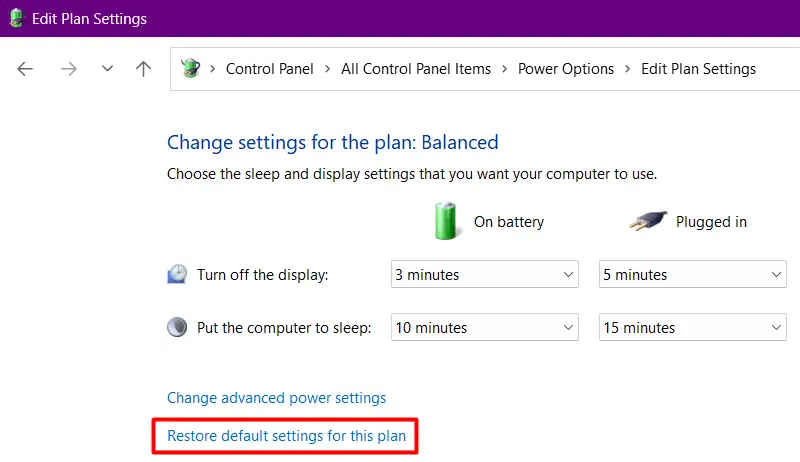
- Restart your PC so that the recent changes come into effect from the next login.
5] Rebuild Windows Search Index
At times, File Explorer’s High CPU usage issue appears only when you are searching for a particular file inside it. If that’s the case, this issue is related to the Search Index Library on your computer and you may fix it by simply rebuilding the Windows Search Index.
Follow the below instructions on how to rebuild Windows Search Index –
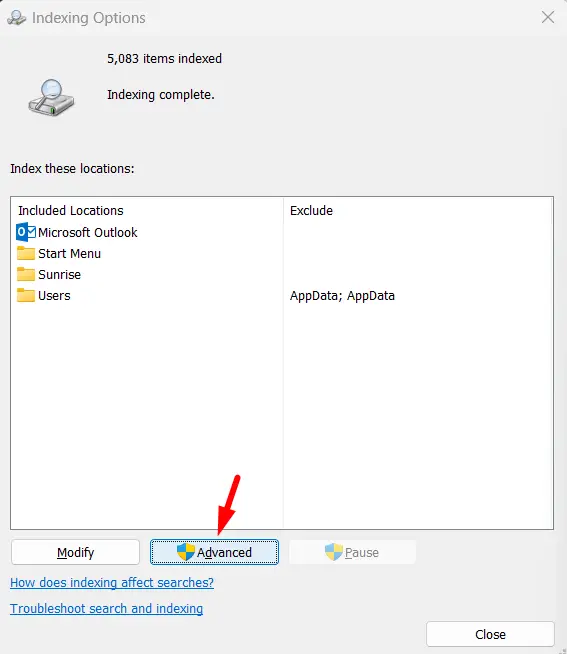
- Press Windows + S, and type “Indexing options” in the text field.
- Click on the top result and when this launches, select Advanced.
- Under Troubleshooting, click on the Rebuild option.
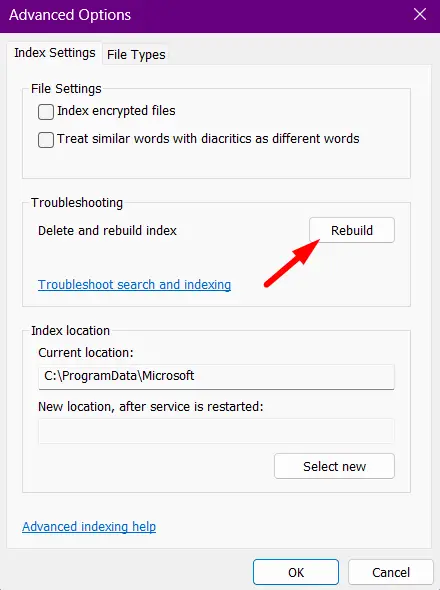
Now, wait for this process to complete which usually takes 1-2 hours. After this “Search Index” rebuilding process completes, there won’t be any issues to deal with.
6] Scan for Malware
The above five methods will surely help you address the high CPU usage in Windows Explorer. If not, there’s a possibility of malware infection on your system. To overcome this issue then, you must initiate a Full Scan using the default security app i.e. Windows Security.
7] Install Pending Windows Updates
If nothing else works, you can manually check for any pending updates on your Windows PC. To do this, click on the Start Menu, go to Settings > Windows Update, and hit Check for updates.
These system updates usually bring all kinds of performance improvements and bug fixes to Windows. Hopefully, this also resolves the issue that you are long struggling with.
Conclusion
I hope you were to resolve File Explorer’s high CPU utilization issue on your Windows PC by following the tips and tricks mentioned above. Let’s know in the comment section about the solution that worked in your case.


