Several users reported receiving an error 0xc0000219 in which their Windows 11 PCs get stuck on the Automatic Repair Screen. It doesn’t matter how many times Windows get into this automatic repair, it never comes out of this loop. The error 0xc0000219 is basically a blue screen of death error and it might occur because of both hardware as well as software reasons.
When you encounter this error, you receive an error message stating – “Your PC ran into a problem and needs to restart“. Let’s explore the reasons for invoking this error code and the fifteen workarounds that should resolve this problem on Windows 11.

What causes an error 0xc0000219 on Windows 11
Two startup programs are responsible to load Windows 11 normally on your computer. They are Windows Logon Subsystem (Winlogon.exe) and Client/Server Runtime Subsystem (Csrss.exe). If something happens to either of these programs which restricts them to start, your device will get into some Stop Error code.
How to Solve Blue Screen of death Error 0xc0000219
Now that you know what may cause this BSOD error 0xc0000219 on Windows 11, attempt the below fixes one after another in the same order as they were put in.
- Start Windows 11 in Safe Mode with Networking
- Remove all Third-party apps
- Repair System File Corruption using SFC and DISM
- Uninstall Recently Installed Windows or Driver updates
- Inspect the Hard drive for possible bad sectors on it
Before you apply any fixes, make sure to do the following first –
- Unplug external devices – There is a possibility that some of your external devices have been corrupted and the same is preventing Windows 11 from loading normally. Remove all external devices like Printer, Webcam, WiFi adapter, etc., and restart your PC. When Windows 11 reloads, check if the error 0xc0000219 resolves.
1] Start Windows 11 in Safe Mode with Networking
Since you can’t boot into your device normally, you can’t apply any workarounds. However, it is possible to apply them when you are inside Safe Mode on your computer. We require accessing the internet to check for driver updates as well as pending Windows Updates, so make sure to boot into Safe Mode with networking.
Safe boot disables all third-party services, drivers, and processes on your computer. If this error resolves while being on this mode, you must uninstall or at least disable all third-party apps.
Here’s how to boot into Safe Mode with networking on Windows 11 –
- Restart your device 2-3 times using the Power button. Doing so will automatically bring up the Troubleshooting window.
- Go to Troubleshoot > Advanced options, and click on Startup Settings.
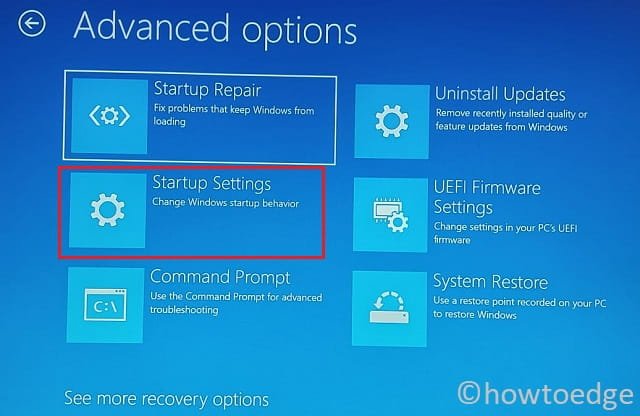
- Opt to restart your device and when it is happening, press the F5 key. This will invoke Safe Mode on your Windows 11 PC.
Now that you are inside Safe boot, you may apply the below fixes one after another.
2] Remove all Third-party apps
When you are inside Safe Mode, you may access all system services and processes on your Windows PC. Use Win + I to launch Settings and select Apps from the left sidebar. On the right pane, click to expand Installed apps.
Scroll down and locate all third-party apps. Click the three horizontal dots next to a program and select Uninstall from the pop-up menu. Click Uninstall to confirm removing the selected program from your computer. Restart your PC and boot into Windows normally this time. Check if the error 0xc0000219 resolves now. If not, follow the below set of fixes.
3] Repair System File Corruption using SFC and DISM
Third-party applications often interact with the system files and make them corrupt. There are cases when certain files or folders start missing from your Windows PC. Winlogon.exe and Csrss.exe are a few files that might corrupt due to such interferences and restricts Windows from loading normally.
To get back the missing files or repair the corrupt ones, attempt running the SFC and DISM tools. Here’s how to run this task –
- Press Win + R to launch the Run dialog.
- Type “CMD” and press the Ctrl + Shift + Enter keys altogether.
- On the elevated console, type the following, and press Enter –
sfc /scannow
- The SFC utility will check for system files and corruption inside them. If there are indeed some missing or corrupt files on your system, the same will be auto-repaired.
- Make sure to run the DISM tool next as this will find and resolve any corruption within the System image. To do so, run this code –
DISM /online /cleanup-image /restorehealth
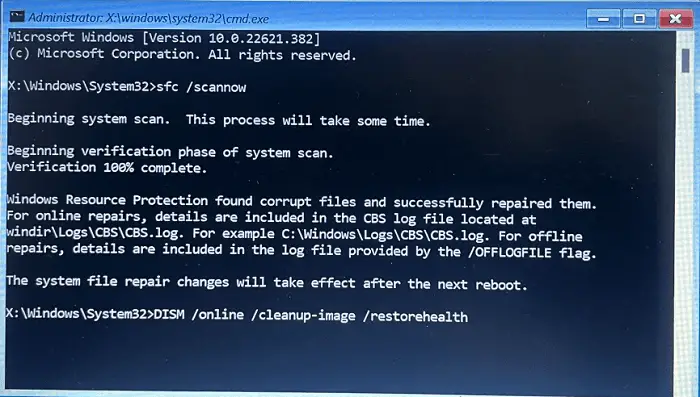
After you run both these commands successfully on your computer, make sure to restart your PC. When Windows 11 reloads, check if the error 0xc0000219 resolves now.
4] Uninstall Recently Installed Windows or Driver updates
Many a time, the error 0xc0000219 occurs after you download and install a new Windows or driver update on your PC. If that’s the case, you must have downloaded and installed a buggy update. Boot into Safe Mode and uninstall all recent updates from your system.
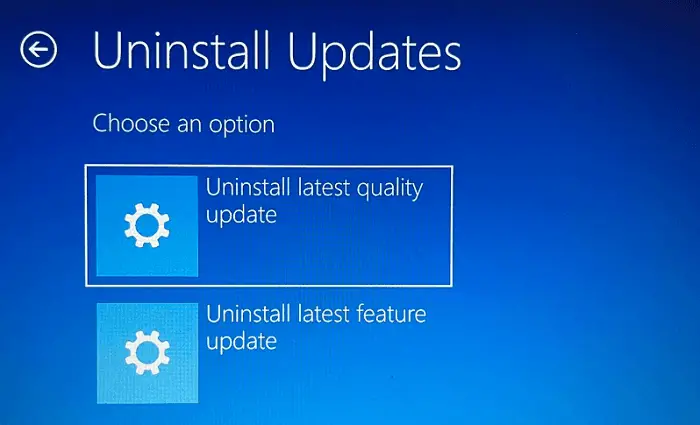
Note: Skip this solution if you haven’t recently updated and driver on Windows 11 or the system itself.
Alternatively, you may also go to Troubleshoot > Advanced options inside the Advanced Startup screen, and select Uninstall updates. Moving forward, select the recent update that you want to remove and hit the Uninstall option.
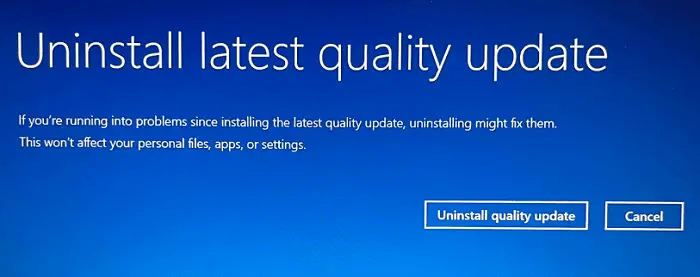
Wait for the updates to uninstall successfully, and restart your computer. Sign back into your device and check if this does resolve the error code 0xc0000219.
Note: To remove recent driver updates, boot your device into Safe Mode, and launch Device Manager. From here, one can remove the recently installed driver updates from his/her computer.
5] Inspect the Hard drive for possible bad sectors on it
If the error 0xc0000219 persists even after repairing system files or folders, make sure to check the hard drive for bad sectors on it. The presence of bad sectors inside a hard disk is known to cause a blue screen of death error on Windows PCs. Here’s how to check for a corrupt hard drive on Windows using CMD –
- As discussed above, restart your device 2-3 times and it will bring up the WinRe screen.
- Go to Troubleshoot > Advanced options, and select Command Prompt.

- You might need to provide your login credentials to boot into your user account.
- On the elevated console, copy/paste the following, and press Enter.
chkdsk c: /f /r
- The Command prompt will immediately start checking for bad sectors on your hard disk.
- If it does find any issue with the hard drive, make sure to replace your old HDD with a new SSD.
6] Diagnose System Memory
Any problems within the System memory may also cause Windows 11 to fail on an error code 0xc0000219. Check if there are indeed any issues with your computer’s RAM by initiating Windows Memory Diagnostic. Here’s how to perform this task –
- First of all, boot into the Advanced Startup menu and navigate to the below path –
Troubleshoot > Advanced options > Command Prompt
- If prompted, use your password to launch the CMD.
- On the elevated console, type the following, and press Enter.
mdsched.exe
- Windows Memory Diagnostic will launch immediately afterward.
- Click Restart now to initiate checking for any issues within your system’s memory.
- Your PC will restart and begin performing a standard test to evaluate your computer’s RAM.
After this diagnosis is over, press F1 to launch the Options page. Go to Extended and then press F10 to perform an advanced memory test on your computer. If this results in no memory issue, you better attempt the next solution. Else, purchase a new RAM (8 GB minimum) and install it on your Windows 11 PC.
7] Disable Driver Signature Enforcement
Microsoft only allows genuine or legitimate drivers to run on the Windows operating system. Still, there are users who for their own purposes, install drivers from third-party sources. When you do so, it breaks the default Driver Signature Enforcement rule. As a result of this, an error 0xc0000219 might occur.
To overcome this, you have only two options and they are as follows –
- Remove the unsigned drivers from your system
- Or, disable driver signature enforcement
Assuming you do have the necessity of the third-party drivers, here’s how to disable the driver signature enforcement on Windows 11 –
- Power On and Off your device using the power button time and again.
- Your System will automatically boot into the troubleshooting screen (after 2-3 times).
- Select Troubleshoot and then Advanced options on the subsequent screen.
- Select Start Settings followed by Restart; your device will immediately reboot.
While Windows 11 is starting, press the F7 key. Doing so will disable the Driver Signature Enforcement feature for your computer. You may now check if the error code 0xc0000219 resolves after this.
8] Download and Install pending driver updates
One of the major issues that usually cause a BSOD error on Windows is the presence of outdated device drivers. If you don’t remember upgrading your device drivers for a long time, this is the perfect time to update all your device drivers.
Earlier, we used to update drivers using the Device Manager. Now, it’s not the case as you can always look for pending driver updates right under Windows Update. Boot your device into Safe Mode with networking and do the following –
- Press Win + I to launch Settings.
- Go to Windows Update, and hit Check for updates.
The system will automatically search for pending drive updates and display the available ones under the link – optional updates. Click over this link, select all the checkboxes, and hit “Download and Install“. Wait for all the drivers to install successfully on your computer and when it does complete, restart your Windows PC.
Note: There are cases in which a newly installed driver may prevent Windows 11 from loading normally. This happens only when you have installed a faulty or incompatible device driver. If that’s the case, you should roll back all such drivers.
9] Repair Corrupt Registry Entries
Each and every task you perform on Windows 11 happens because of some registry entries running on your computer. When these entries get corrupted, it is impossible to start the startup applications. Repairing all registry entries might prove to be a useful solution in such cases. Here’s how to reset the registry to its default configuration –
- Power On and Off your device 2-3 times to boot into the Advanced Startup window.
- Go to Troubleshoot > Advanced options, and select Command Prompt.
- When prompted, use your login id and password.
- Wait for the CMD to launch and when it happens, run these codes one after another –
cd %SystemRoot%System32\config
ren %SystemRoot%System32\config\DEFAULT DEFAULT.old
ren %SystemRoot%System32\config\SAM SAM.old
ren %SystemRoot%System32\config\SECURITY SECURITY.old
ren %SystemRoot%System32\config\SOFTWARE SOFTWARE.old
ren %SystemRoot%System32\config\SYSTEM SYSTEM.old
copy %SystemRoot%System32\config\RegBack\DEFAULT %SystemRoot%System32\config\
copy %SystemRoot%System32\config\RegBack\DEFAULT %SystemRoot%System32\config\
copy %SystemRoot%System32\config\RegBack\SAM %SystemRoot%System32\config\
copy %SystemRoot%System32\config\RegBack\SECURITY %SystemRoot%System32\config\
copy %SystemRoot%System32\config\RegBack\SYSTEM %SystemRoot%System32\config\
copy %SystemRoot%System32\config\RegBack\SOFTWARE %SystemRoot%System32\config\
- Close Command Prompt and restart your PC.
When Windows 11 reloads, check if you can sign back into your device normally.
10] Repair Boot Configuration Data
Windows 11 might also fail to load when the boot configuration data has been corrupted somehow. If that’s the case, it is imperative to rebuild the corrupt BCD. Assuming you are inside Safe Mode, follow these steps –
- Press Win + S, and type Command Prompt on it.
- Right-click on the top result, and select Run as administrator.
- When the CMD launches, execute the below set of commands on it –
bootrec /scanos
bootrec /fixboot
bootrec /repairbcd
bootrec /osscan
bootrec /repairmbr
bootrec /rebuildbcd
- Close Command Prompt and restart your computer.
When Windows 11 reboots, check if the error 0xc0000219 resolves now.
11] Reset BIOS
Just like corrupt BCD codes, an incorrect BIOS configuration might also restrict Windows 11 from loading normally and result in an error 0xc0000219. One may resolve this issue then by resetting the BIOS. Here’s how to perform this task –
- First of all, boot your device into the Advanced Startup Repair Screen.
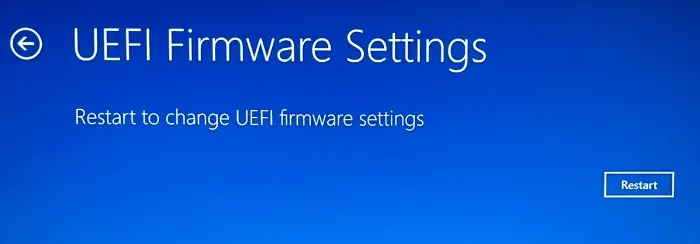
- Go to Troubleshoot > Advanced Options, and click UEFI Firmware Settings.
- On the next screen, click Restart.
- Locate the option that resets your BIOS Configuration data on your computer.
- When you find such an option, hit the same to reset BIOS to its default values.
- Save the newly configured BIOS Settings and exit the WinRE screen.
Sign back into your device again and check if the error 0xc0000219 resolves now. If the problem persists even after this, you may update the BIOS on your computer.
12] Disable Fast Boot on Windows 11
These days, all devices come pre-loaded with fast boot capability. Though it does boot up your device in 2-3 seconds, this may cause trouble if the necessary processes don’t start during Windows startup.
As you can never be sure of this, we suggest disabling this Fast Boot on Windows 11 and checking the error 0xc0000219 resolves afterward. Here’s how –
- Inside WinRE, select Troubleshoot > Advanced Options > UEFI Firmware Settings.
- Click Restart to enter the UEFI firmware settings. See the Snapshot provided above.
- Now, go to the Advanced BIOS options, and opt to deactivate Fast Boot.
- Save the recent changes made to BIOS and restart your computer.
Boot normally into Windows 11, and check if the problem resolves this way.
13] Run a Malware Scan
The blue screen of death error might also appear when there are viruses or malware inside your system. You can never be sure of that unless you use a good anti-malware program. We suggest using some premium apps or at least Windows Defender to perform this task.
Never go for a freely available third-party antivirus program as this will do more harm than good. Good security apps will look for the viruses inside your system and quarantine them. Make sure to re-run the SFC and DISM tools if you find any viruses existing on your computer.
14] Run System Image Recovery
If none of the above solutions work so far to resolve this error code 0xc0000219, and you do have a restore point on your computer, it’s time to revert back your PC to its previous stable state. Here’s how –
- As suggested before, boot your device into the Advanced Startup Menu first.
- Go to Troubleshoot > Advanced options, and hit System Image Recovery.
The system will check for any restore points available on your computer. In case it does find any backup, the system will take you to the System Restore window. Click Next and follow the on-screen instructions to complete reverting your system to its earlier state.
15] Reset your Windows 11 PC
In case you didn’t have a restore point on your computer, you are left with only one option and that is resetting your Windows 11 PC. To do so, follow these easy steps –
- Boot into the Advanced Startup Screen and navigate to the below path on it –
- Go to Troubleshoot > Advanced options, and click Reset this PC.
- The system will list out the application that will uninstall after you proceed ahead with this decision.
- Note down the changes going to occur on your system and click Remove everything.
The whole resetting process is quite a time-taking process. So, you need to keep your device attached to a Power Source and wait till this process finishes.
How do I update BIOS on Windows?
Windows Update has become quite a useful tool these days. In addition to providing regular cumulative updates, this also provides firmware and driver updates for your system. It is required of you to keep the firmware updated on your computer.
A failing firmware update may result in a blue screen of death error including the 0xc0000219 error. Here’s what you need to check for firmware updates on Windows 11 –
- First of all, reach out to the Advanced Startup Screen on your computer.
- Go to Troubleshoot > Advanced Options, and select UEFI Firmware Settings.
- On the subsequent screen, click the Restart button.

- The system will redirect you to the BIOS setup mode.
- Go to the main section, and note down the BIOS manufacturer, its current version, and its installation date.
Note: You may now go to your manufacturer’s official site and download a newer BIOS version for your system. Make sure to download an update that is higher in version number as compared to the noted-down number, or Date of installation.
- Download the BIOS setup file and unzip the same into a USB Flash drive.
- Attach this USB to your problematic device, and come back on the BIOS setup screen.
- Create a backup of your current BIOS version and after that begin updating your BIOS.
Boot your device and check if the error 0xc0000219 resolves afterward. I hope you find this article useful to find and easy to follow. Let’s know in the comment section which solution works in your case.
Rollback incompatible device drivers from a buggy device
If you do remember installing some driver updates, and the error 0xc0000219 started occurring afterward, you may roll back the recently installed driver updates. To do so, follow these easy steps –
- First of all, boot your device into Safe Mode with Networking.
- Launch the Run dialog by pressing Win + R.
- Type “
devmgmt.msc” without quotes on it and hit OK. - When the Device Manager opens up, click to expand the section inside which you have upgraded a driver.
- Right-click on the driver inside and select Properties.
- Go to the Driver tab, and hit Roll Back Driver.
Wait for the driver to roll back to its previous version successfully, and when this is over, restart your computer.
Note: This solution will work only if you have not yet passed the 10-day time period after upgrading a device driver. If you have already exceeded this time frame, you better skip this solution.
How do I run Startup Repair on my Windows PC?
Startup Repair is one of the most effective tools to fix a Stop Error code on Windows. However, for this to happen, you require a working Windows bootable media first. Insert the installation disc or USB Flas drive into your device, and follow these steps –
- Restart your computer 2-3 times abruptly to enter the Advanced Startup menu.
- Go to Troubleshoot > Advanced option, and hit Startup Repair.
- When prompted, select your user account and log into that using the passkey.
- Now, follow the on-screen instructions to complete this Startup Repair on Windows.
How do I create a Windows 11 bootable Media?
For this, you require a valid Windows ISO image. If you don’t have access to an ISO image, get the same from the official site of Windows 11. After you have the ISO image, use Rufus to make it bootable.


