Did you recently encounter the error code 0x8024401f or 0x8024402f while updating Windows 10 to the latest build version? Well, this bug usually occurs due to 3rd-party apps interfering with the core files, missing system files, or piled up Windows cache.
One can easily solve this bug check by temporarily disabling the third-party antivirus program. In case the error persists, reset Windows services, purge accumulated cache in Microsoft Store, repair core system files, or manually disable the Proxy.
If none of these solutions solve the 0x8024401f/0x8024402f error, use the “Reset this PC” feature or clean install Windows 10.
What causes Windows Update Failure?
Windows 11/10 updates fail primarily when your system meets either of the below conditions –
- Hardware or Drivers conflicts
- Shortage of DISK spaces
- More than one update in the queue
- Corrupt update files
How to Fix Update Error Code 0x8024402f
To solve the Update Error code 0x8024401f or 0x8024402f on Windows 10 PC, try the following workarounds –
1] Disable Third-Party Antivirus Software
The 0x8024401f error may occur due to third-party antivirus interfering with the core files on the computer. So, in order to rule out this possibility, we suggest temporarily disabling the anti-malware program.
Note: Microsoft Defender, unlike its predecessor, works efficiently and provides several other functionalities. If you are using a free 3rd-party app to secure your PC, we recommend switching to Windows Security.
2] Run Windows Update Troubleshooter
The most effective way to address update-related trouble is to run the Windows Update Troubleshooter. Here’s how to use this utility program –
- Jointly press Win+I to start the Settings UI.
- Select Update & Security thereafter Troubleshoot on the upcoming screen.
- Head over to the right pane and hit “Additional troubleshooters”.
- Subsequently, click to expand Windows Update and hit “Run the troubleshooter“.

- The troubleshooter will start the scanning process and try resolving the problem (if found any).
- Once this is over, Reboot Windows to implement the changes.
In case the error persists even after this, try the next set of solutions –
3] Disable Proxy Server VPN Client
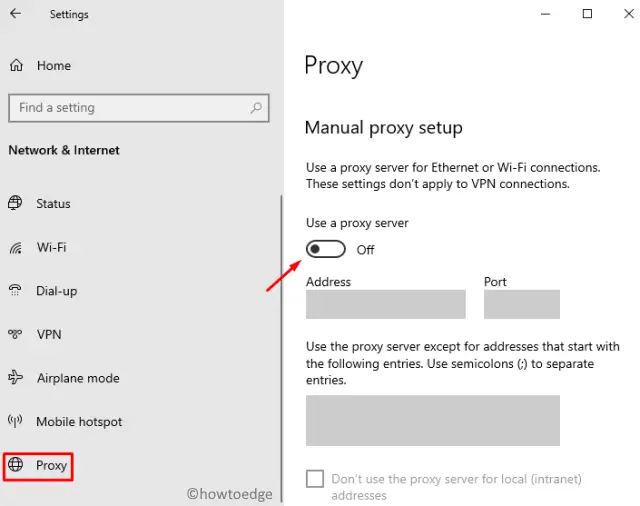
Sometimes using a proxy to surf online may also interfere with updating Windows 10 PC. If that’s the case, one should disable the Proxy and then re-try updating his/her operating system. Here’s how to proceed with this task –
- Hold down the Windows key and press I to start the Settings App.
- Select Network & Internet thereafter Proxy on the next screen.
- Head over to the right side and disable “Use a Proxy server” under Manual Proxy Setup.

- Now, Restart Windows so that the changes made so far come into effect.
I hope by now, you won’t receive the 0x8024401f error while updating Windows. However, if it does, you should reset Windows following the below solution.
4] Repair Corrupt System Files and Purge Store Cache
At times, Windows 10 users encounter the 0x8024401f error while updating a UWP application on the Microsoft Store. This error occurs owing to the presence of corrupt system files. One can repair system files by running the System File Checker utility program. Thereupon, purge the Windows Store cache executing a single command line. Here’s the complete guideline –
- First of all, start the Command Prompt as an Admin.
- On the elevated console, type
sfc/ scannowand press Enter.

- This will take 5-10 minutes depending upon the degree of corruption on the computer.
- Once the scanning/repairing process completes, type the following code, and hit Enter again.
wsreset.exe
- Running the above command line will reset the Windows Store cache.
- Now, Restart the PC and check whether the error gets resolved or not.
If not, follow the next workaround –
5] Reset Windows Update
Since the error persists even after the purging Store cache, you should manually reset your Windows 10 PC. Here’s how to do this –
- Right-click on the Windows icon and select Run.
- Type “cmd” at the void and press Ctrl+Shift+Enter keys altogether.
- Doing this will start Command Prompt having administrative privileges.
- Now, execute the following codes one after another.
- Make sure to hit Enter at the end of each command line.
net stop wuauserv
net stop cryptSvc
net stop bits
net stop msiserver
- The above codes will stop essential Windows 10 services.
- Navigate to the
C:/Windows/SoftwareDistributionfolder, and rename this to SoftwareDistribution.old. - Next, browse to the
C:/Windows/System32/Catroot2Folder, and rename this to catroot2.old. - After you rename both these folders, restart the services that you stopped earlier.
net start wuauserv
net start cryptSvc
net start bits
net start msiserver
- Restart Windows to confirm the recent changes.
From the next login, the 0x8024401f error should not occur during updating Windows.
Note: You can also go back to the SoftwareDistribution and catroot2 old folders and delete them. However, do check for the new folders at their places.
6] Reset this PC
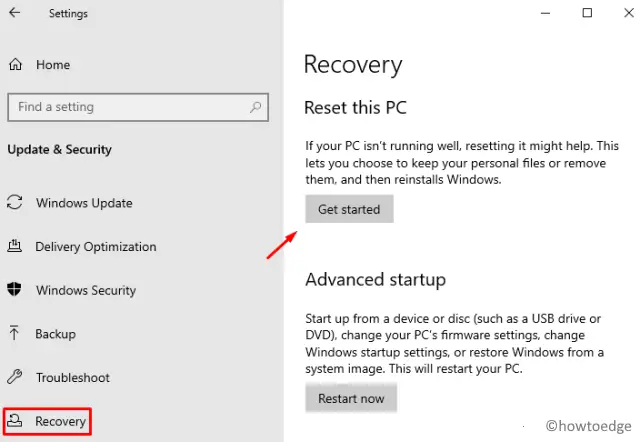
If none of the above fixes resolve the update error code 0x8024401f, you may restore Windows running the system backup. In case you haven’t created any restore points on the computer, attempt to Reset this PC using the below steps –
- Jointly press Win + I to invoke the Windows Settings.
- Select Update & Security thereafter Recovery on the upcoming screen.
- Switch to the adjacent right and hit “Get Started” under the Reset this PC section.

- Make sure to tick the “keep my files” checkbox while moving ahead with this solution.
- Click Next to continue thereupon press the Reset button.
- Wait for a while as this usually takes 20-30 minutes to reset your PC.
Read Next: How to reset this PC using Cloud Download on Windows 10
I hope this article indeed helps to resolve the 0x8024401f error on the computer. If you have any queries or suggestions, let us know via the comment section.
How do I fix a corrupted Windows Update?
To solve Windows update error codes or issues, you may try out these solutions in any order you prefer –
- Run Update Troubleshooter
- Reset Update Components
- Run SFC/DISM
- Manually install updates


