Did you recently experience Mail error code 0x80072746 on your system, while trying to sync Windows Mail client or loading mail? In this case, when you load a specific Mail; the error message pops up and it reads the following –
"We’re having a problem downloading messages. Make sure you have a connection and your account info is correct, and then try again”
The above error indicates that the network connection is either abruptly closed by the remote host or the existing HTTP doesn’t support VPN connections. A blocked svchost.exe file in the Windows firewall may also lead to Mail error code 0x80072746.
Temporarily disable Windows Firewall then deleting and re-adding the problematic account might solve the ongoing issue. Let’s discuss this error message and its solutions in detail-
- Set up your account manually
- Allowing svchost.exe in Windows Firewall
- Change VPN Settings
- Via Windows Defender Firewall
How to fix Mail error code 0x80072746 in Windows 10
Here are the step-wise workarounds to fix Mail error code 0x80072746 in Windows 10 PC-
1. Set up your account manually
Most of the time, using a less popular email click such as TalkTalk, GoDaddy, or company-provided specific email can cause error 0x80072746. This is because your Windows client can’t manage these settings properly. The re-settings mail app is the best way to solve this issue. To do this, you should manually assign POP & IMAP on the Windows mail client using these steps-
- At first, go to Cortana and type Windows Mail in the text box, once found click on the same.
- Move the mouse pointer at the bottom on the current page, tap the Settings ( gear) icon thereafter Manage Accounts from the list.
- Here, click on the mail account that generates the bug then hit Remove this account from your device on the succeeding page. (See snapshot)

- Again tap the Delete button to save the changes.
- Henceforth visit the email provider’s website and copy the manual settings of IMAP. If the IMAP setting is not listed here, select POP3.
- Subsequently, return to the mail app and navigate to the following path-
Settings-> Manage account-> Add account
- Here scroll the cursor down and tap Advanced Setup.
- Succeeding after, select Internet email and fill in the relevant information as well as the IMAP setting that you have previously fetched.
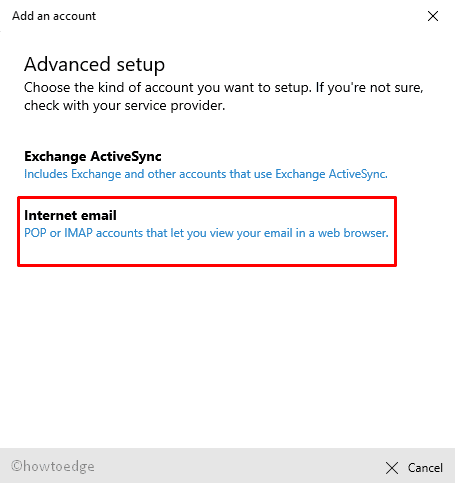
After applying these changes successfully, tap the Sign In button and check whether you are getting the faulty message or not. In case you still experience the same problem, try the next workaround.
2. Allowing svchost.exe in Windows Firewall
If the Mail error code 0x80072746 still persists, configure “svchost.exe” application in the Windows firewall. To perform this, you need to add this file to the Firewall using the following steps-
At first, open the Control Panel and move to the Windows Defender Firewall section.
When a new window comes in view, select Allow an app or feature through Windows Defender Firewall on the left pane.
On the next screen, select Change Settings followed by Allow another app button.
Henceforth, select the Browse button on the following window.
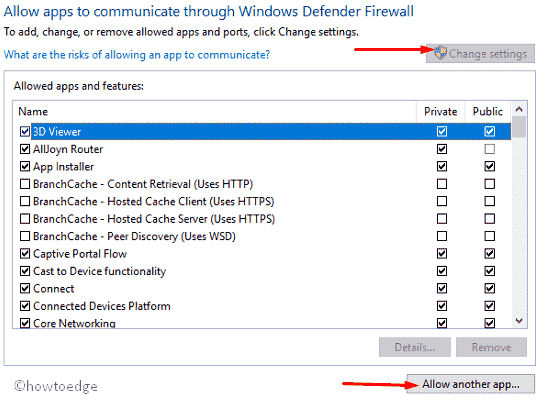
Now navigate to C:\Windows\system32 and locate svchost.exe from the list.
Succeeding after, hit the Add button to include this application then OK to save the changes.
Once you allow Svchost.exe on Windows Firewall, go back to the Mail client and see whether you can access emails without any interruption.
3. Change VPN Settings
A few users fix the error code 0x80072746 by making a change in the VPN connection. Here’s how they fix this error on their computers –
- Press the Win & I hotkey to invoke Settings.
- On the pop-up window, select the Network & Internet category then hit VPN on the left column.
- Again move to the right panel and ensure the Allow VPN over metered network toggle switch is turned ON.
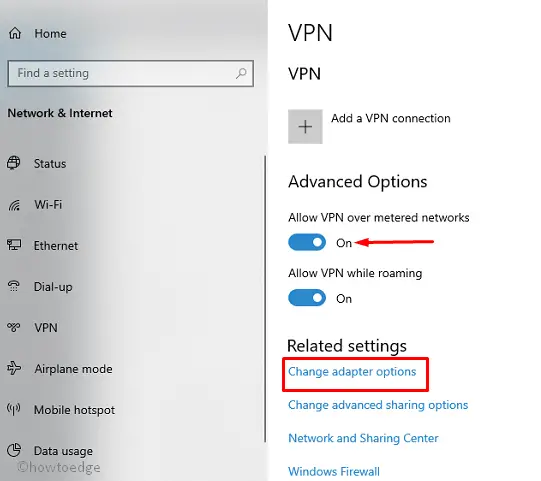
- Henceforth, select the Change adapter options link followed by your current internet connectivity network.
- Make a right-click on your LAN (Wi-Fi) connectivity then select Properties from the context menu.
- Here select Internet Protocol Version 6 (TCP/PV6) on the list then tap OK to confirm the changes.
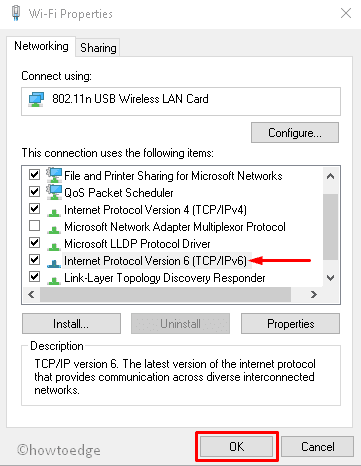
Once the task is over, close all apps and see if the error code 0x80072746 vanishes on the mail or not.
4. Via Windows Defender Firewall
If the above processes fail to solve the problem, it might be due to interrupting the connection between Windows mail and the email server.
As a result, there is the possibility of the occurrence of Mail error code 0x80072746. To avoid this trouble, you need to temporarily disable the firewall and then delete and re-add the problematic account to your mail client.
When you add it back successfully, enable Windows Firewall again. Here are the steps to guide you properly-
Delete and re-add problematic mail account
- Go to the system tray and tap the Mail icon, once the app opens up; click on the Settings option.
- Select Manage Accounts on the pop-up window thereafter tap the account that is creating a nuisance.
- Here, choose to Delete this account from your device henceforth hit the Delete button to remove the account from the list.
- Now return to the home page of Windows Mail and select the Account category at the left column.
- Again, Jump to the right-hand side and select the Add account under the Manage Accounts section.
- After this, go through the on-screen instructions to re-add the respective email using the proper credentials.
Once this task is finished, enable Windows Defender Firewall again.
Enable Windows Defender Firewall
- At first, right-click on the Windows key using your keyboard and select the Run option from the Power menu.
- Here in the void box, type
wf.mscthen hit OK. Doing so will start the “Windows Defender Firewall with Advanced Security”. - On the Public Profile section, select the Windows Defender Firewall Properties link.
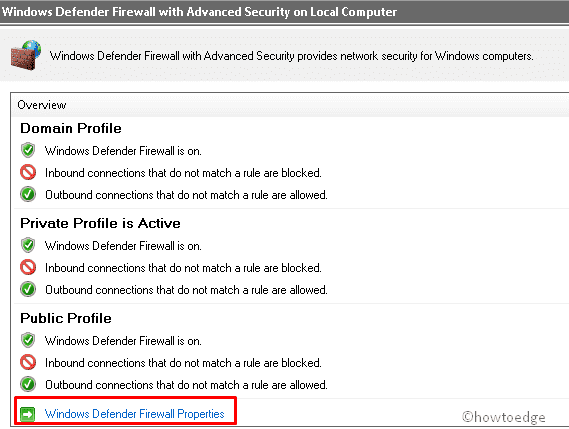
- Next, tap the Domain Profile tab and set the Firewall state to On.
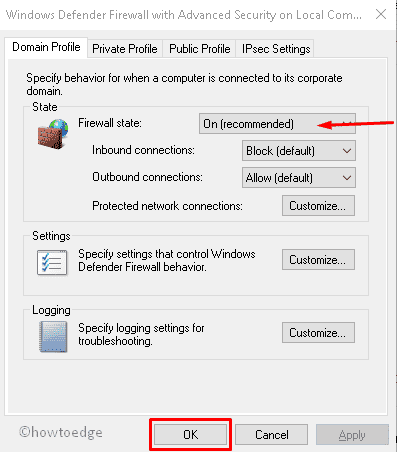
- Succeeding after, hit Apply then OK to save the changes.
- Finally, close all opened apps and Reboot your PC.
Now open your mail client, it may start without any Mail error code 0x80072746. I hope you get what you were looking for. In case, you have any queries related to this post, do ask us in the below comment section.
How do I reinstall the Mail app in Windows 10?
You may reinstall the Mail app on your Windows 10 PC via Microsoft Store. Launch this app by clicking on its icon and typing “Mail and Calendar” in the search bar. Press Enter to view the matching results.
Select the top result and hit Install. Let this app install on your computer and once it is over, hit Open to launch the Mail app. You might need to allow a few on-screen instructions to continue using this application.

