Out of several update-related bugs, the update error 0xc19001e1 is the most important one. This may occur because of different reasons like corrupted or missing system files, obsolete device drivers, interferences from third-party apps, and many others. When this occurs, it simply prevents users from upgrading or installing new updates on their devices.

What causes this Error 0xc19001e1 on Windows 11/10 PC?
The corrupt system core files and bugs in the cumulative update are some prime reasons that Windows Update Error 0xc19001e1 on your device. Performing SFC utility or DISM health command may resolve this issue.
If not, try Update Troubleshooter, uninstall 3rd party antivirus, install the latest patch update manually, or Reset Windows Update Services as well as Components. Using System Restore point or clean install Windows 10 are some of the last resorts to fix this error code 0xc19001e1.
List of Contents
- Detach all hardware components except the Mouse and Keyboard
- Not enough disk space to install Updates
- Run SFC command
- Run the Update troubleshooter
- Update display driver
- Disable third-party anti-malware program
- Perform System file check using DISM code
- Uninstall all unused device driver
- Manually install the latest SSU then Cumulative Updates
- Restart Windows Update services
- Turn off the Windows Defender Firewall
- Reset Windows Update components
- Clean install Windows 11/10
Fix – Update error 0xc19001e1 on Windows 11/10
Here’s how to find the underlying causes behind this issue and resolve them on your Windows PC –
1. Detach all hardware components except the Mouse and Keyboard
In case, the ongoing update stops being downloaded and instead displays the error 0xc19001e1, this might be a hardware issue. Hence, we suggest detaching all external drives except the Mouse and Keyboard.
If this does sort out the issue, try plugging back each hardware one by one. While doing so, you may recognize the corrupt drive. Sometimes, a simple restart of the PC does solve several bugs as doing this restores the default state of different Windows services. If the error still persists, try the next workaround –
2. Not enough disk space to install Updates
Sometimes Windows Update error 0xc19001e1 may occur due to No Enough Disk Space on the disk. A bare minimum of 20 GB is required for a fresh installation and 2 GB for Windows Up-gradation.
If your PC doesn’t have enough space as per Microsoft norms, you may encounter the above bug. Therefore, one must check the minimum system requirements for the patch-up before proceeding to download. If you don’t have enough space, try to release the space first then only upgrade the existing OS.
3. Try the SFC utility program
If the Update error 0xc19001e1 is still disturbing your PC’s working performance, the system file checker may resolve the underlying cause. This command line will scan all the Windows files and repair the same if there are indeed some obsolete files. Here’s how to proceed-
Step-1: Go to the Run dialog, (the simple way is to right-click on Start and pick up the same option).
Step-2: Next, type cmd in the void area and simultaneously press the Ctrl + Shift + Enter keys.
Step-3: Henceforth, tap Yes to launch the Command Prompt with administrative privileges.
Step-4: Once the elevated prompt starts, copy/ paste the following code then hit the Enter key.
sfc /scannow

Step-5: This process will take a few minutes to complete the scanning of different files, so wait accordingly.
Step-6: When it is over, Restart your computer and update the previous operating system.
4. Run the Update troubleshooter
The Update troubleshooter is the default tool of Windows 10 that may repair several general bugs. Here are the steps to follow-
- Press Win and I altogether to open Settings.
- When the Settings window appears, hit Windows Update followed by Troubleshoot on the left pane.
- Subsequently, jump to the right pane and press the Windows Update option.
- Run the troubleshooter will appear immediately after, just click on it to begin the detecting and repairing process.

- Once finished, reload the Windows and check if the update error 0xc19001e1 has been resolved or not.
Note: While on Windows 11, you will not access the troubleshooter following the steps above. Rather, you need to visit the path below and press the Run button.
Settings > System > Troubleshoot > Additional troubleshooters

5. Update display driver
The display driver plays a vital role in keeping your system error-free and maintaining smooth navigation. The Update error 0xc19001e1 may also occur due to corrupt display drivers. If that’s the case, do update the display driver. If you don’t know how to proceed, here is the procedure –
- Press the Window key and R shortcut together to invoke the Run dialog.
- Now, type
devmgmt.mscin the void area and hit Enter to move ahead. - Afterward, expand the Display adapter option and right-click on the installed graphics chipset.
- On the context menu, choose the Update Driver option.

- Henceforth, choose the first option i.e. “Search automatically for updated driver software“.
- The system will find a suitable driver from the net as a proper replacement.
- At last, Reboot your computer so that the recent changes come into effect.
6. Disable third-party anti-malware program
In general, users download third-party antivirus programs to safeguard their PCs from malware or protect against data leaks. What they don’t know is, this action may bring more chaos or even stop the ongoing update. This may lead to an update error 0xc19001e1 on your device.
Instead of using third-party anti-malware, you should rather update the pre-existing Windows Defender app on your Windows 11/10 device. This is the default security app that protects your computer from malicious attacks. Here is the step-wise procedure –
- Right-click on the Windows icon and select Settings from the Power menu.
- Here, select Apps thereafter Apps & Feature from the left panel.
- Jump to the corresponding right pane and scroll the cursor down to see the entire list of programs.
- Once you locate the external antivirus program, click on the same, and hit the Uninstall button.

- If the confirmation window appears, tap Yes to begin the removal process.
- Finally, after the above task is over, Reboot your computer and update the earlier OS.
7. Perform System file check using DISM code
The corrupt image files in your system may also pause the upgrading Windows 10 process. If that’s the case, you should execute the DISM command line on your PC using the following steps-
- Type Run in the Search box (after clicking Ctrl + S) then right-click on the well-matching result.
- Select Run as Administrator from the context menu thereafter Yes on the succeeding screen to launch this app.
- Now on the elevated command prompt, execute the following code, and hit Enter at the end.
DISM.exe /Online /Cleanup-image /Restorehealth

- The repairing process will begin immediately after, so wait patiently until it finishes.
- Lastly, Restart your computer. You may now download and install the monthly cumulative update without receiving the Update error 0xc19001e1.
8. Uninstall all unused device driver
If you attach a new device to the port, its relevant driver automatically installs on your system. But when you remove these components, their drivers continue to exist even when there is no need. Such unnecessary device drivers may prohibit the Updating process and lead to error code 0xc19001e1 while downloading patches. Removing these not-so-important drivers is the best workaround to solve this issue. Here’s how to proceed-
- First of all, right-click on the Windows icon and choose the Device Manager option.
- When the respective apps come up, select the driver that you have recently removed.
- Next, perform a right-click and choose Uninstall device from the drop-down menu.

- The warning window will appear instantly, hit Yes to authorize the access.
- Lastly, Reboot your PC so that changes made so far come into effect.
You may now download the pending packages successfully without experiencing Update error 0xc19001e1.
9. Manually install the latest SSU then Cumulative Updates
If you are going to download and install the latest LCU, it’s better to ensure whether you have the recent SSU or not. This is a necessary step as it makes sure that the whole Updating process runs smoothly and effectively.
To avoid the error code 0xc19001e1, you may also download the patch update manually and thereafter install the same. Follow these guidelines to proceed –
- First of all, you need to open this page to see the list of the latest update history.

- Go to the left pane and browse the recent package released by Microsoft.
- Next, copy its KB number and paste it into the search box of the Microsoft Update Catalog website.
- If you do see the same copy of the update file, tap the Download button to save it on your PC.
- After the .msi files are installed successfully, Restart your computer.
I hope this time you successfully fix the Windows Update error 0xc19001e1 on your Windows 10 Machine.
Here’s how to manually find and install Windows 11 cumulative updates on your computer.
10. Restart Windows Update services
The corrupt or incomplete Windows Update folder is a common reason behind Update error 0xc19001e1 on Windows 10 PCs. The simple solution is to remove this directory by going through the below steps-
- Launch the Run dialog and type “
services.msc” on it. - Click OK to start the Services window.
- On the Services window, look for the Windows Update.
- Right-click on this service and select Properties.
- If you will find this service running under Status.
- Click on the Stop button and the Windows update stops immediately afterward.
- Close all opened tabs and repeat the above steps to reach out to the Windows Update again.
- Right-click on Windows Update again and hit the Restart button.

- Lastly, reboot your PC and see if the Windows Update error 0xc19001e1 issue has been resolved or not.
11. Turn off Windows Defender Firewall
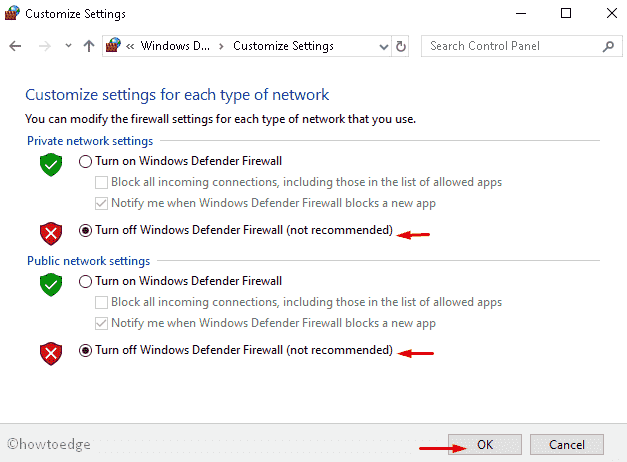
The Firewall is the built-in feature of Windows that protects the system from viruses. This even prohibits data leaks from your PC. However, in some scenarios, this may block the genuine file which is responsible for the smooth Windows Update. Hence, you should temporarily disable Windows Defender Firewall by following these easy steps-
- Right-click on the Windows icon and choose Run from the appeared Power Menu.
- In the void area, type
Firewall.cplthen press the OK button. - On the succeeding window, hit Turn Windows Defender Firewall On or Off.
- Further, check the boxes against Turn off Windows Defender Firewall in both private and public network settings.
- Click OK on the same window to confirm the recent changes.
- Sign out of current Windows and try updating the OS after the subsequent login.
Note: There is no need to manually enable the Windows Defender Firewall again as this will be active by default after re-logging into the Windows.
12. Reset Windows Update components
In case, the Update error 0xc19001e1 bug check is still available, this may be due to the corrupt Windows tools. Re-settings Windows Update components will repair the issues and restore the Windows to normal. Just follow these simple steps-
- Open the Command prompt as Admin. The quick way is to type cmd in the search field then right-click on the first option and choose Run as administrator.
- A UAC prompt may appear immediately after. Click Yes to authorize the access.
- Next, execute the following codes near the winking cursor one by one and hit the Enter key at the end.
net stop wuauserv
net stop cryptSvc
net stop bits
net stop msiserver

- This might stop certain running services. Henceforth, you need to rename the SoftwareDistribution and Catroot2 folders.
- Run the following command lines to take care of this-
Ren C:\Windows\SoftwareDistribution SoftwareDistribution.old
Ren C:\Windows\System32\catroot2 Catroot2.old
- Afterward, restart the services using the following command lines that you have previously paused-
net start wuauserv
net start cryptSvc
net start bits
net start msiserver
- Restart your computer so that the changes made so far come into effect.
- After the next login, navigate to the following path and download the latest cumulative update.
Settings > Update & Security > Windows Update > check for updates
13. Clean install Windows 11/10
If you are still getting the error even after applying the above workarounds. we recommend a clean installation of Windows 10. Here are the essential steps –
Tip: Windows 11 users may follow this URL instead.
- First of all, insert the Media Creation Tool into its respective port and Reboot the PC.
- At the time of loading BIOS, press any of the function keys like Del, Esc, F2, F12, F10, etc.
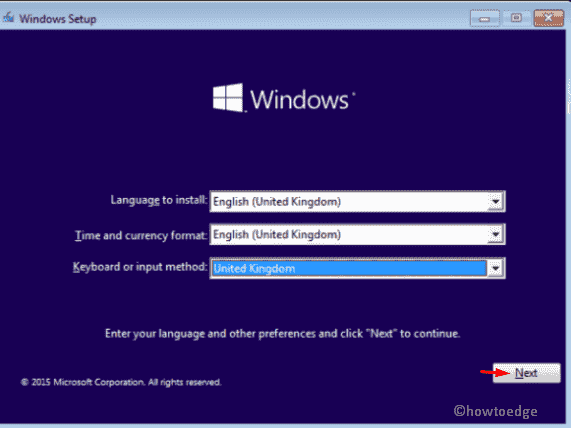
- On the Bootable Screen, select the Next option followed by the Install now button.
- Again, put the genuine product key on the Windows Setup page, you may even skip this step.
- Going ahead, delete every partition and reallocate this to your Hard Drive.
- Furthermore, select your region, keyboard layout, and preferred language then Next to proceed ahead.
- Lastly, go through the on-screen instructions to complete the remaining process.
How do I check for pending updates on Windows 11?
You may search for a pending update on your Windows 11 PC by navigating to the below path.
Settings > Windows Update > Check for updates
That’s it, you won’t get the Windows Update error 0xc19001e1 on your PC.


