If your Microphone is not working on your Windows 11 PC, this guide will help you find out what is causing the issue and how to fix it.
There are times when the microphone on your computer may stop working. Actually, this problem is common but it may be caused by any number of factors. Sometimes there is a physical problem with your microphone, such as when something gets in its way or when the cord comes unplugged from its socket. Other times, it might be an issue with the settings on your computer or software program.

Related: Can’t Play Audio Error 0xc00d36fa in Windows 10
Fix Microphone is not working on Windows 11
Even though this problem has many causes, there are some solutions to it. It may be necessary to replace your mic if it has been broken for a long time and will not work with any device. On the other hand, if the issue only just started happening recently, there are some troubleshooting steps to try. So, let’s explore them.
- Enable your microphone if disabled
- Disconnect Additional peripherals
- Disable Audio Enhancements for Microphone
- Configure Microphone Boost settings
- Run the Recording audio troubleshooter
- Update the Audio drivers
- Turn on app permissions for your microphone
1] Enable your microphone if disabled
Before you apply any fixes outlined below, check if the Microphone is enabled on your Windows 11 PC or not. This may happen that the Microphone is disabled on your device and hence there is no sound coming from your Microphones. Here’s how you may check and enable it (when found disabled) –
- Right-click on the Start button and select Device Manager from the menu list.
- On the next page, double-click on Audio inputs and outputs to expand it.
- Then right-click on Microphone Array and hit Enable device.

- If the device is already enabled, it will be listed as Disable device instead of Enable device.
- Reboot your PC and when you sign back into your device.
I hope the “Microphone is not working” issue resolves on your Windows 11 PC.
2] Disconnect Additional peripherals
It’s possible that your computer’s peripherals (such as USB devices) interfere with your microphone’s detection and cause this issue to occur. So, if this problem still persists, you can try disconnecting the peripherals connected to the USB ports and see if that helps you detect your microphone.
3] Disable Audio Enhancements for Microphone
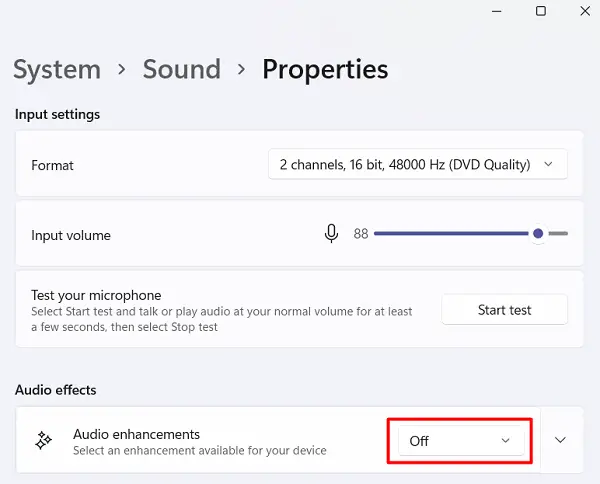
Enabled Audio enhancements under Sound Settings may trigger No or Low Microphone issues on your Windows 11 PC. Users often enable this feature in hope that this will improve the clarity of the sound coming from Microphones. If you have also enabled this feature and are getting No or Low volume from your Microphone, disable audio enhancements on your computer. To do so, follow these easy steps –
- Press Win + I to launch the Settings app.
- Click System and then Sound on the right pane.
- Click Microphone available inside the Input section.

- Scroll down to Audio effects, and select “Off” using the drop-down menu next to Audio enhancements.

That’s it, restart your PC and the Low Microphone Volume issues should resolve from the next logon.
4] Configure Microphone Boost settings
This may happen that your Microphone has corrupted and hence the volume coming out of it is quite low. If that’s the case, you may try boosting the Microphone volume by following these steps.
Note: This method is applicable only when there is some sound coming out of your Microphone. If not, you may run the Audio troubleshooter as described below.
Here’s how to boost Microphone Sound in Windows –
- On the taskbar, right-click on the speaker icon and select Sound settings.

- The system will redirect you to the Sound settings page.
- Scroll down to the bottom and click “More sound settings“.

- Doing so will invoke the Sound window on the Display screen.
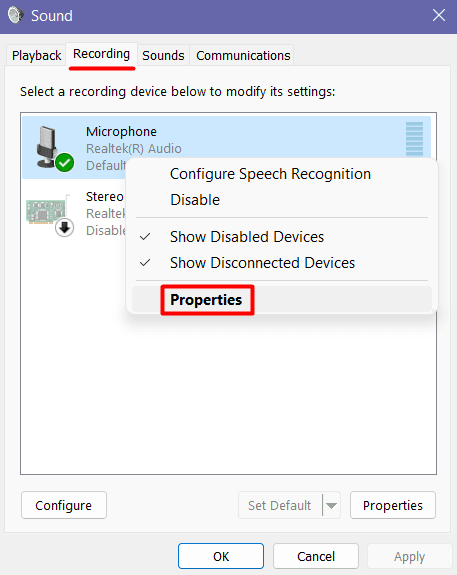
- Go to the Recording tab, and right-click on the Microphone tile.
- Select “Properties” on the context menu.

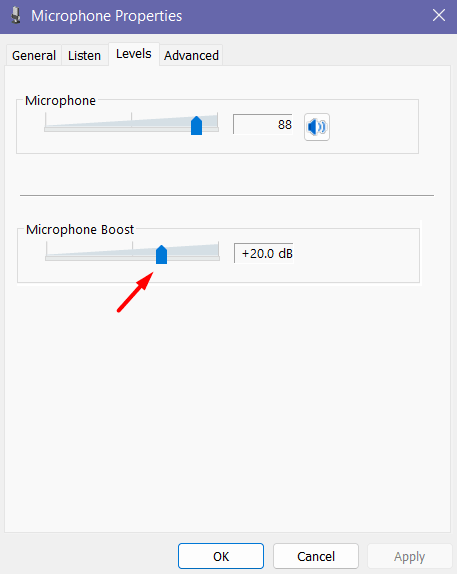
- On the Microphone Properties window, head over to the Levels tab and slide the Microsoft Boost to the right.

- Click Apply then OK to confirm this setting.
- Restart your PC next so that changes made come into effect from the next logon.
5] Run the Recording audio troubleshooter
If the microphone on your system isn’t working as it should, you can perform a test using the Recording audio troubleshooter. Here’s how to run the Recording audio troubleshooter –
- Press the Windows+I keys to open the Settings menu.
- Select the System from the left side of the page.
- Click on the Troubleshoot section.

- Then click on the option – Other troubleshooters.
- Scroll down to the Other section and search for the Recording Audio troubleshooter.

- Once you find it, click on the Run option next to it.
This will begin running the microphone troubleshooter, which seeks to fix any issues that prevent it from functioning properly. To resolve the problem, proceed as instructed, and afterward, close the troubleshooter window. You can now test if the microphone on Windows 11 is working properly.
6] Update the Audio drivers
If the above solutions didn’t work, you could be experiencing this problem due to outdated drivers. Windows usually search for and install driver updates automatically, but there are some cases where you have to manually update them
- Open the Run command using the Win+R keys.
- Type
devmgmt.mscin the text box and press Enter to open the Device Manager. - Double-click on Audio inputs and outputs to expand it.
- Right-click on your outdated microphone and select Update driver from the menu list.
- Next, choose to “Search automatically for drivers” option.
- Then follow the on-screen instructions to install the update.
In case Windows is unable to find an updated driver, there is still a chance that a driver update exists on the manufacturer’s website. So, visit the manufacturer’s official website and download the update.
Once you download the update, double-click on the file to run the installer and then proceed as instructed. After installing the driver, start the computer again and see if the microphone issue is solved.
7] Turn On app permissions for your microphone
Sometimes privacy settings block access to the microphone, which prevents applications from using it. This is one of the most common reasons to occur this problem but it can be fixed easily. Here’s what you need to do –
- Press Windows+I at the same time to launch the Settings app.
- Select Privacy & Security from the left-hand menu.

- Navigate to the App permissions section, then select Microphone.

- You now need to turn on the toggle next to Let apps access your microphone.
You can now check whether Windows 11 allows you to use the microphone. If the solution didn’t work, move to the next one.
What is the role of a microphone in the computer system?
A microphone can be used with a computer, phone, or other devices to turn sound into data. When you speak into a microphone, your voice is translated into an electrical charge that can be read by the computer and reproduced as sound. Windows’s microphones are often built-in and integrated with the motherboard, while external microphones connect to a USB port or other type of input jack.
As many parts of our lives now take place online, we have become more reliant on speech recognition systems in order to communicate. And since most of these systems use your microphone to listen, it’s important to ensure that your microphone is working properly before using it.
Why does my microphone not work in Windows 11?
There might be multiple reasons why your microphone is not working. It could be due to having a faulty microphone, drivers issues, muted audio input, and many other reasons.


