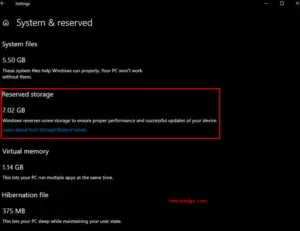
Reserved Storage is a new concept, all set to come with Windows 10 19H1 update. As its name suggests, this will block 7 GB of the regular Disk space for the purpose of System Update, temporary files, and cache.
This might not be an issue for those who are having huge disk storage. However, if you don’t want to have this attribute for whatsoever reasons, we have brought the perfect workaround. Here, in this article, we will discuss some easy tips on how to reduce Reserved storage on Windows 10 19H1.
What is Reserved Storage on Windows 10?
Reserved Storage on Windows 10 is a kind of extra stability. The prime role of this is to retain 7 GB of existing Hard drive Storage so that there won’t be any disk space related issue. The blocked area will be there for system updates, applications and settings cache, etc.
Though this is a nice feature, it also indicates that you are going to have less Disk storage available on your System. The amount of space allocated can’t be modified later. However, there are a few methods using which you can reduce the Reserved storage size.
Note: Whenever there is a new Windows update available, the old files lying inside gets deleted to allow the installation of a new Update.
Here, in this article, we will focus on these three topics-
- Reduce Reserved Storage on Windows 10
- Turn On Reserved Storage on Windows 10
- Turn Off Reserved Storage on Windows 10
Recommended: How to check reserve storage on Windows 10
How to reduce Reserved Storage on Windows 10
There are none direct or proven ways that can aid to mitigate the Disk space. However, uninstalling some of the optional features & language packages can assist you to reduce Reserved Storage on Windows 10-
1. Uninstall optional features
To remove optional features on Windows 10, use these steps-
Step-1: Press Win and I hotkey to launch Settings.
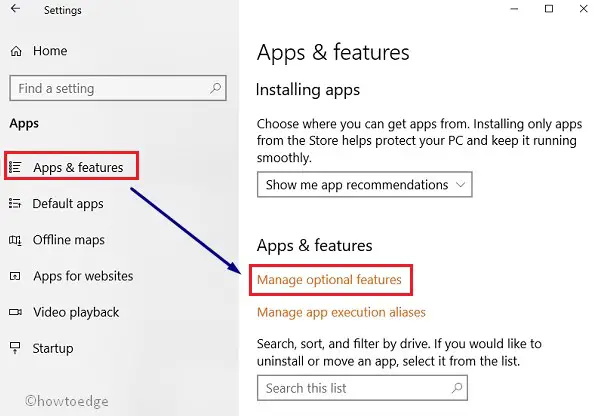
Step-2: Explore the Apps category thereafter Apps & features.
Step-3: Now on the right pane, hit Manage Optional features link.

Step-4: From the list select the features which you want to remove.
Step-5: Click on the Uninstall button.
Repeat the above steps to remove the other optional features as well. Bear in mind, some features may not uninstall.
2. Uninstall language packages
Uninstall a few language packages can also help you to reduce Reserved Storage. To perform this task, do the following:
- Step-1: Click on the Search icon and type Settings.
- Step-2: Tap Time & language category thereafter Language on the left pane.
- Step-3: Move to the right side and locate the preferred languages section.
- Step-4: Select the one which you are not going to use in the near future and hit the Remove option.

That’s it.
3. How to turn on Reserved Storage on Windows 10
Here is how to turn on Reserved Storage on Windows 10 –
- Type regedit in the Search box.
- Right-click on Registry Editor and select Run as administrator option.
- If the UAC prompt appears up, click Yes.
- Now navigate to the following path-
HKEY_LOCAL_MACHINE\SOFTWARE\Microsoft\Windows\CurrentVersion\ReserveManager
- Move to the right pane and build a new 32-Bit DWORD value and name this ShippedWithReserves.
- Note: For 64-bit Windows, the above procedure is exactly the same.
- Henceforth set the value from 0 to 1 then OK to save the changes.
- When the task is finished, Reboot your system.
- At last, upgrade your system with the newer build to turn on reserved storage on Windows 10.
- Now you can see the extra drive space allocated on your system. This is for updates only.
Note: This is an in-built feature of Windows 10 lashed with Build 1903. Even if you perform a clean installation on your system, this feature gets activated automatically.
How to turn off Reserved Storage on Windows 10
If you don’t want Reserved Storage for updates on your system, disable this using some tweaks on Registry Editor. Here is how to turn off Reserved Storage-
Warning: Registry Editor requires utmost care. Any minor fault can cause a serious issue. Hence, create a full back up of important files and folders on the external drive.
Warning: The unusual changes made under the registry might create a sober problem on your machine (sometimes corrupt OS). hence while modifying these section you must have careful.
- Press Win+R hotkey together to launch Run dialogue box.
- In the void, type regedit then press Enter. If UAC appears, click Yes.
- On the succeeding window, navigate to the path written below-
HKEY_LOCAL_MACHINE\SOFTWARE\Microsoft\Windows\CurrentVersion\ReserveManager
- Here double click on the ShippedWithReserves key (on the right pane) and change the value from 1 to 0.
- Hit OK to confirm the changes.
- At last, Restart your PC.
After upgrading to the next build, this feature will be disabled on your System.

