BIOS stands for Basic Input/Output System and is very crucial for basic to heavy operations in Windows 11/10. When this becomes corrupt, this may result in different error codes including an update error, Blue Screen, and others. This guide highlights the reasons why it occurs, and how to reset the BIOS on your ASUS computer.
How to fix Error Code 0x800700d8 in Windows 10
How to reset the ASUS BIOS on your Computer?
Depending on what mode i.e. UEFI or Legacy installed on your PC, you may follow the specific section to reset the BIOS of your ASUS computer.
Before you perform the resetting task, you need to first enter boot into the BIOS mode. Here’s how to do that –
- First of all, shut down your PC normally.
- Next, press and hold the F2 key, and press the Power On button.
- Wait for a few seconds and you will see your device entering the BIOS mode.
Note: The function key may vary depending on different models of ASUS. So, if the F2 key doesn’t work, try with the next function key or contact your PC’s manufacturer.
1.1 Resetting ASUS BIOS in UEFI mode
The UEFI feature in ASUS supports both Mouse as well as Keyboard inputs. So, you may use either your keyboard or mouse to select the options of resetting its BIOS. Here’s what you need to follow –
- Restart your computer and when your device is restarting, press the supported function (F2 or Del) key.
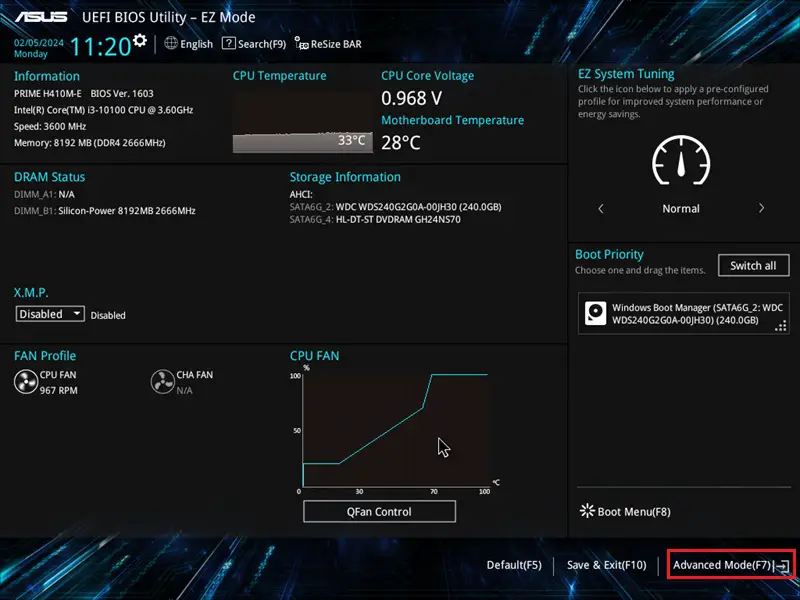
- Once you are inside the UEFI mode, click on the Advanced Mode option or press the F7 key.
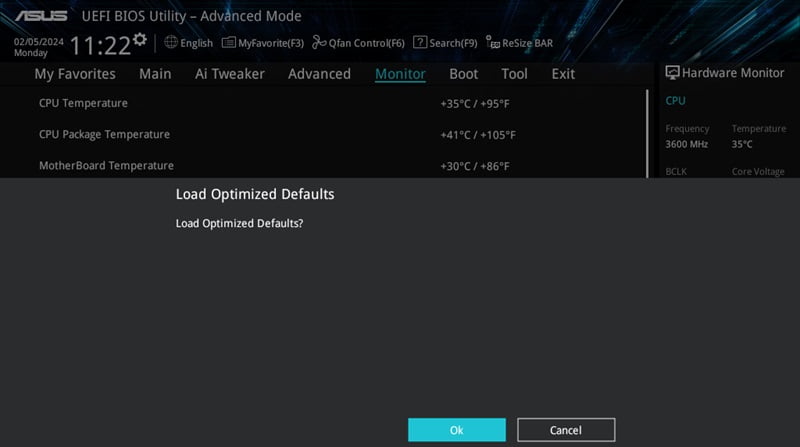
- Next, press the default BIOS key (F5).
- A confirmation box will appear next suggesting to load optimized default settings. Well, click OK.
- Wait for a few seconds and you will find your BIOS reset to its default settings.
- Press F10 to save and exit the current state on your PC.
- Alternatively, you may also click on the Save & Exit button available at the bottom of the screen.
- A new confirmation box will appear asking if you want to save the recent changes on your PC.
- Click OK and your PC will restart normally.
That’s it, you have successfully reset the ASUS BIOS in UEFI mode.
1.2 Resetting the ASUS BIOS in the Legacy mode
As contrary to UEFI mode, the legacy mode doesn’t let you use the mouse inputs. As a result, you may use only the arrow keys to jump from one position to another and make any changes using the Enter key. To reset ASUS BIOS in the legacy mode, you may follow these easy steps –
- Restart your computer and when it’s loading, press the function key.
- Press the F9 key next to select the optimized defaults.
- Alternatively, you may also visit this setting using the arrow keys and press the Enter key.
- A confirmation message will appear next asking if you want to load the optimized default settings.
- Click Yes using the arrow keys. Your BIOS will next save to its default settings.
- Use the arrow keys again to reach the Save & Exit option and press the Enter key again.
- A confirmation box will appear again prompting if you want to save and exit.
- Select Yes by using the arrow keys and the ASUS BIOS will be saved to the current configuration.
Restart your computer and you will find your device functioning all okay.
2. Use the Clear CMOS Jumper
ASUS PC includes a Clear CMOS Jumper that you may use the reset the BIOS mode. Here’s how to use this tool to reset the BIOS. This fix involves some pre-knowledge about hardware. In case you don’t have enough expertise, make sure to take the help of some professional or a technician.
- Turn off your computer and disconnect the power supply.
- Locate the Clear CMOS jumper on the motherboard. It is typically labeled as CLR_CMOS or something similar.
- Move the jumper from its default position to the clear position (consult your motherboard manual for the exact location).
- Leave the jumper in the clear position for about 10-15 seconds.
- Move the jumper back to its original position.
After you have successfully followed the above steps, reconnect the power supply and turn on your computer.
3. Remove the CMOS Battery
If clearing the CMOS Jumper doesn’t work, you may go with the solution of removing the CMOS Battery. Here’s how –
- Power off your computer and disconnect the power supply.
- Locate the CMOS battery on the motherboard. It is usually a coin-cell battery.
- Remove the CMOS battery from its slot.
- Leave it out for about 10-15 minutes.
- Reinsert the CMOS battery.
- Reconnect the power supply and turn on your computer.
The BIOS on your computer must start working as before without any issues or glitches.
