Microsoft rolls out a new feature that allows its users to run Windows 10 troubleshooter automatically on their computers. This is designed to resolve several issues that occur arbitrarily on the System then start interrupting the same. In short, it keeps things under control so that you can do your task smoothly. This new feature will be available for Windows 10 users after May 2020 update.
Here, in this article, we will discuss how to activate this automatic troubleshooter on your PC. It is quite easy to set this in-built troubleshooter by following the below procedure –
Run Windows 10 troubleshooter automatically
Learn how to run windows 10 troubleshooter automatically using the following steps –
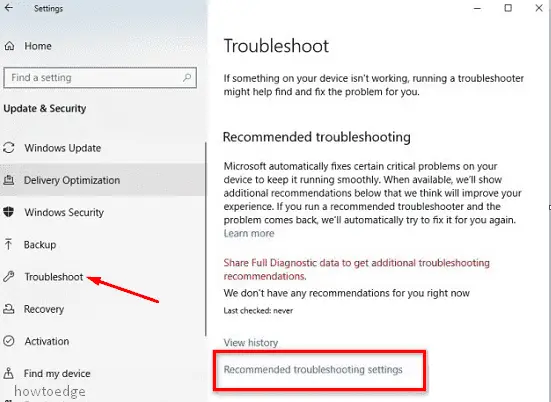
- At first, make a right-click on Start Menu then select Settings.
- This will invoke the Settings window, tap Update & Security.
- Now from the left column, select Troubleshoot followed by Recommended troubleshooting settings option on the right panel.

Subsequently, three options will appear, choose any one of them to diagnose the issue at hand.
- Fix problems for me without asking
- Tell me when problems get fixed
- Ask me before fixing problems
Here, Fix problems for me without asking is the best way to avoid any trouble that pops up randomly on your System. In case you want to have feedback related to ongoing issues, select one of the rest two options.
Troubleshooting History
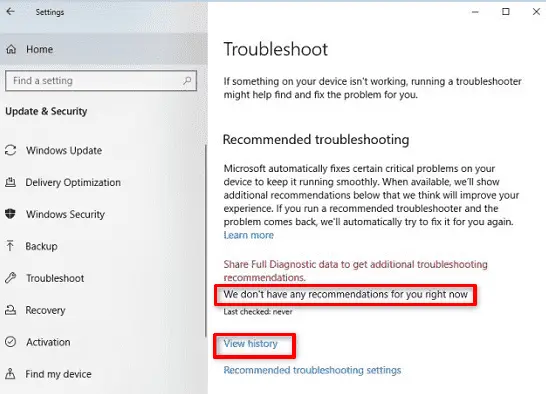
Another amazing feature of this tool is that it lets you see the detailed history of the bugs that ever occur on your PC. If you want to see this, click on the back arrow to revert back to the previous page.
Henceforth, select the View History option under the Troubleshoot category.

It will show the list of issues that you have previously encountered on your System. This certainly helps to fix re-occurring trouble which you have earlier solved.
Note: You can avail of this feature only after upgrading your Windows device to May 2019 update or the latest version.