Today, in this blog post, we present a detailed description of how to set up and use the Remote desktop on Windows 10 PC. The remote desktop connection allows Windows 10 users to access different PCs through a private network or the World Wide Web. Its usage is enhancing on a daily basis owing to its easy sharing of files or data over the network. Recently, Microsoft adds an in-built Remote Desktop app to make the entire process smooth and effective. You can get a copy of this for yourself as well by visiting the Store.
If you want to access a PC remotely for the very first time, this article explains the whole steps in depth. To establish a successful setup, you need to ensure that the remote desktop setup is enabled on your PC. Moreover, one must validate his/ her IP address then forward the port to the router. Windows 10 users should use a strong password so as to prohibit any malicious attack or unauthorized access. If you encounter any issue in the remote desktop while establishing the connection, the below troubleshooting guide will fix this problem. For safety purposes, it is recommended to disable the Remote desktop while this is not in use.

| Note: Since the remote desktop feature is only available in Windows 10 Pro and Enterprise edition, Windows 10 Home users can’t enable this tool. Instead, they should opt for the Remote Desktop apps. |
Recommended: Missing taskbar in remote desktop in Windows 10
How to set up and use Remote Desktop in Windows 10 PC
If you want to set up and use the Remote Desktop using the Local Network or over the Internet, try out the suggestions below –
1] Enable Remote Desktop connection on the PC
The first thing you should do beforehand to use the remote desktop is to make sure that you have enabled the remote desktop connection on your computer. Then only, go and connect to remote connections. Here’s how to enable remote desktop in Windows 10 –
- Open the Search window and type Control Panel in the text area.
- Select the top result to start this desktop app.
- When Control Panel opens up, select System and then Remote settings.

- Go to the Remote tab, and mark the checkbox next to “Allow remote connections to this computer“. See the Snapshot below –

- Lastly, hit Apply then OK to confirm the changes.
After you have applied the steps guided above, you may now control your desktop remotely over the local area network or internet.
2] Set a static IP address of the PC
After you have set up the remote desktop connection on your Windows Machine, now it’s time to use a static IP address. Here’s how to re-configure the IP address of your device –
- At first, open the Control Panel app.
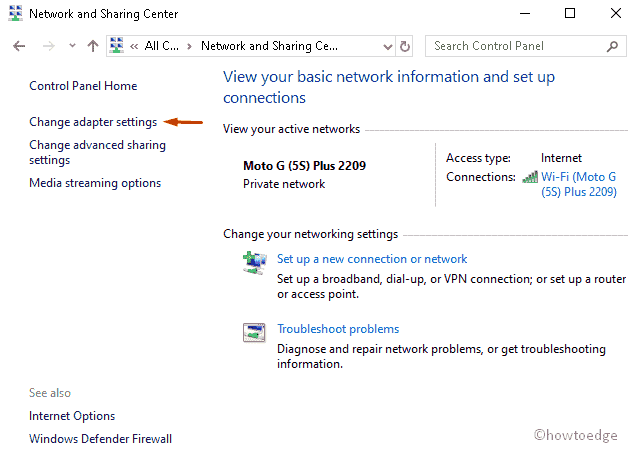
- Under the Network and Internet category select the Network and Sharing Center.
- Subsequently, choose the Change adapter settings link on the left pane. See the Snapshot below –

- Right-click on the current network adapter and select Properties using the context menu.
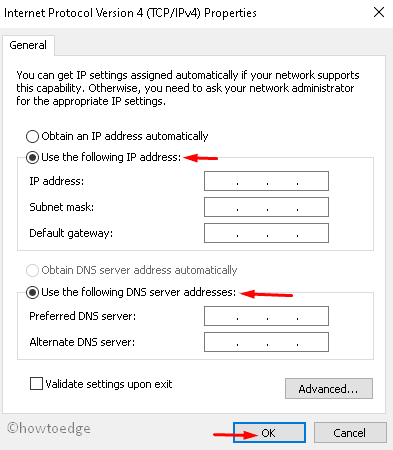
- Afterward, locate and click Internet Protocol Version 4 (TCP/IPv4) there forth press the Properties button.

- Under the General tab on the succeeding page, tick “Use the following IP address” Radio.
- Here, enter the valid Internet Protocol address, Subnet mask, and default gateway values at respective places.
- Subsequently, mark the “Use the following DNS server addresses” checkbox.
- Succeeding after fill in the Preferred DNS server and Alternate DNS server values and tap OK.

Quick tips: In case, you still can’t connect the device to the internet, use public Google Public DNS addresses: 8.8.4.4 and 8.8.8.8 in the DNS section.
- At last, close the current window. You may now connect and use your computer remotely.
Note: In general, the internet provides a dynamic Internet Protocol (IP) address for home users. Hence, you need to configure this address very often.
3] Forward a port to a local router
If you allow your system to use the remote desktop over a server or local network, it is necessary to forward the TCP port 3389 to the connected router. Here’s how to proceed-
- Go to the Start and type Command Prompt in the void area.
- When the list views up, right-click on the well-matching option and choose Run as administrator.
- There appears the UAC, tap Yes to authorize the access.
- Copy/ paste the following code near the blinking cursor and hit Enter at the end-
ipconfig
- Note down the IPv4 address and Default Gateway number. This works as a gate-pass to connect your PC to the local network.

Change setup inside your web-browser
After collecting the IPv4 and default Gateway number, you should change its setup on the web browser as well. Here are the essential steps-
- Minimize the elevated command prompt and open your web browser.
- In the address bar, type the IPv4 address that you have previously collected and hit the Enter key.
- Go ahead and log in to the router using the User-name and Password.
- Now browse the credential settings and reach out to the Port Forwarding section.
- Next, turn the Port Forwarding option On.
- Move to the port forwarding list add and put the valid information as follows-
Service name: Here you should put the name.
Port Range: You should enter the TCP number which you have previously noted.
Local IP: You need to type the IPv4 address of your system.
Local Port: In this, you should type the port number 3389.
Protocol: Under Protocol section, write TCP only.

- Hit the Save button to confirm the modifications.
- Furthermore, put the required credentials to sign in to the remote computer.
- Succeeding after, use your local user name and password for login purposes.
Note: If you are using the Microsoft account on the remote PC, you need to sign in using proper credentials.
- Click the Save button to add the connection settings on this list.
- From the appeared list of options, select the specific system on which you want to start the remote connection.
- Probably, a warning message appears to allow this. Here, mark Don’t ask about this certificate again checkbox then press the Connect button to finish this process.
If you want to add more changes like account, session, full-screen mode, and additional settings, click on the Settings option available at the top right corner and modify the same.
- Right-click anywhere on the current screen and choose the Edit option.
- When the edit window appears, update the IP (Internet Protocol) address as well as the username.
- Now click “More option“ on the list and re-configure the settings such as display name, getaway identification, or audio information.
- Using this tool, you can also modify the admin section of the connected remote desktop.
4] Troubleshoot a remote desktop connection
After configuring all the setup successfully, if you still can’t access the network-connected computer remotely, you should try below troubleshooting methods –
Uninstall third party application
The recent installation of a third-party antivirus application may arise bugs while using your desktop remotely. Therefore, you need to remove this program then try connecting to the remote desktop again. Here are the steps to follow-
- Jointly press Win & I keys combination to launch the Settings app.
- Here, select Apps thereafter Apps & feature from the left-hand side.
- Jump to the adjacent right-wing and locate the third-party anti-malware application.
- Once found, select and hit the Uninstall button.

- Subsequently, press the Uninstall button again to permanently remove this software.
- At last, when you uninstall the third-party antivirus program, Restart your computer and connect to the remote desktop again.
Enable Remote Desktop using Windows Defender Firewall
When you turn on the remote desktop connection, Windows Firewall enables the same by default. However, If not may arise some trouble. To overcome this, you should manually enable it by following this troubleshooting guide-
- Go to the Control Panel desktop app and select the Windows Defender Firewall category.
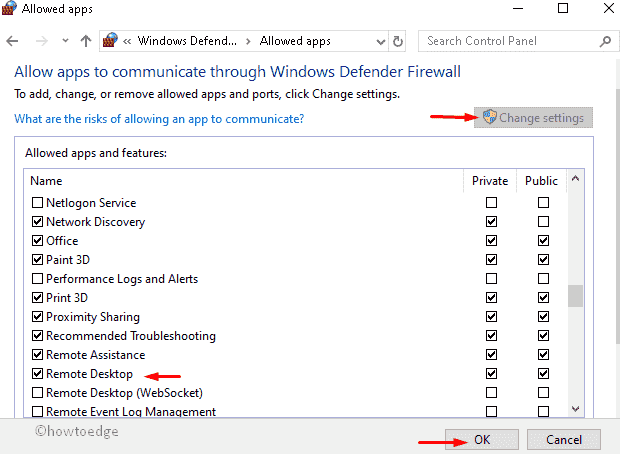
- Now from the left pane, click Allow an app and feature through Windows Defender firewall.
- On the succeeding screen, select the Change settings button.
- Scroll down, locate and activate the Remote Desktop checkbox then hit OK to confirm the changes.

Change the IP address of your computer
In case somehow you still fail to connect to the device remotely, this might be due to clocked IP address. Hence, you need to reset the IP address on the private network. Following the below guideline may help to address the underlying cause-
- Go to the Taskbar and click on the search icon.
- Type Control Panel in the void box and hit the Enter key.
- From the list of categories, click Network and Sharing Center.
- Henceforth, press the network connectivity under the connection section.
- After the WiFi status page pops, click the Properties button.
- Next, click on the Internet Protocol version 4 (TCP/IPv4) then the Properties button.
- Here, click on the Use the following IP address radio button and type your PC’s IP address then OK to confirm the changes.

5] Remote Desktop Connection vs. Remote Desktop app
The remote desktop connection is an in-built feature of Windows 10 OS by Microsoft. Recently, the company rolled a new app for the convenience of its users. You may download the same by visiting Microsoft Store. The core principle remains the same using either of these applications. However, they do differ in the following areas-
| Remote Desktop Connection | Remote Desktop App |
| This can work only if the host computer allows remote connections. | This may work only if the users receiving assistance allow Remote Assistance connections to their system. |
| Using this, one can take full control of a remote PC like- Desktop, programs, files, etc. | Using this, one can gain partial control of the remote computer like- shared desktop, mouse, keyboard, etc. |
| To access a PC remotely, you must know the credentials of the account existing there. | This requires an invitation to access the system remotely. |
| Once connected, you don’t require any further permission. | In this, a user who wants others to access his/her PC needs to manually accept an incoming remote connection. |
| The client can see the computer screen only after initiating the remote connection. | While using the app, both hosts and the client see the same Desktop. |
Both have their own pros and cons. However, based on their differences, one should go for a remote desktop app to safeguard his privacy as well as the important files.
We hope you are now able to set up and use a Remote desktop on Windows 10 PC.


