The Error code 0x800705AA is an update-related issue that occurs while upgrading Windows 10 to its latest Build version. Insufficient RAM, fewer HDD spaces, and corrupted Windows components are some of the main reasons that might cause this issue in the first place. Although not always, the presence of third-party applications may also lead to this problem.
The error code 0x800705AA often accompanies a message that reads –
0x800705AA -2147023446, ERROR_NO_SYSTEM_RESOURCE, Insufficient system resources exist to complete the requested service

Windows 10 Update Error 0x800705AA Solutions
Before proceeding to the solutions listed below, do meet these essential conditions –
- Remove all USB drives, SD cards, secondary peripherals attached to the computer.
- There must remain at least 10-15 GB of free spaces on the HDD. If not, you may use the disk cleanup tool to clear unnecessarily stored cache and old windows files.
- Disable Third-party Antivirus or Microsoft Defender.
Now that you have already performed these tasks, try out these workarounds sequentially –
1] Troubleshoot Windows Update
Running Windows Update Troubleshooter is the best way to solve different update-related troubles on a computer. If you haven’t performed this method already, give this a try using the below steps –
- First of all, reach out to the below location –
Settings (Win + I) > Update & Security > Troubleshoot
- Jump to the right side and click Additional troubleshooters.
- On the next screen, click to expand Windows Update and hit Run the troubleshooter.

- When the troubleshooting completes, there appears a message that reads “Apply a fix”.
- Click upon this button to apply whatever solutions Troubleshooter came with.
Once over, Restart your computer so that changes made come into effect. If the problem persists even after applying a fix, try out the next set of solutions.
2] Repair Corrupted Windows Update Components
The 0x800705AA error may also occur if the Windows Update components get corrupted somehow. In such cases, it doesn’t matter how many times you attempted to upgrade Windows. This is because the update process will fail every now and then on the same error. In order to fix this issue, you should reset Windows 10 update components to their original settings by following the below guideline –
Step-1: Stop Essential Services
- Use WinKey + S to launch the Search window.
- Type services in the text bar and hit the Enter key. Doing so will open the Services window.
- Right-click on the Background Intelligent Transfer Service and select Stop.
- Similarly, stop these services as well – Cryptographic Services, MSI Installer, and Windows Update.
Step-2: Clear Windows Cache folders
- Go to the location –
C:\Windows. - Put a right-click on the softwaredistribution folder and select the rename option. Subsequently, rename this folder to something sd.old.

- Next, go to the location
C:\Windows\System32and look for the catroot2 folder. Once found, right-click over it and rename this to catroot2.old.
Step-3: Restart stopped services
- After renaming the folders successfully, go back to the Services window and restart the services that you have stopped earlier.
- Reboot your PC to incorporate the recent changes.
When Windows reloads, check if the error 0x800705AA still occurs or has been resolved.
3] Perform a Clean Boot
There are times when users can’t upgrade their Windows 10 devices just because of the presence of some corrupted third-party applications. Since a clean boot doesn’t allow launching any external programs, this is the best way to find if this bug started appearing due to app-level corruption. Here’s how to perform a clean boot on your device –
- Hit the Start Menu and type “System Configuration”.
- Click the top result to enter the system configuration window.
- On the Services tab, search and mark the “Hide All Microsoft Services” checkbox.
- Subsequently, click Disable All option.
- Next, go to the Startup tab and click Open Task Manager.
- Right-click on each one of the unused services or programs and choose to Disable.
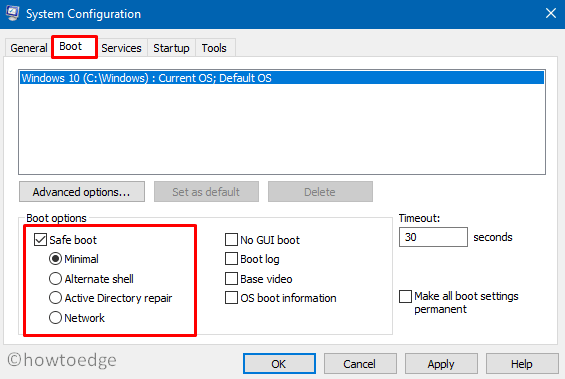
- Now, re-visit the System configuration window and click the Boot tab.
- Under the Boot options, mark the Safe boot checkbox and Minimal.

- When you click Apply then OK, a pop-up window appears asking to either Restart or Exit without Restart.
- Clicking the Restart option will let your PC automatically boot into the Safe Mode.
- Now that you have entered the clean boot state on your computer, check if the error 0x800705AA gets resolved or not.
4] Manually Install Latest Cumulative Update
If none of the above solutions address the 0x800705AA issue, you may try installing the pending updates manually as well. Here’s how to download and apply the standalone package on the computer –
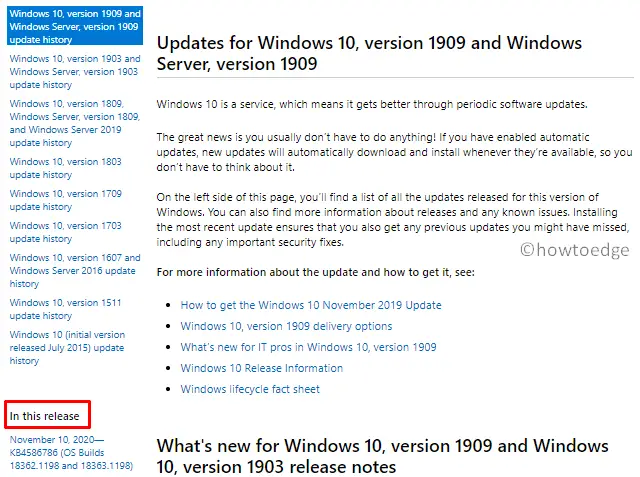
- Visit the Windows Update History webpage. Select Windows 10 version on the left column then scroll down to “In this release”. Click the first link and copy the cumulative number starting with “KB”.

- Press Ctrl + T to start a new tab, type Update catalog in the address bar and press Enter.
- Click the top result and paste the copied cumulative number in the search bar.
- Pressing Enter will display all relevant updates containing the typed-in number.
- Pick the one that matches your system architecture and hit Download next to it.
- After the download completes, open the folder containing this file, and double-click the setup file.
- Wait for the standalone package to install successfully. Once over, you won’t get the 0x800705AA error while installing Windows 10 updates anymore.


